
Back in an earlier blog I discussed how to create and utilize a specific Microsoft Purview sensitive information type (SIT) called a document fingerprint. In a nutshell, they are classifiers created from various types of source documents that let you identify other documents that partly or fully match the original.
I think they are a really solid tool for catching any standardized, process-related documents. As a plus, they aren’t even technically demanding to implement – especially after Microsoft’s recent round of improvements.
During the last few months, I’ve either planned or already created over 200 different document fingerprint SITs for various organizations.
I feel like the experience with – and support for – using document fingerprints has improved significantly and it seemed like the right time to have this discussion with you.
✨ So, what’s new?
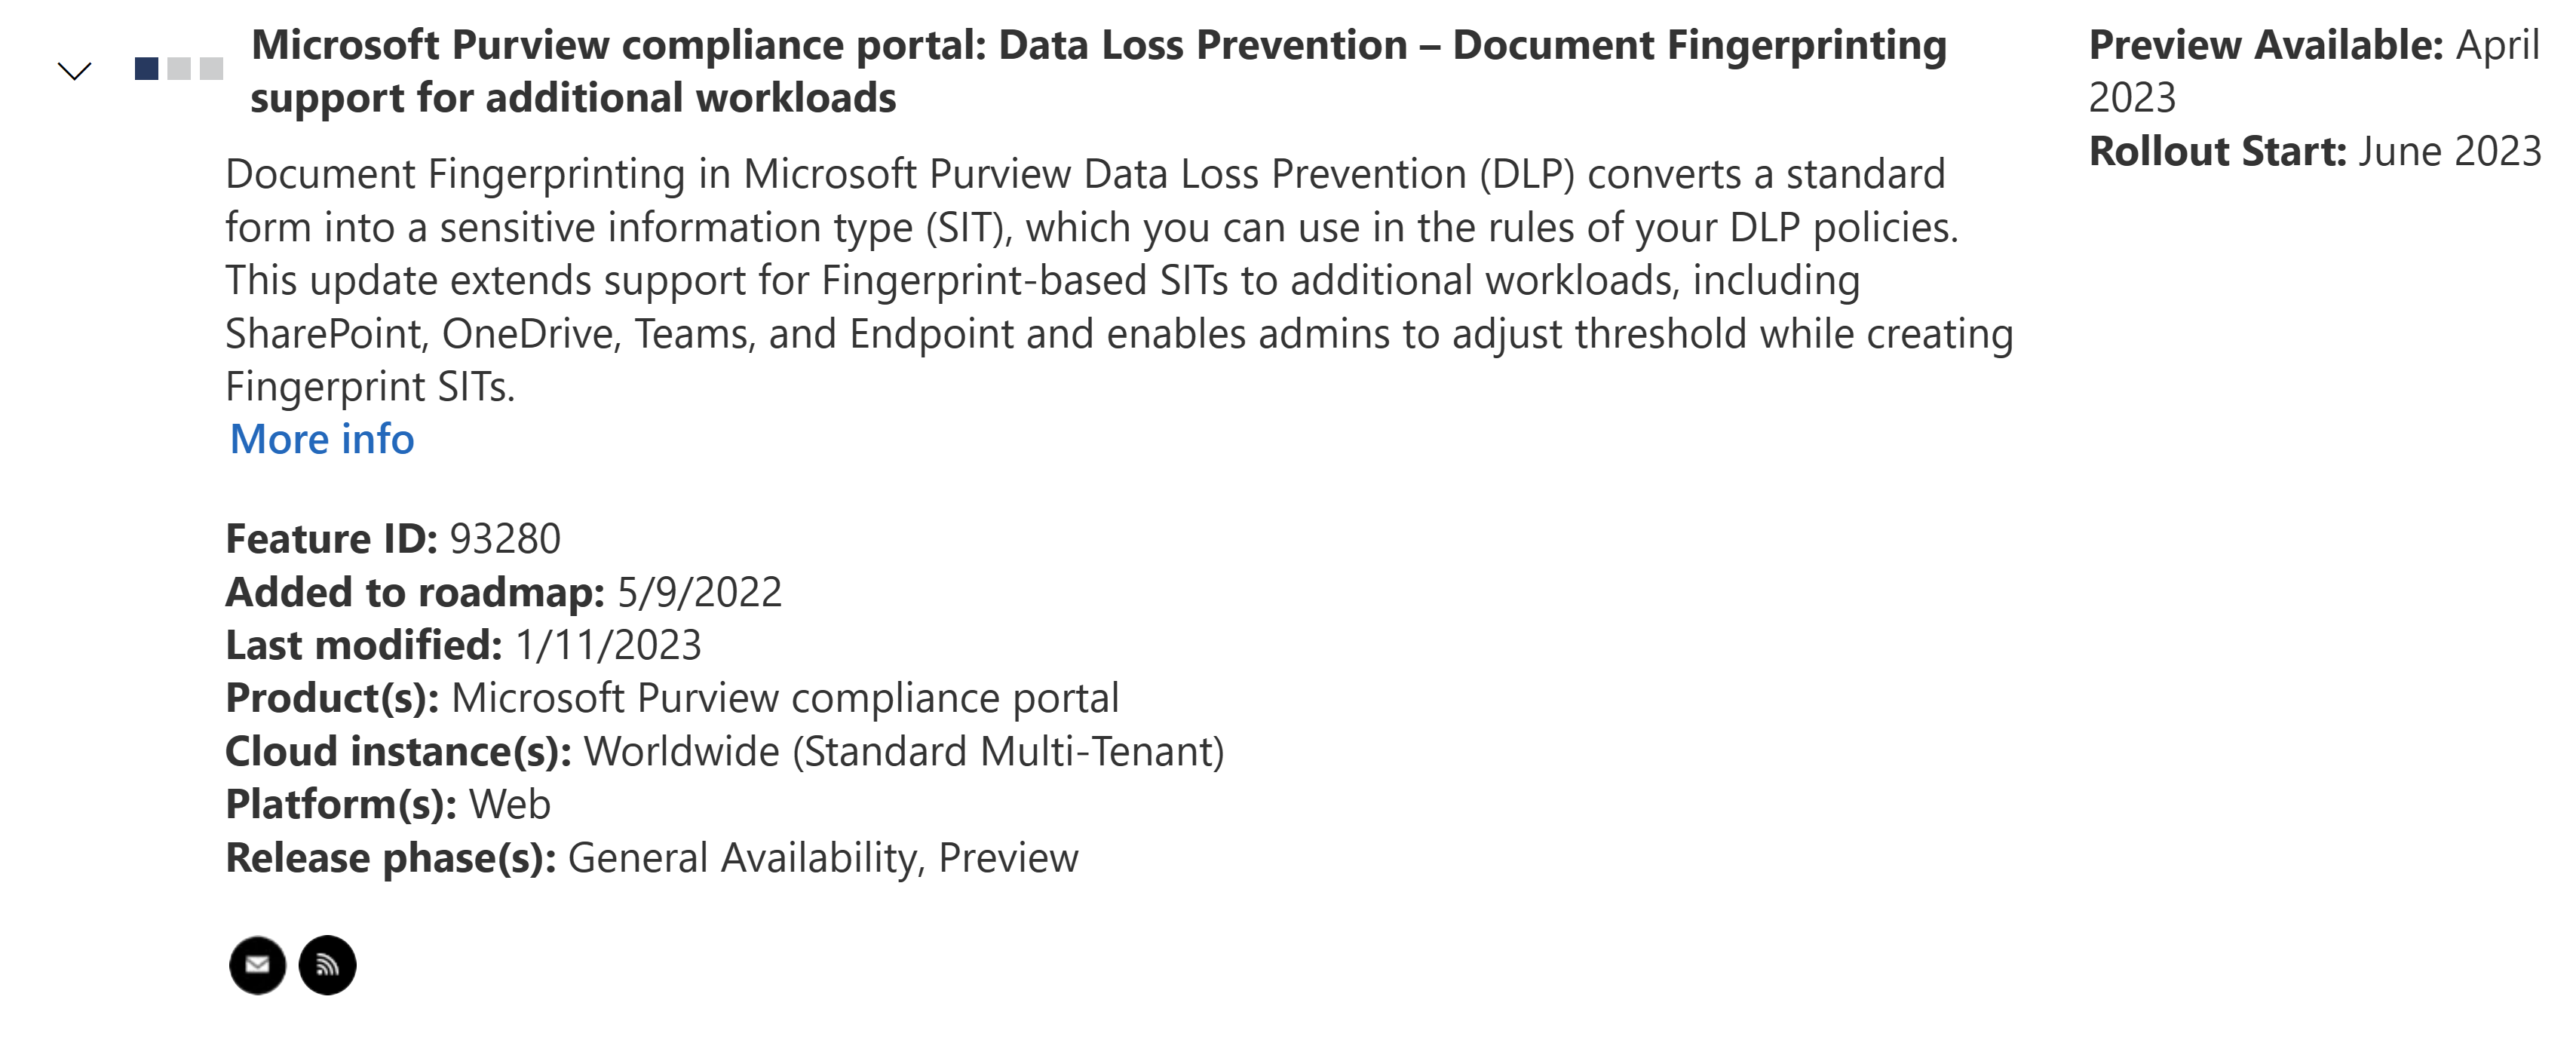
Before the latest changes, document fingerprints were supported in..
- Exchange Online DLP
- Defender for Cloud Apps File Policies
- Automatic retention labeling policies
After the latest round of improvements, they can now also be used in..
- Teams DLP
- SharePoint & OneDrive DLP
- Endpoint DLP
Fingerprint SITs also flexibly support both partial and exact matching along with fine-tuning of confidence thresholds, which I’ll give some tips on in a bit.
🪄 The new SIT creation experience
In the past, fingerprint-based SITs had to be created with Security & Compliance PowerShell. You still can, but there is also a new graphical user interface option available that is likely more approachable for many compliance & data security professionals that haven’t swam in the command line ocean too much.
The process is really very simple. Just navigate to the Compliance portal > Classifiers > Sensitive Info Types and choose the new option, Create Fingerprint based SIT.

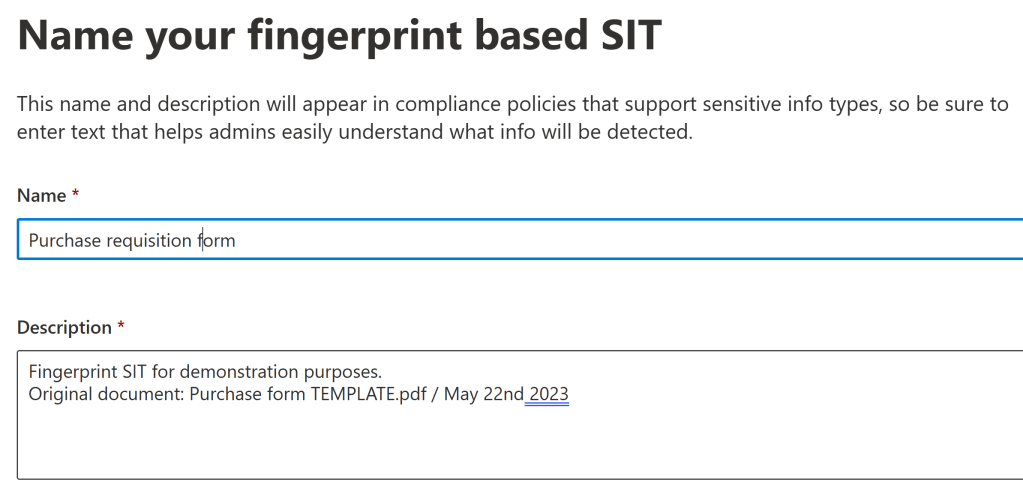
Then, choose a name and enter a description for the SIT. I typically like to include at least the filename and last modification date of the fingerprinted document for later reference.
If a lot of fingerprints are planned, it’s a good idea to establish a naming convention for them – for example..
Format: <country> / <category or department> / <fingerprint name>
Example: Finland / Manufacturing / Purchase requisition form
Then it’s time to choose the document to upload and choose confidence level thresholds.
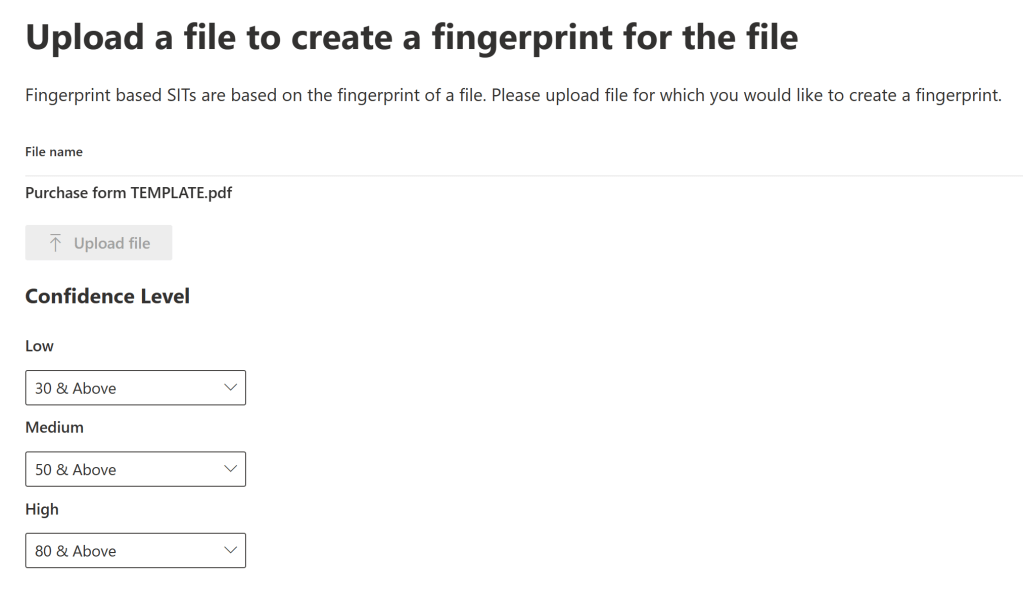
I’ll share some initial tips for choosing confidence levels in a bit. Moving on from here, you’ll get a quick confirmation window of the chosen details and from there, it’s one click to completion.
Pretty rapid stuff!

For PowerShell aficionados, you can still refer to my earlier blog and Microsoft’s official documentation for examples.
If you have tens or hundreds of fingerprints to create at once, I would look to streamline the process with a script or serialized command line approach.
🚗 Some early speedbumps
Soon after the new creation experience rolled out, I ran into curious freezes, crashes and errors in the Compliance portal (and into some generic errors over S&C PowerShell – examples below) when trying to create fingerprints from certain rather large Excel sheets used for project planning.
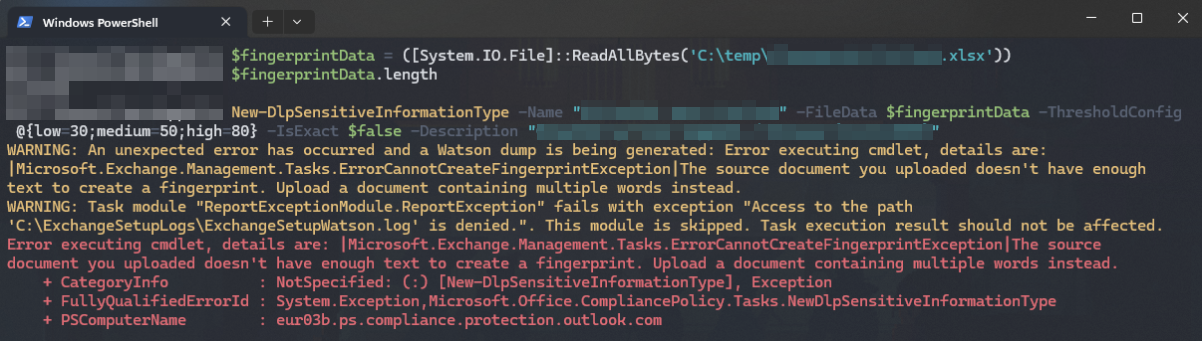

Initially this stumped me since there was no clear error to work with. I started doing Fiddler traces and ended up working with Microsoft support on finding the issue. We settled on isolating the issue by means of elimination: create alternate versions of the troublesome sheet, with a different sheet removed from each version. Then try creating an SIT with each version until the culprit is found.
In the end, we got the root cause down to a single, specific sheet in the macro-heavy Excel file. The exact cause within that sheet remains a mystery for now, but after removing the specific sheet from the fingerprinted document, the SIT creation went through just fine.
The sheet probably contained some macros or functions that simply didn’t gel well with Microsoft’s backend processes. The woes of an early adopter.. oh well, in the end, with help from partial matching, the story had a happy ending. All it took was compensating for the slightly imperfect fingerprint by adjusting the SITs confidence thresholds. Then, we only looked for high confidence matches in DLP and MDA, which gave the desired outcome.
This little story is actually a pretty nice segway to the next topic.
Let’s talk a bit about confidence levels.
⚖️ Adapting SIT confidence levels to different types of content
From my early experiences, I found a few scenarios where specific adjustments to Fingerprint SIT default confidence level thresholds were necessary.
#1 – Highly specialized documents and sheets
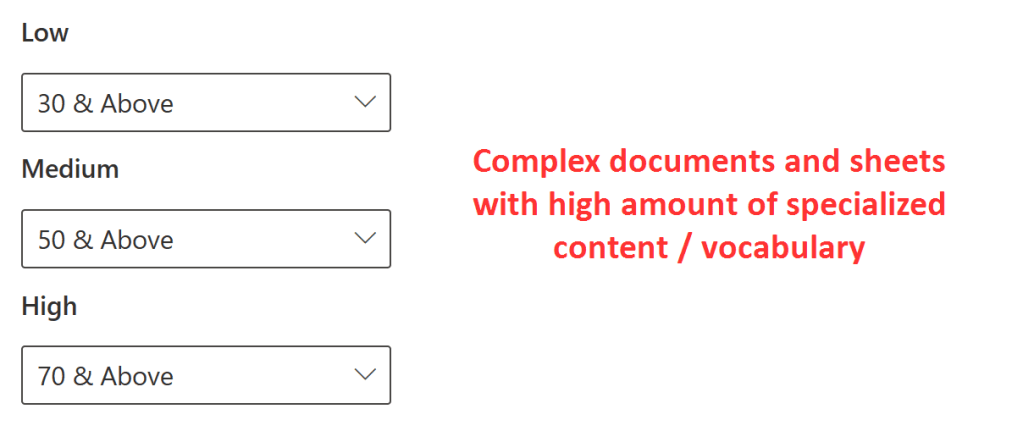
If you have something like a heavy excel sheet with plenty of specialized terminology and complex contents, I got best results by setting the high confidence level to around 70. These kinds of documents are unique enough that this level should still get you mostly true positives.
Examples:
- Budget and project planning and tracking sheets
- Complex financial calculation sheets
#2 – Smaller, generic human-oriented documents
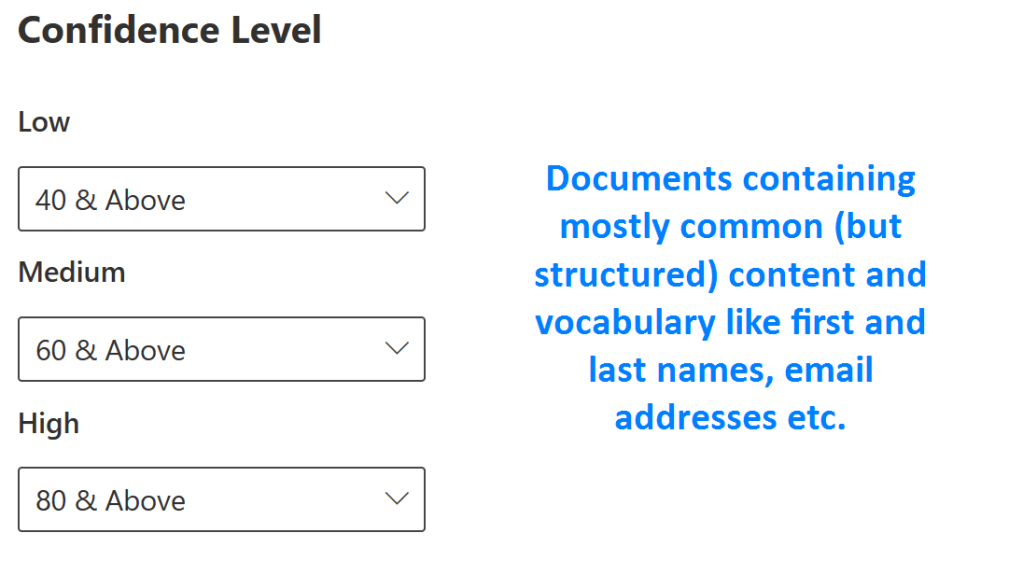
For more generic documents containing commonly-found text like names, email addresses, titles, departments, dates etc. I found that a confidence level of ~70 often netted an unacceptably high amount of false positives even for High confidence levels – especially if the source documents were small, 1-2 page forms.
Bumping the High threshold up to 80 or even 90 (and raising Low and Medium confidence correspondingly) helped alleviate this while still catching the desired docs.
Examples:
- Work contract / offer of employment
- Performance review form
#3 – Exact or near-exact match

In some special scenarios, it has been necessary to only find documents that are either identical (or almost identical) to the fingerprinted source doc.
To accomplish this, I’ve set an SIT’s High threshold to Exact, with correspondingly demanding thresholds for Low and Medium as well.
Examples:
- Contracts
- Immutable records as defined by regulation
🥂 Fruitful usage scenarios
As I mentioned, fingerprints can now be used in many all-new scenarios. Here are just a few examples of real use cases I’ve either planned or implemented so far:
#1 – Provide everyday guidance
My belief is that Data Loss Prevention should be primarily thought of as a guidance & educational tool with both gentle (Policy Tips) and strong (Restrictions with or without override possibilities) ways to influence behavior.
In line with this, I often use document fingerprint SITs to provide soft guidance through Policy Tips without implementing hard restrictions.
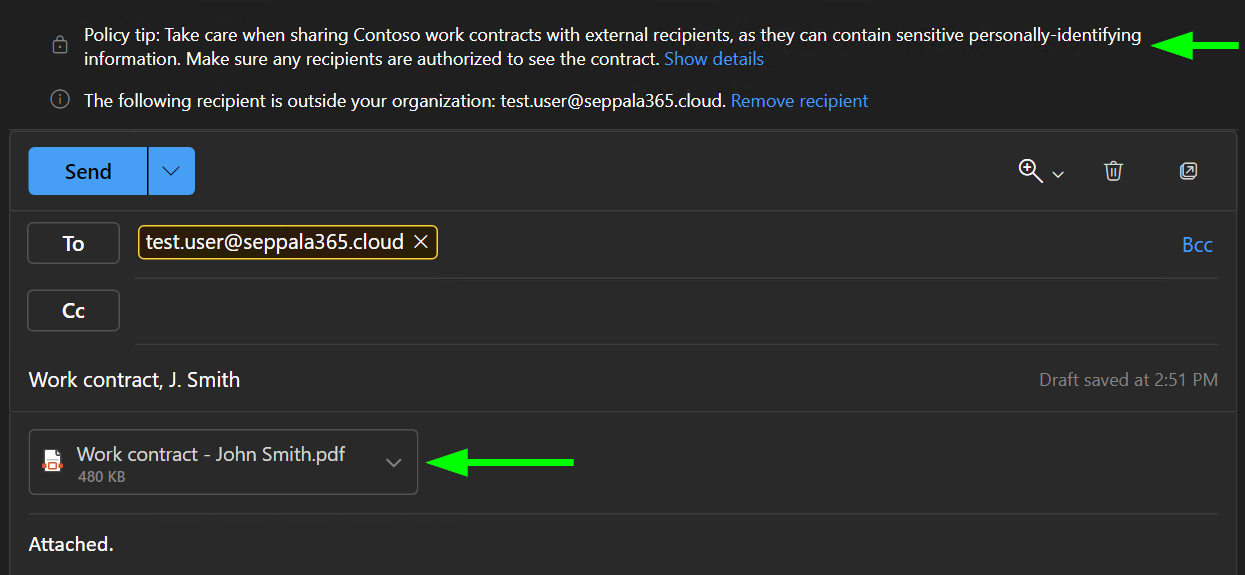
#2 – Automatically encrypt outgoing work contracts
Document Fingerprints were first supported in Exchange Online DLP and there are plenty of useful scenarios for them in the email space.
For instance, you can ensure all work contracts emailed from your organization to external recipients are sent encrypted. To do so, configure an Exchange Online DLP policy rule as follows..
DLP rule naming convention suggestion:
<service acronym>/<what is looked for>/<what is done>
EXO/FP:WorkContract/Shared:External/Encrypt
👉 This is the naming convention I’ve figured out and have been using over the last year or so. The upside is it lets you efficiently understand the scope and effects of a DLP rule from the rule name alone, which comes in handy when using tools like the Activity Explorer.
Conditions & actions:

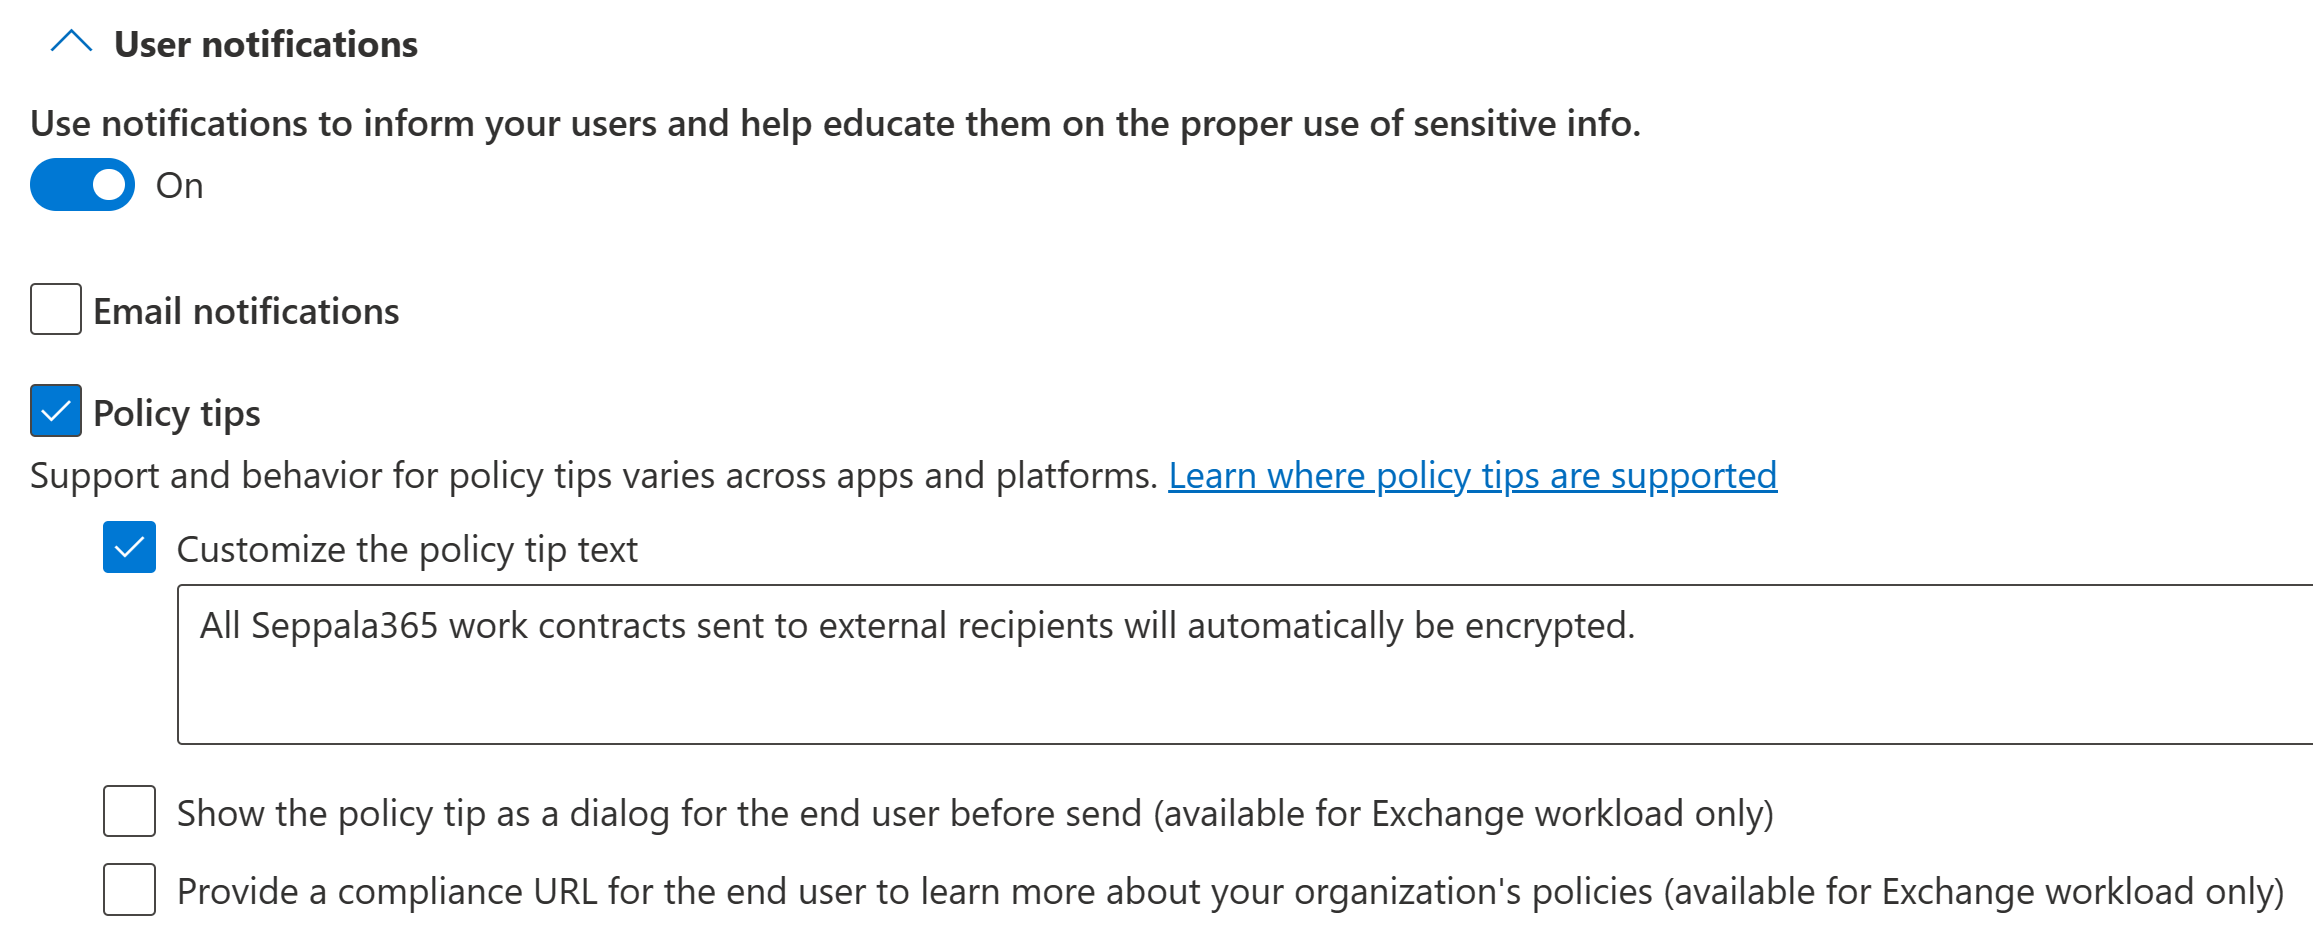
(Optional but recommended) Policy tips:
#3 – Use content search to discover documents
You might want to search your current SharePoint Online and OneDrive document estate to identify any instances of a fingerprinted document. For this, you can either use MDA File Policies (slower) or Content Search, a typically faster alternative that is a spin-off from eDiscovery capabilities. Content Search is excellent for identifying SharePoint and OneDrive sites with exceptionally high concentrations of stale data.
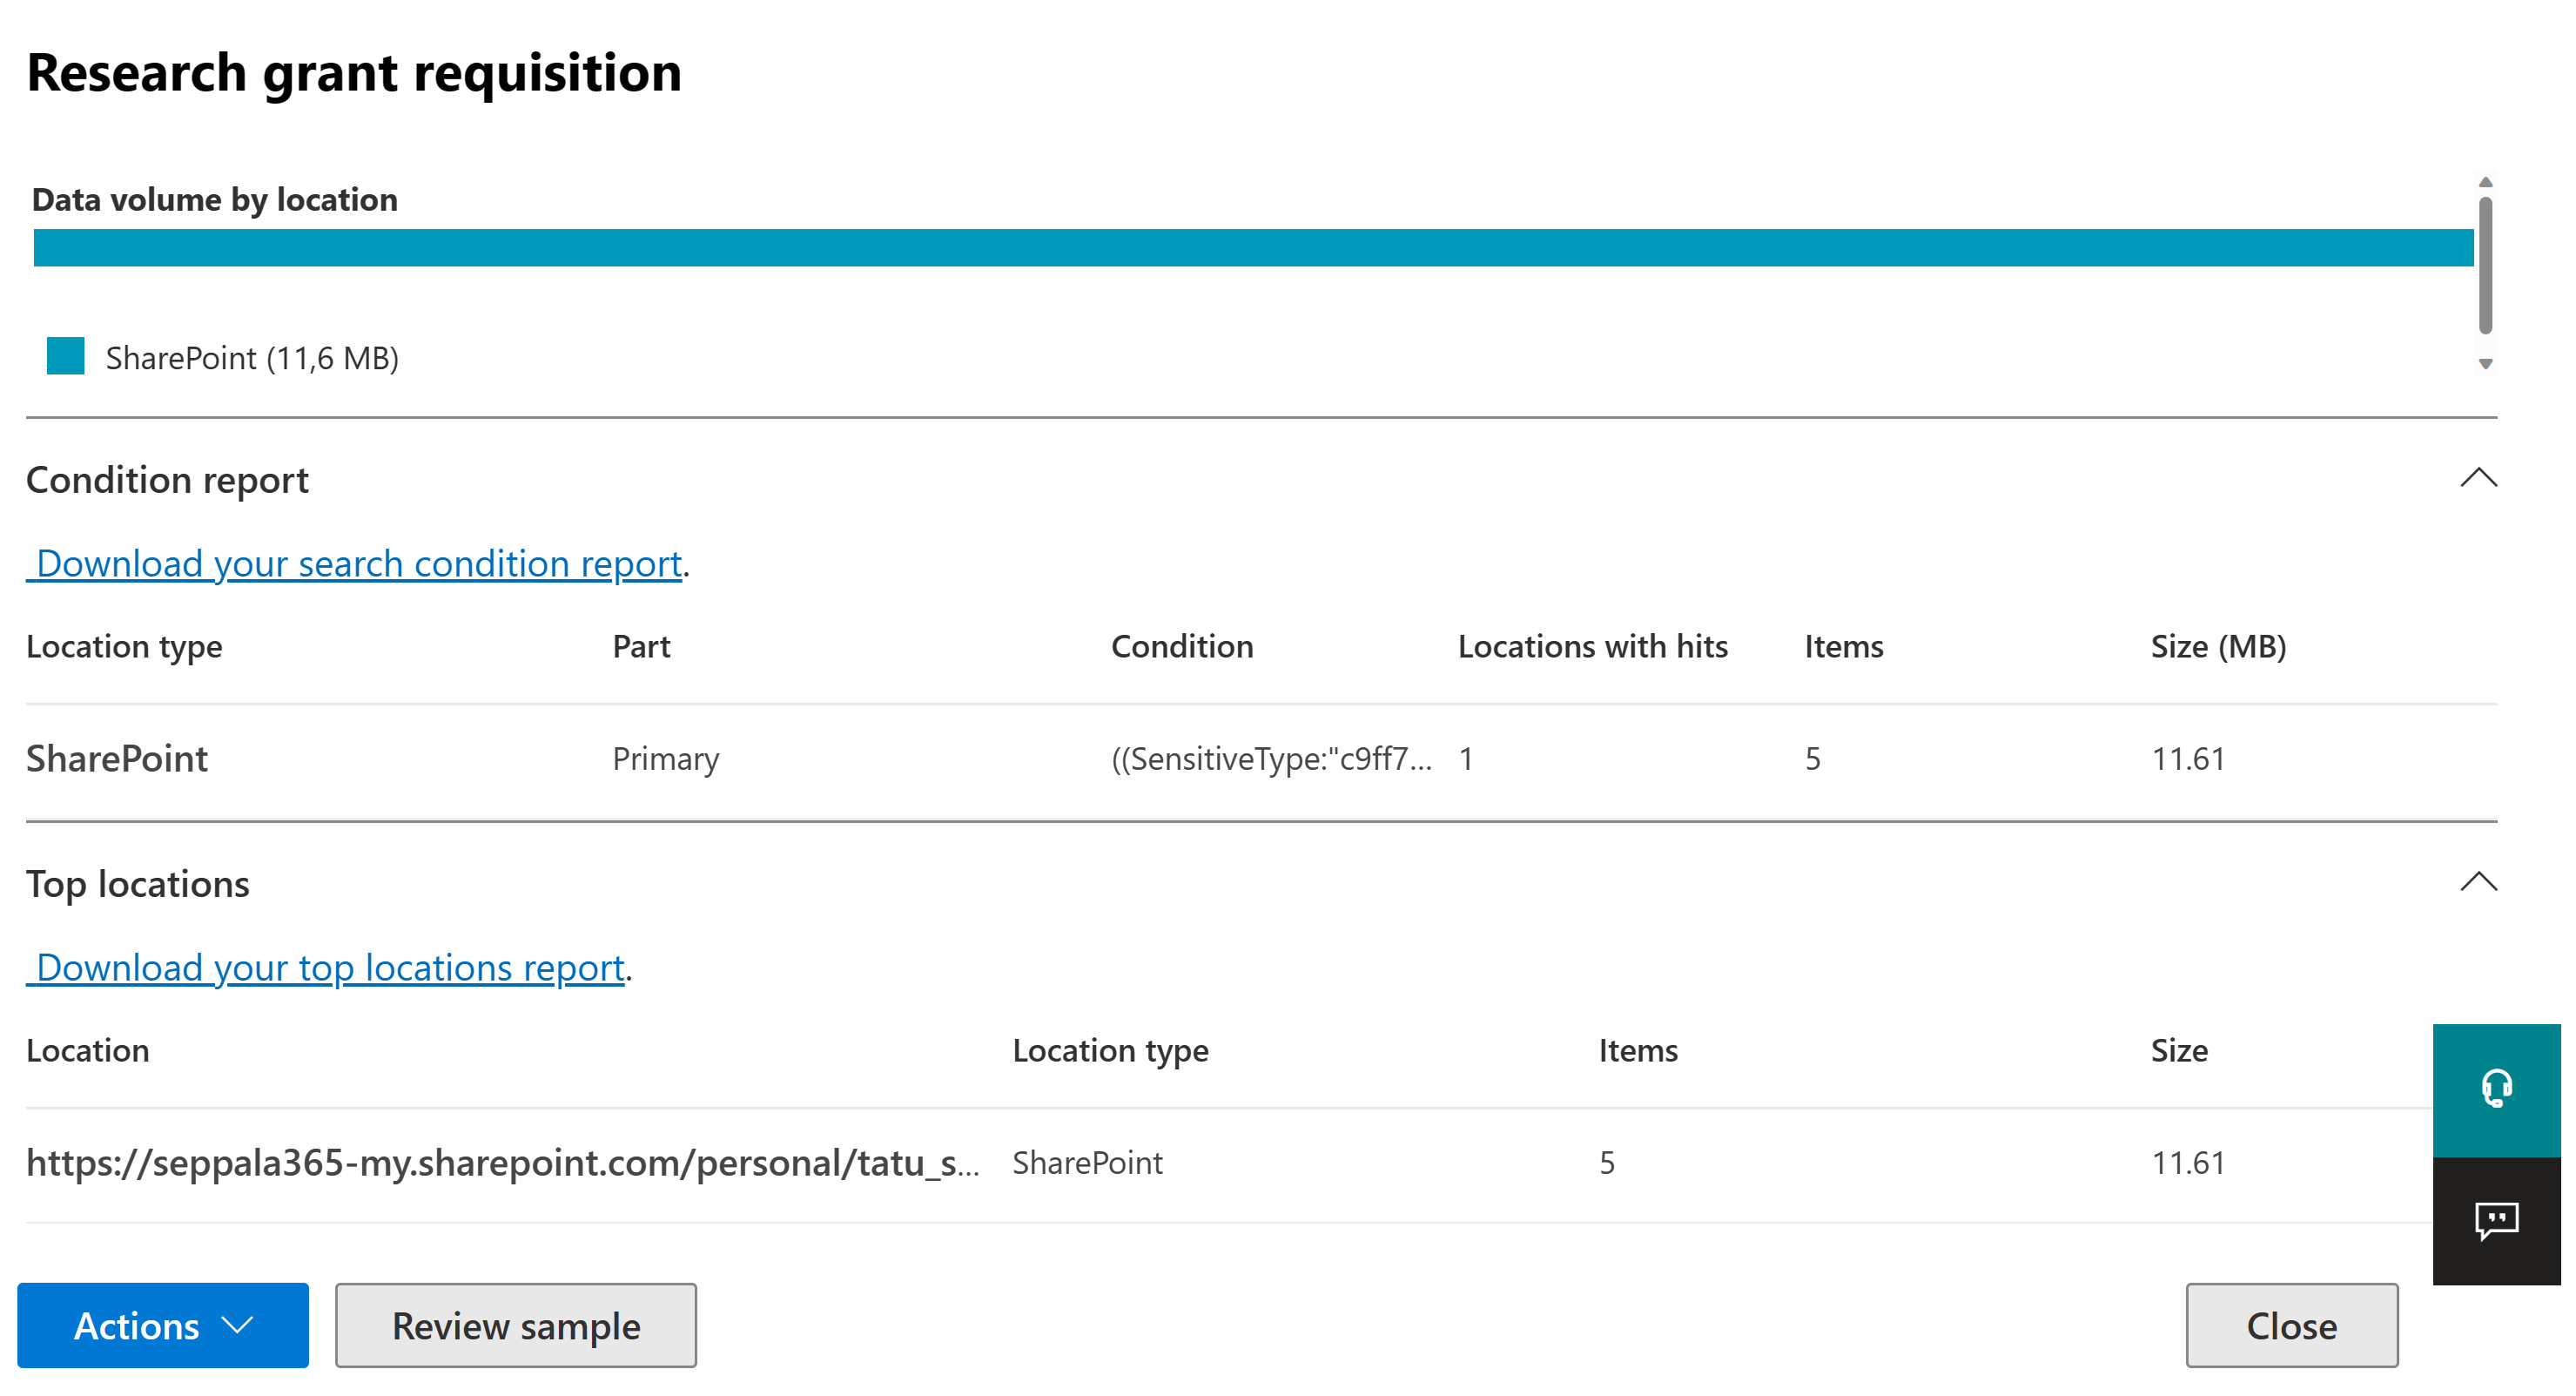
On the flipside, Content Search only works with SharePoint & OneDrive when it comes to looking for sensitive information types in documents, while MDA can tap into all kinds of SaaS services.
To use use custom SITs in a Content Search job, you have to refer to them with their unique identifier instead of with their name. You can find this identifier with the Security & Compliance PowerShell’s Get-DlpSensitiveInformationType command, as below.
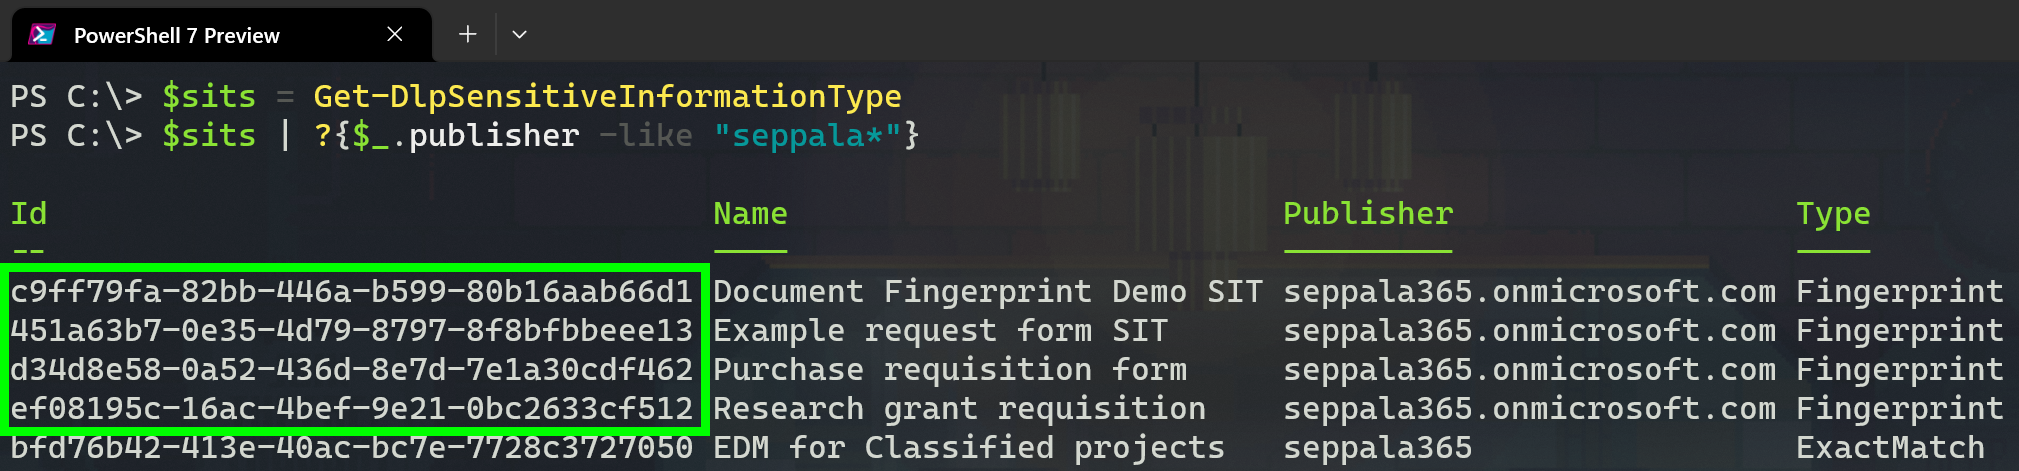
Once you have one (or more) fingerprint’s unique id, you can define your content search KQL like this to look for them:
Format: SensitiveType:"<Fingerprint SIT Id>|<count range>|<confidence range>"
Example (single fingerprint): SensitiveType:"c9ff79fa-82bb-446a-b599-80b16aab66d1|*|75.."
Example (multiple alternative fingerprints):
SensitiveType:“c9ff79fa-82bb-446a-b599-80b16aab66d1|*|75..”
OR SensitiveType:“451a63b7-0e35-4d79-8797-8f8bfbbeee13|*|70..”
OR SensitiveType:“d34d8e58-0a52-436d-8e7d-7e1a30cdf462|*|90..”
The first example looks for..
- Documents metching a specific Fingerprint SIT
- With any number of matches accepted per document
- With a confidence level of at least 75.
For more examples of complex queries, check out Microsoft’s documentation here.
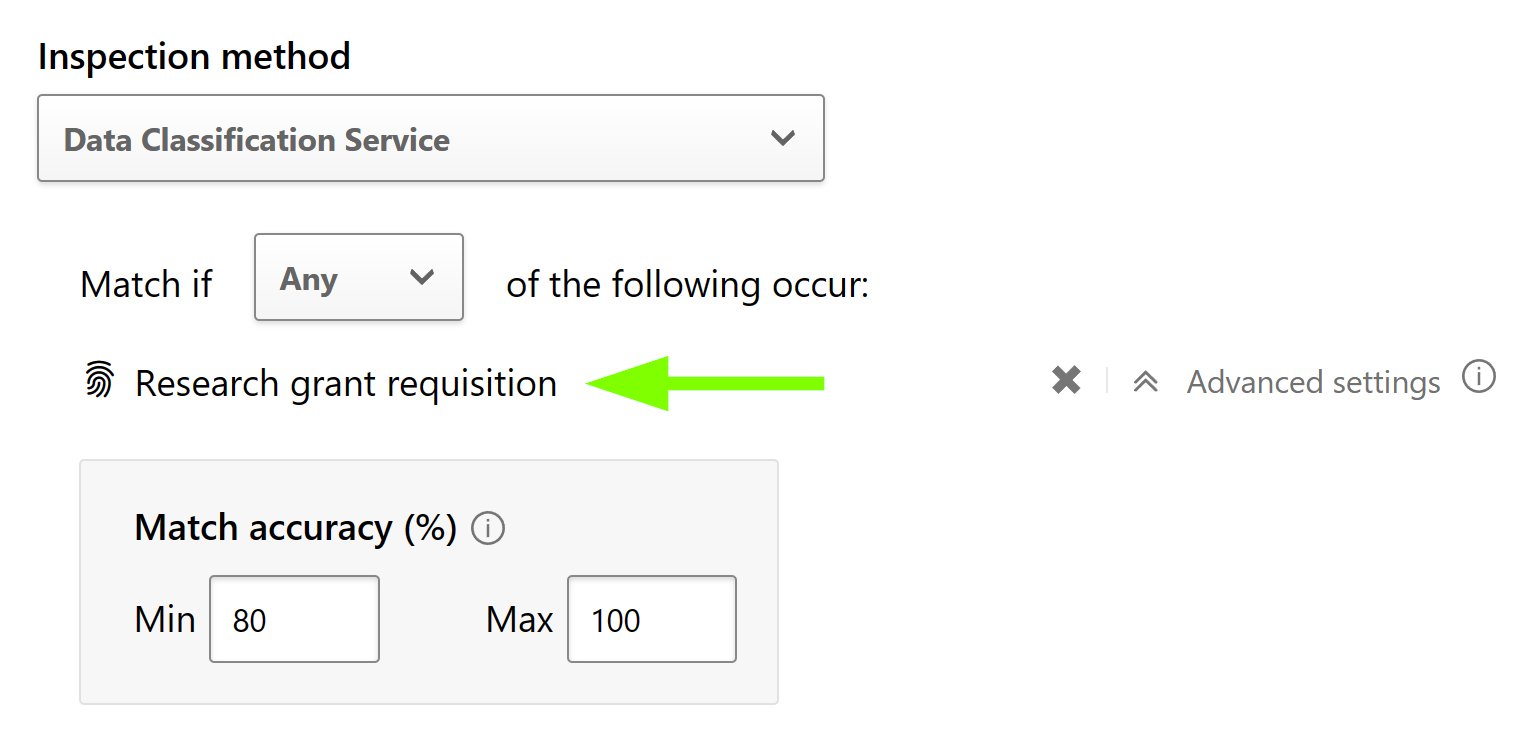
#4 – Auto-label with Defender for Cloud Apps
Using the general method I described in this blog, we can leverage Defender for Cloud Apps to automatically apply sensitivity labels to any documents matching a document fingerprint with the desired confidence level. In short, set an MDA File Policy’s inspection method to look for fingerprints with a confidence level corresponding to high confidence, as discussed in the previous chapter.
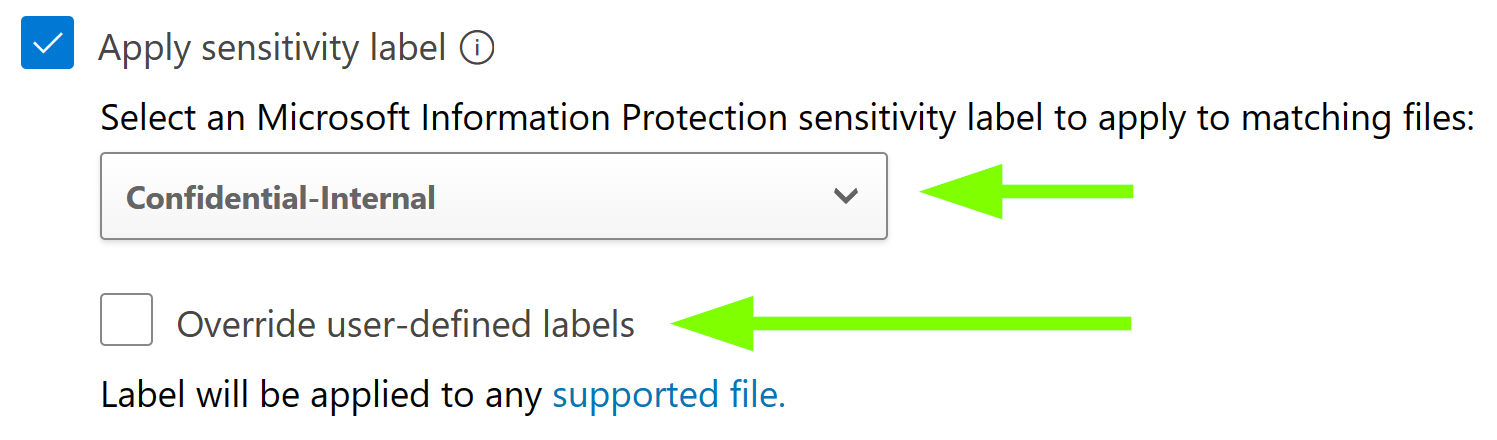
Then set the governance action for OneDrive, SharePoint or both (and other possible SaaS apps) to apply. Finally, choose whether existing sensitivity labels should be overridden.
As an extra tip for this scenario, you can also refine your File Policy by defining which document types can trigger the policy. Define this in line with your document fingerprint to help cut down on false positives further.

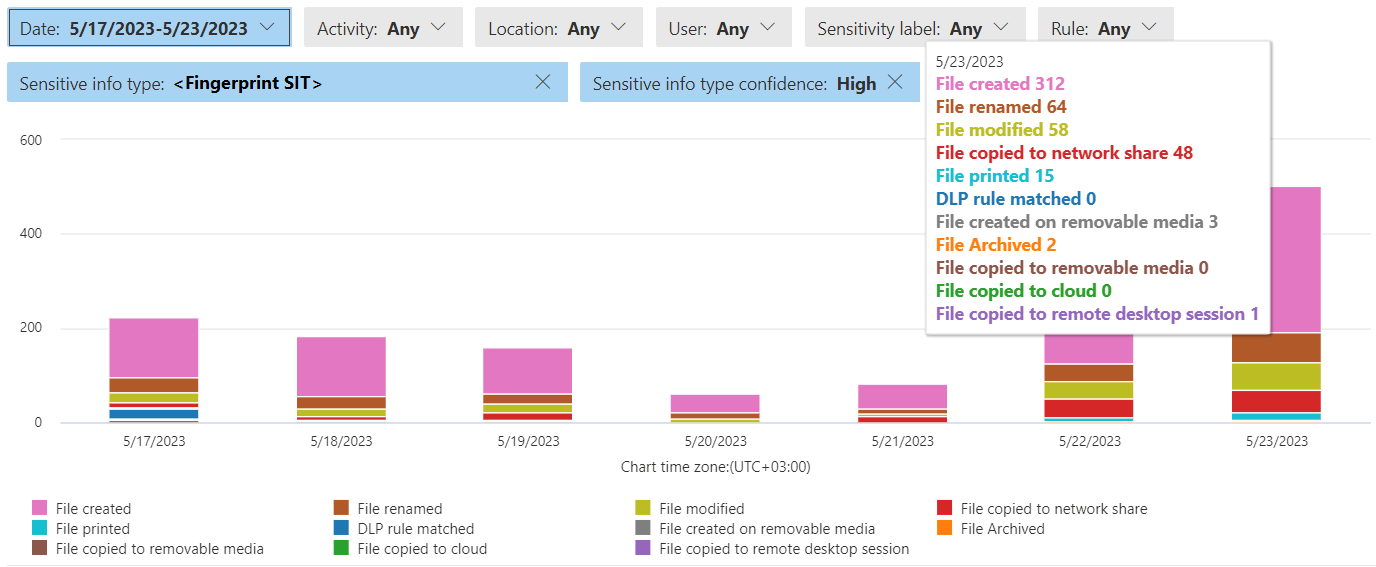
#5 – Understand document movements and activities at scale
Since support for document fingerprints is now fairly comprehensive, you can leverage tools like DLP and Activity Explorer to get a fine-grained understanding on the movements of and activities related to fingerprinted documents.
My suggestion is to use the Activity Explorer to try filtering for one or more Fingerprint SITs and also filter for High confidence matches only, then look at the trends on daily activities.
After doing this kind of initial discovery and analyzing the results, you can pivot to set up DLP policies for the same SITs to audit, advise people on and control any discovered risks.
#6 – Refine your Insider Risk Management policies
Insider Risk Management policies can be enhanced by defining so-called prioritized content. When such content is involved in activities detected by IRM, the activities are assigned an elevated risk score.
Fingerprint SITs can also act as prioritized content, as in the example below. In this way, fingerprinting standardized documents that likely contain high-value information can help you improve the signals provided by your IRM policies.

For more thoughts on Insider Risk Management, I’ve published these recent articles:
- It’s time to start focusing on insider risk – Seppala365.cloud
- Understanding Insider Risk Management: The sequence game – Seppala365.cloud
#7 – Automate document lifecycle management
If you need to take control of persistence (and possibly also orderly disposal) of certain types of standardized documents, document fingerprints also have your back. You see, they can also be used as conditions when defining automatic retention label policies.
Retention labels are used to manage the lifecycle of individual documents – namely, how long they are retained and what happens afterwards.
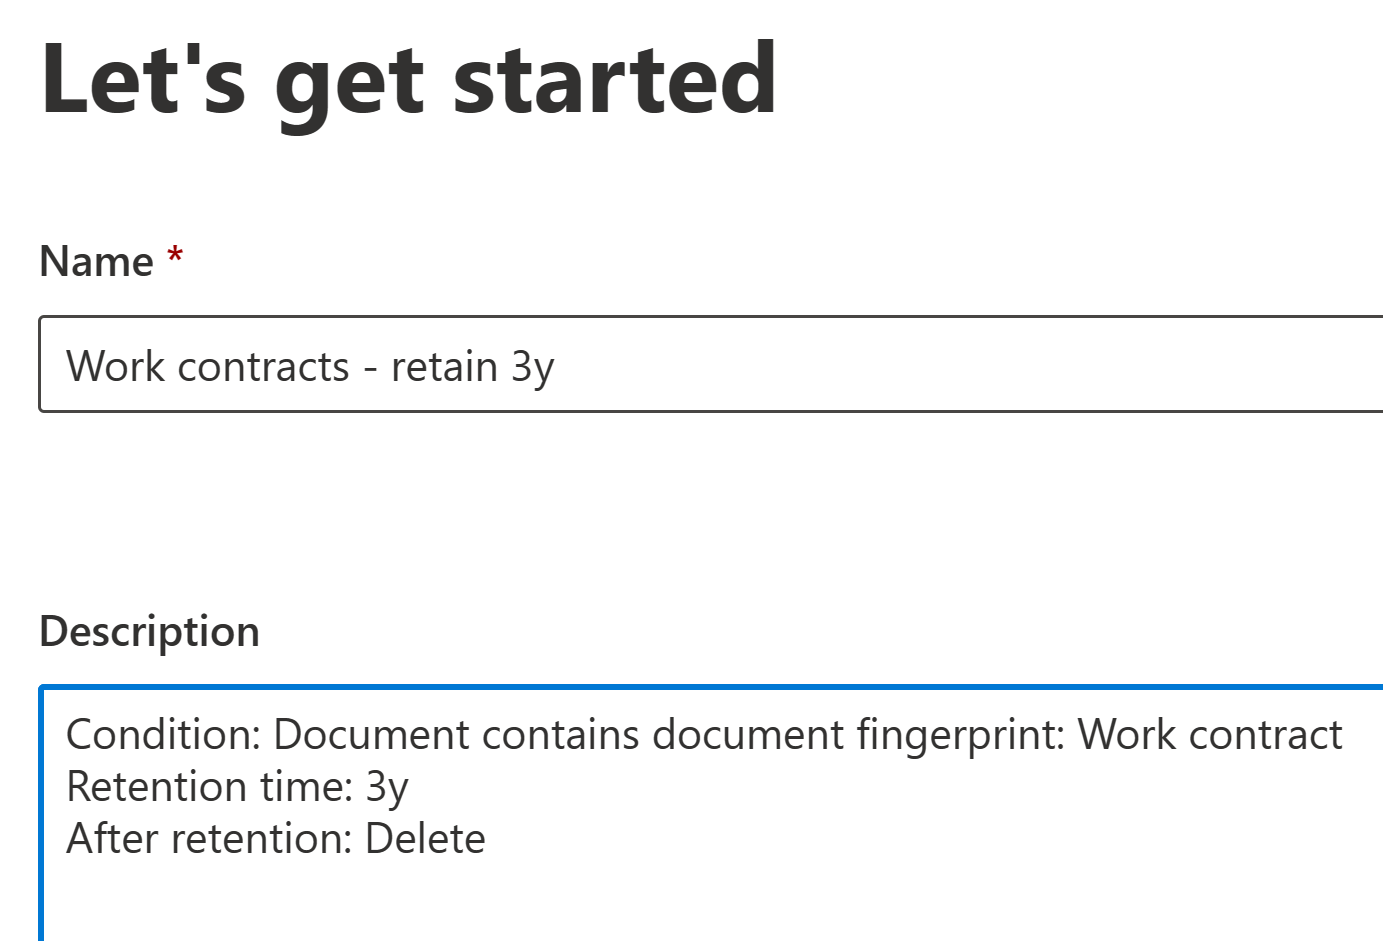
When defining an auto-labeling policy for retention labels, choose to apply a label to content that contains sensitive info.
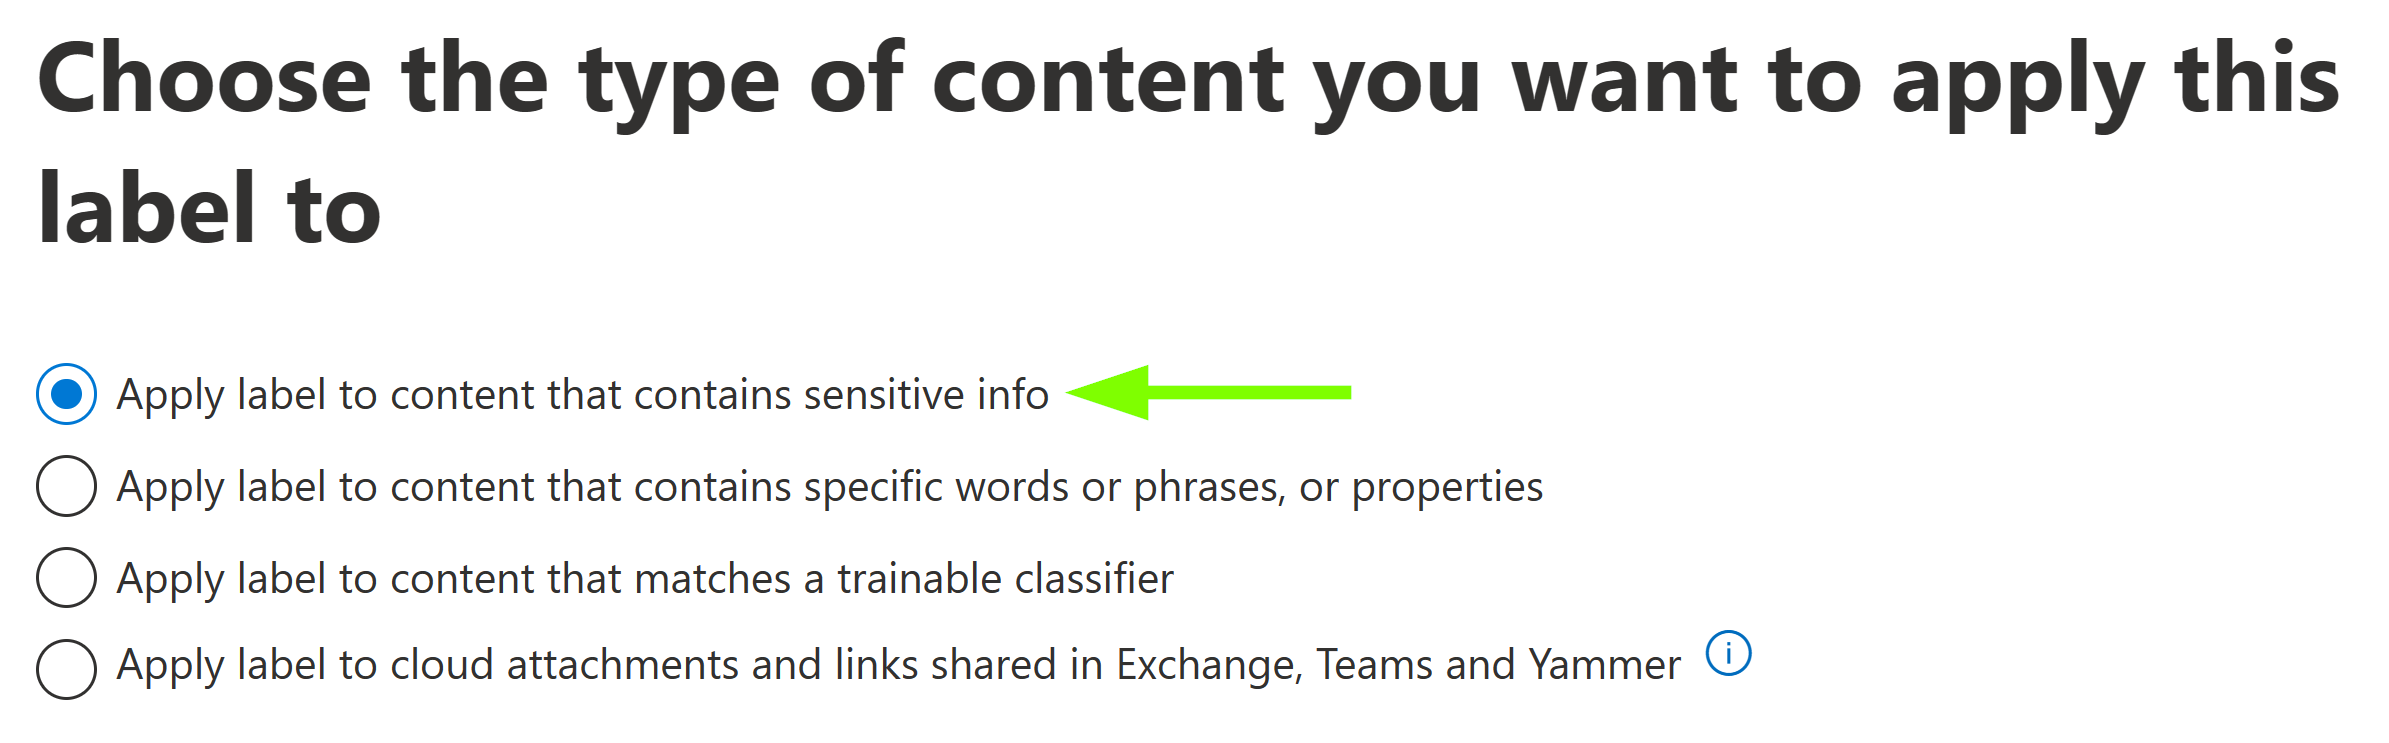
Then, make a custom policy and add one or more fitting fingerprint SITs as policy conditions. You’ll definitely want to use High confidence here and generally in any other policies as well that do more than just gather audit events for analysis.
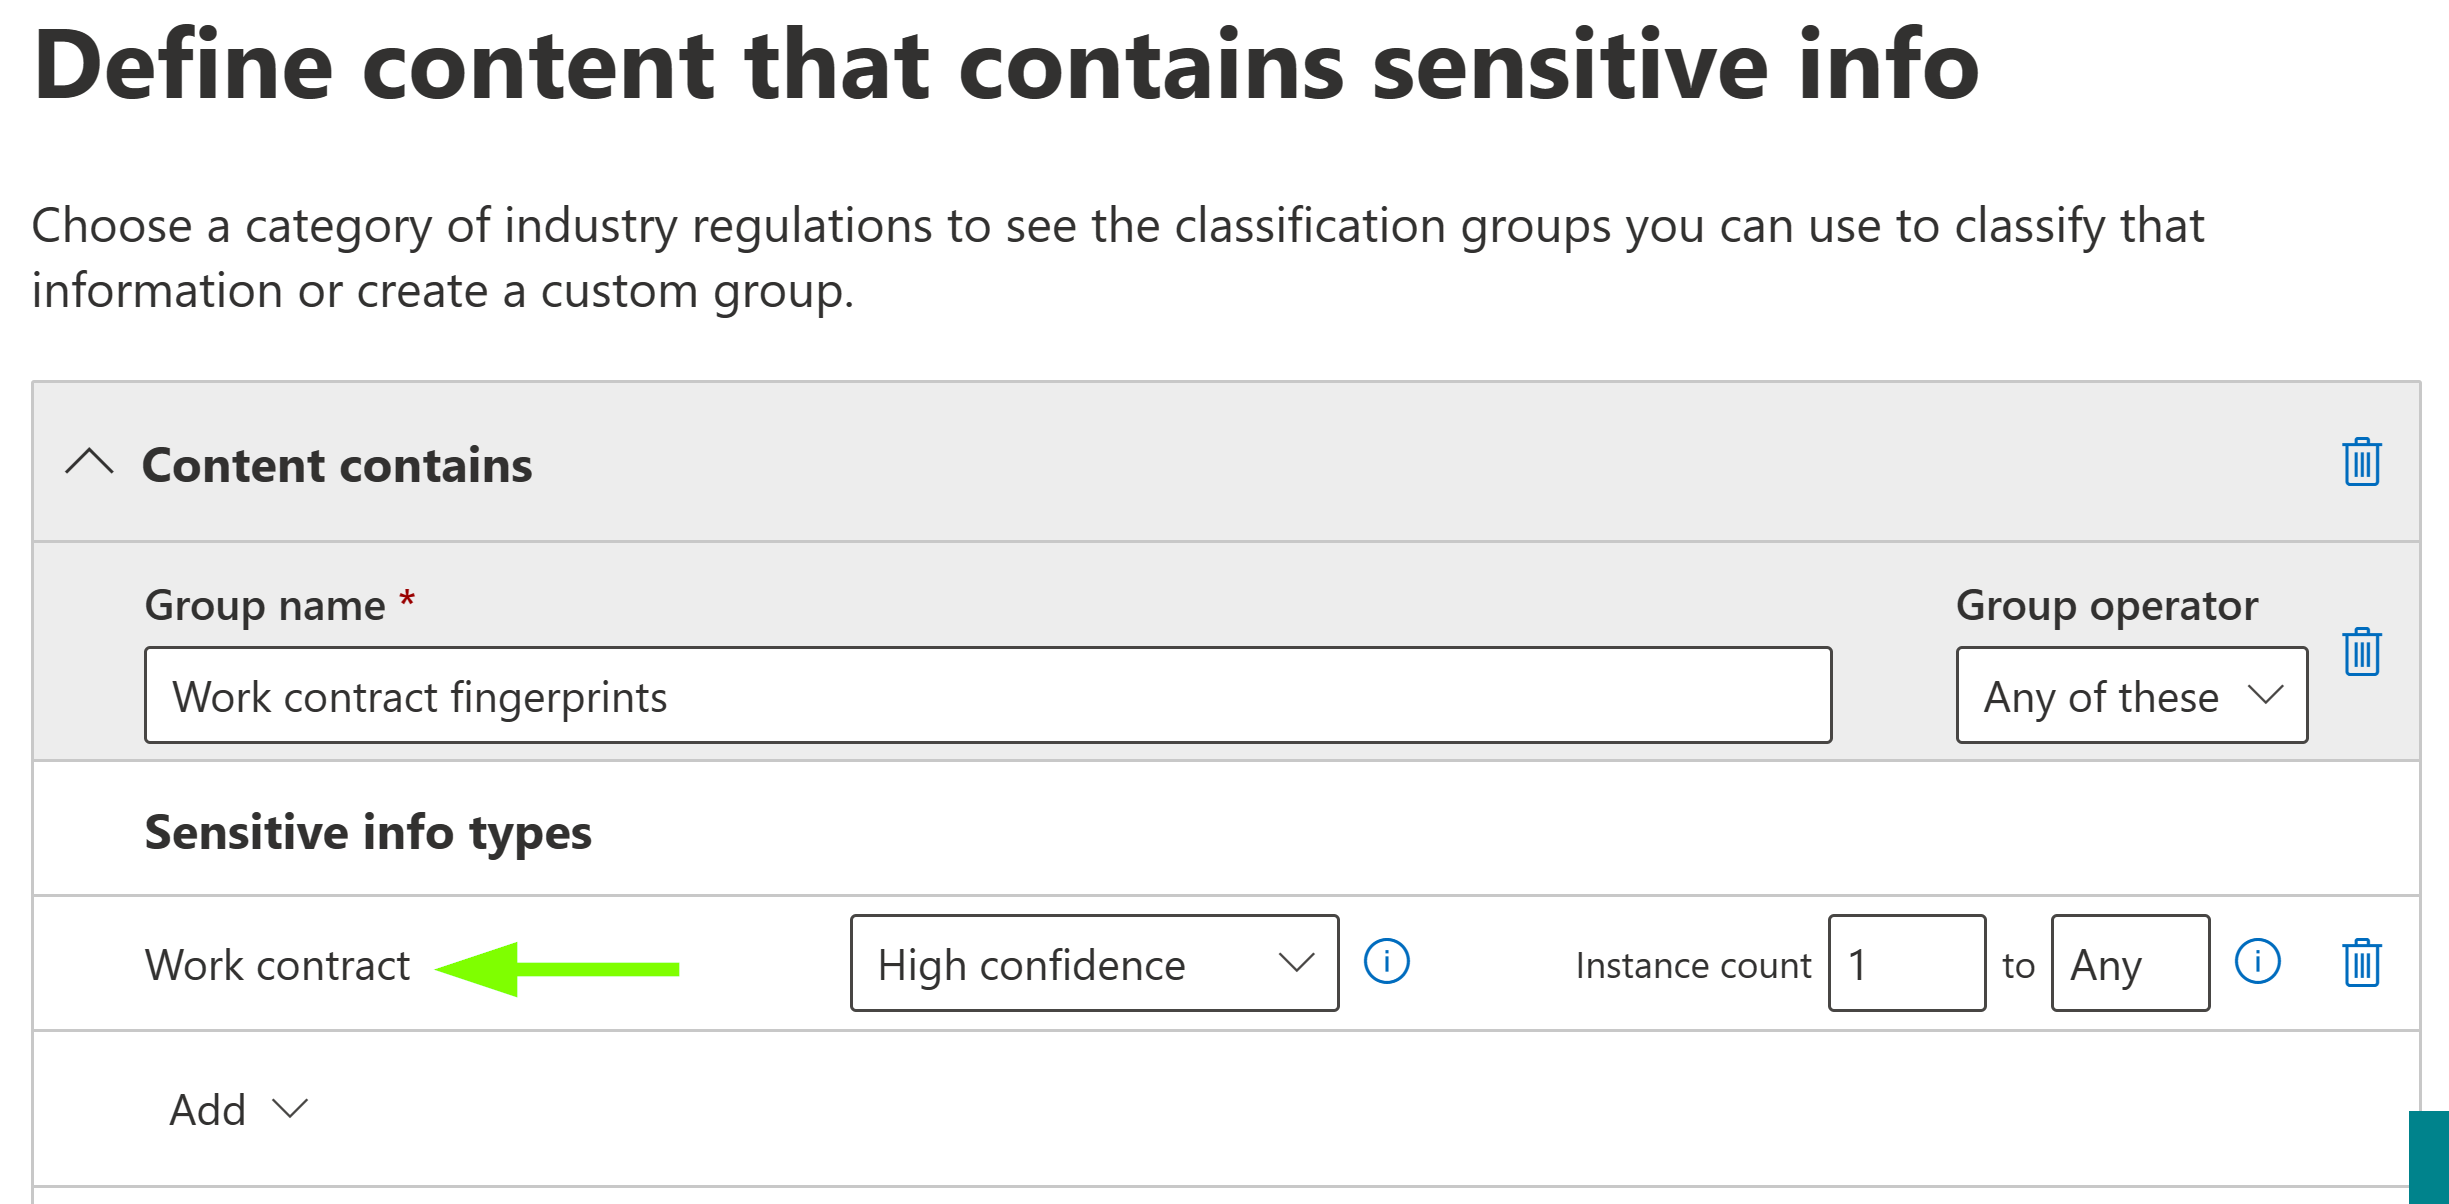
Then, you can proceed creating the policy as you need to and with it, apply retention labels matching content in Exchange Online, SharePoint Online and OneDrive.
#8 – Prevent upload to unapproved cloud services
Using the method I described in Discover and control sensitive file uploads to unapproved cloud services with Endpoint DLP and with Endpoint DLP (my favourite 💖) now also supporting document fingerprints, you can prevent people from using managed browsers like Edge, Chrome or Firefox to paste documents matching a Fingerprint SIT to specific cloud services without affecting legitimate ones.
Just make sure you have Advanced Classification turned on in your Endpoint DLP settings. It’s a requirement to enable Endpoint DLP to use Fingerprint SITs in policies.
✅ And yes, MacOS is also supported for this scenario.
🧪 More to come?
Currently, neither Service-side or Client-side automatic sensitivity labeling support fingerprints as conditions.
Service-side auto-labeling can more or less be worked around with MDA (Defender for Cloud Apps) but client-side recommended and automatic labeling is a capability I very much would like to see.
It would be pretty intuitive. Say you’re filling out a work contract in a .docx or .pdf file and the client could suggest a specific sensitivity label even before you get any personally-identifying information (PII) filled into the template.
🚧 A word on limitations
As of now, there are a few key limitations you need to be aware of when it comes to creating document fingerprints:
- Max file size – The maximum file size for a fingerprinted document is 4MB
- Max # of fingerprint SITs – You can have ~50 concurrent Fingerprint SITs. This limit comes from the maximum size of the classification rule pack (150kb) which fits approximately – but not exactly – the stated number of Fingerprint SITs.
You also can’t create SITs from password-protected or encrypted documents.
Read the list of limitations in Microsoft Learn: Limitations of document fingerprinting
⚡ Take action!
Document fingerprints now require A5/E5 or E5 Compliance licensing. It used to be an A3/E3+ capability but the new improvements bumped this up a notch.
If you are set licensing-wise, you can get started by asking functions such as HR, Legal, Finance and R&D to provide access to unfilled standardized forms used in various processes.
Once you have a bunch of forms, it’s just a quick hop to fingerprint creation and from there, you can start unlocking new discovery, monitoring and governance capabilities.
In practice, one proven way to start is to use Content Explorer, Content Search & audit-mode DLP policies to start discovering both the locations and movements of fingerprinted documents across your Microsoft 365 services and endpoints.
If you’ve had success stories or interesting experiences with using document fingerprints, please drop me a line here or in LinkedIn. I’m always interested in hearing from you!
Thanks for stopping by – until next time! 👋

4 responses to “Document Fingerprinting revisited: Tips, tricks and notes from the field”
Nice read, thank you.
LikeLiked by 1 person
[…] like the Microsoft Rule Pack long with the packs for your custom Exact Data Match classifiers, Document Fingerprint SITs and other custom information types you might have […]
LikeLike
What are the character count limitations when creating the fingerprint? The learn document says “The template used to create a fingerprint should have at least 256 characters. The supported extracted text length for the fingerprint template must be between 256 and 204,800 characters.” But, the portal says “The uploaded file must have a minimum of 4000 characters.” So, what is the best practice here?
LikeLike
The 4000 in the portal is definitely not true. Microsoft at one point waffled around with the character count limitations and the minimum limit actually was 4000 for a little bit earlier this year. They reverted the backend change but left the UX mismatch. I just validated it again and 259 character doc got fingerprinted just fine.
You get the actual error for a lot of stuff in the Purview portal by recording network traffic with browser developer tools and looking at the API calls. MS hasn’t bothered to implement a lot of the errors consistently in the UX but they are returned from the API. Uploading a less than 256 character DOC errors out with a short message in the portal but the API actually returns: “Error executing cmdlet, details are: |Microsoft.Exchange.Management.Tasks.ErrorInvalidTextLengthFingerprintException|The extracted text length ‘206’ is invalid. The extracted text length must be between ‘256’ and ‘204800’” – so that’s the real state of things.
LikeLike