
Index of parts:
- Part 1: Identify your data
- Part 2: Getting started with sensitivity labels
- Part 3: Implementing automatic sensitivity labeling & outlining a labeling strategy
- Part 4: Information governance & automatic sensitivity-based retention labeling
- Part 5: Data Loss Prevention
In this ongoing series of articles, we are undertaking an information protection and governance journey across Microsoft 365 services. We’ve moved from sensitive content identification to sensitivity label creation. Now, we’ll look at how to apply labels to actual content. We’ll also talk a bit about what a labeling strategy might look like.
Let’s get going!
Manual sensitivity labeling features✍️
Manual labeling
This is the starting point. After you publish one or more sensitivity labels with a label policy to a person, they can choose to take manual action to label all kinds of content when creating them or afterwards, such as:
- Documents in Office apps
- Microsoft 365 groups across workloads (Teams, Yammer, Outlook, Planner, Stream..)
- SharePoint sites
- Power BI datasets, dashboards and dataflows, .pbix files and reports

The exact user experience varies a bit between scenarios but the gist of it is:
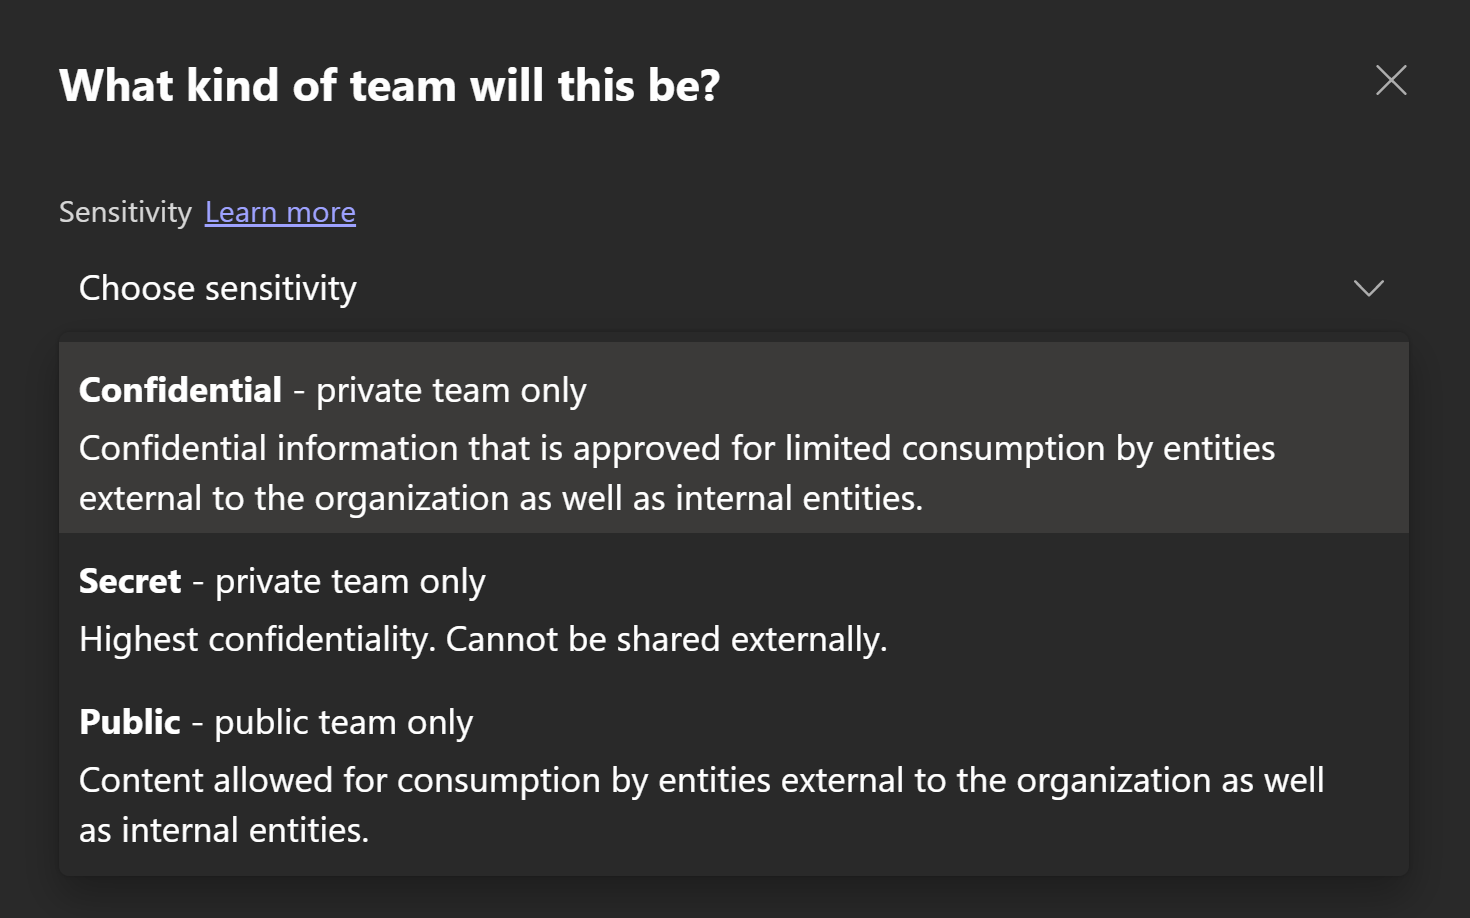
- Person opens a Sensitivity menu or such a menu is presented automatically
- Person looks at the available options, thinks about the data they are working on, considers organizational guidelines and chooses a fitting label.
As with all processes requiring people to actually remember to do the right thing and have all the correct information either memorized or at hand, this might not be enough by itself to dependably run an organization-wide data classification operation in a production setting.
This is because we are, after all, human. It’s easy to forget guidelines and just wing it when choosing the correct label. It is easier still to just not classify the data at all when your colleagues are waiting for you to get ready for lunch / coffee break etc. or when it’s 4PM on a Friday and you just can’t be bothered right now.
As a short-term solution, basic labeling capabilities by themselves are an acceptable stepping stone. In the mid-to-long term is advisable to make use of the various supporting features Microsoft offers to help people classify data consistently.
Mandatory labeling
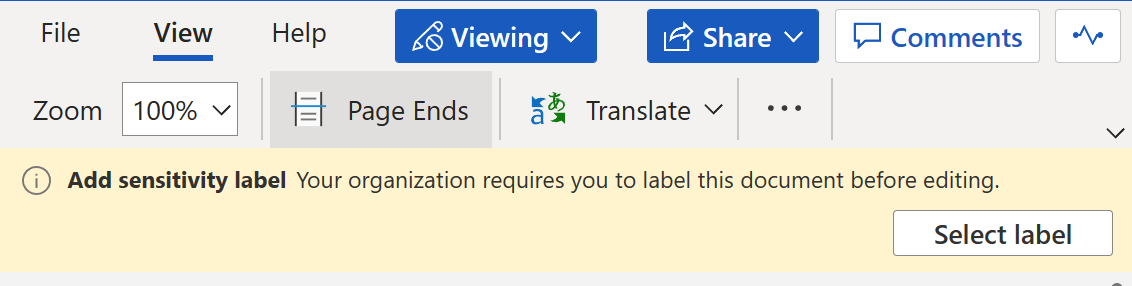
You can take advantage of this capability to make sure people apply a sensitivity label to any newly-created or edited document that supports labeling.
Mandatory labeling is a useful rollout-enhancing tool to ensure people get into the habit of considering the sensitivity of information they deal with. Always pair with training and resources before rolling this out to make sure people actually know what the criteria is for choosing the correct label.
By the way, if mandatory labeling for all email seems harsh or cumbersome, I think it should also be considered whether email is used too much for mundane internal communication before making any judgments. From experience it seems that email is still used quite a bit (and quite unnecessarily) for short-form, ad-hoc internal communication which could just as easily be handled over Teams, Yammer or other possibly more suitable channels.
Recommended labeling
This lets you recommend a specific sensitivity label based on sensitive information types to people without automatically applying that label. The option has quite good synergy with mandatory labeling since you can help people make the right choice whenever a sensitive information type can be identified – without taking away control from people and without lessening the need to be thoughtful when classifying data.
When a label is recommended, users have the option to apply the recommended label with a single click – or to disregard the recommendation.
Automatic sensitivity labeling options 🤖
Default labels
Using this option, you are able to define a label that gets applied by default to new and updated files & containers. People can still change the label to suit their needs, but a default label can be set to ensure all objects get at least some kind of baseline label applied when they are interacted with.
Default labels can currently be applied to documents, email, sites & groups, Power BI content
A couple of notes:
- A configured default label takes precedence over mandatory labeling. An example: let’s say you configure a default label for email and also enforce mandatory labeling. When a person composes an email in Outlook on the Web, the selected default label is added automatically and the person is not required to make the manual choice normally enforced by mandatory labeling, since the requirement to label the document is already satisfied.
- Like mandatory labels, default labels have good client-side synergy with both recommended labels and client-side auto-labeling. If default labels are used, I would warmly recommend making sure you are able to use one or both supporting features to make sure critical & high-sensitivity use cases aren’t passed over accidentally without applying a properly elevated label.
Client-side auto-labeling in Office apps

First of three ways to selectively apply automatic labels to content in Microsoft 365 and the only one affecting the user experience when creating or modifying a file. Both this and service-side auto-labeling are tied to sensitive information types (SITs) – including ML-based trainable classifiers.
When client-side auto-labeling conditions are defined in a sensitivity label and a user creates or edits a new document (or replies to or forwards an email), the content is checked for defined SITs and if found, the desired label is automatically applied. The user can still decide to overturn the automatic labeling decision, though, to help weed out false positives.
⚠️Here’s a critical detail: when content has been manually labeled by the user, an auto-labeling method (client-side nor service-side) will not overturn that classification. Other automatically applied labels of lower sensitivity can be replaced with higher ones, though, which means default labeling and both auto-labeling methods work cleanly together.
On the other hand, using mandatory labeling will neutralize the effectiveness of client-side auto-labeling because when it is used, people will be made to choose a label manually pretty much right away for new documents, after which auto-labeling will no longer apply.
Client-side auto-labeling is useful for applying labels to data that is actively interacted with. To do the same for data at rest, we need to look to the next two options.
Service-side auto-labeling
While otherwise similar to client-side auto-labeling, this capability uses SITs to automatically apply labels to content at rest / in transit. This practically means content that was already saved to the cloud and emails after they are sent by a user (not applied to the mailboxes themselves at rest, though).
Service-side auto-labeling can be used in SharePoint, OneDrive and Exchange Online. Rolling these out requires you to first do an initial simulation run with your configured Auto-labeling policy to confirm that it will be applied to the correct scope of files.
Azure Purview also offers its own capability to automatically apply sensitivity labels to schematized data assets.
You might have noticed that there is a neat fit between the functions of service-side and client-side auto-labeling. Indeed, they aren’t meant as competitive methods for automatically classifying your data. Instead, they complement each other and aim to fill in each other’s weak spots.
Both service-side and client-side auto-labeling are still based on the availability of sensitive information types. On the other hand, default labels require interaction with the content to be labeled. That leaves a single, rather large use case: data at rest that is not interacted with and that cannot with certainty be identified with a sensitive information type.
For this, we turn to the Swiss army knife of products – Defender for Cloud Apps.
Defender for Cloud Apps auto-labeling

When DfCA has its Microsoft Information Protection integration configured, we can use it to work with sensitivity labels in a multitude of ways, for example:
- Apply a default label to all supported, unclassified data-at-rest in SharePoint Online and OneDrive using one or more File Policies. This can be useful to organizations that already have unclassified data in the cloud to effectively apply a baseline label to the current data. I will write a separate article on this later but in a nutshell, you do this by configuring a File Policy to look for all supported file types that don’t have a sensitivity label applied and that haven’t been edited in the last day. You can then use governance actions to apply the desired baseline label to all of them – after which present or future auto-labeling policies can still override files with stronger sensitivity when necessary.
- Apply fine-grained labels to data-at-rest in very specific circumstances – such as when the files were created within the last 3 months by certain people, under a certain folder and have certain strings in their filenames.
In DfCA, when applying labels to files identified by your File Policies, you have the option to tell the policy to respect user-defined labels – or to override them, if necessary.
If you expect to include content in a File Policy’s scope that is already encrypted by a sensitivity label and you want to base the file policy on the content of the file in some way, make sure you enable your policy to inspect protected files.

DfCA does come with a built-in limit of 100 labels applied per app per day, which can be raised with a support ticket if necessary.
AIP unified labeling scanner
The AIP unified labeling scanner can be installed on-premises to help classify and protect data even before it ends up in cloud services. The scanner can be run in discovery mode to get an accurate picture of the sensitive data in on-prem locations or it can be used to automatically apply labels as well when such content is detected. The scanner relies on sensitive information types to detect targeted content. You configure the scanner to either crawl through on-prem resources once or repeatedly, as per your needs.
You can either use a blacklist or a whitelist approach when it comes to choosing the file types the scanner looks for. That means you either tell it to only look at certain file types or to look at anything except certain file types. There are also certain file types such as executables that are automatically excluded from scanning.
SharePoint Syntex
In short, Syntex is used to automatically understand and process documents using AI and machine learning models. The document understanding models in SharePoint Syntex can also automatically apply sensitivity labels when a document is identified by a model. Like most other auto-labeling options, Syntex auto-labeling respects any pre-existing manually-applied labels in documents it inspects.
Scenario: Implementing SIT-based automatic labeling ⚙️
We will use the SIT we defined in the first part of this series to automatically label content in all three primary ways available to us.
Implementing client-side auto-labeling in Office apps
To implement client-side auto-labeling, we navigate to the Compliance portal (compliance.microsoft.com) and choose Information Protectionfrom left-hand navigation.
Then, we select the Labels tab and choose to edit the label we created in the second article of this series (Secret). We move to the screen labeled Auto-labeling for files and emails.
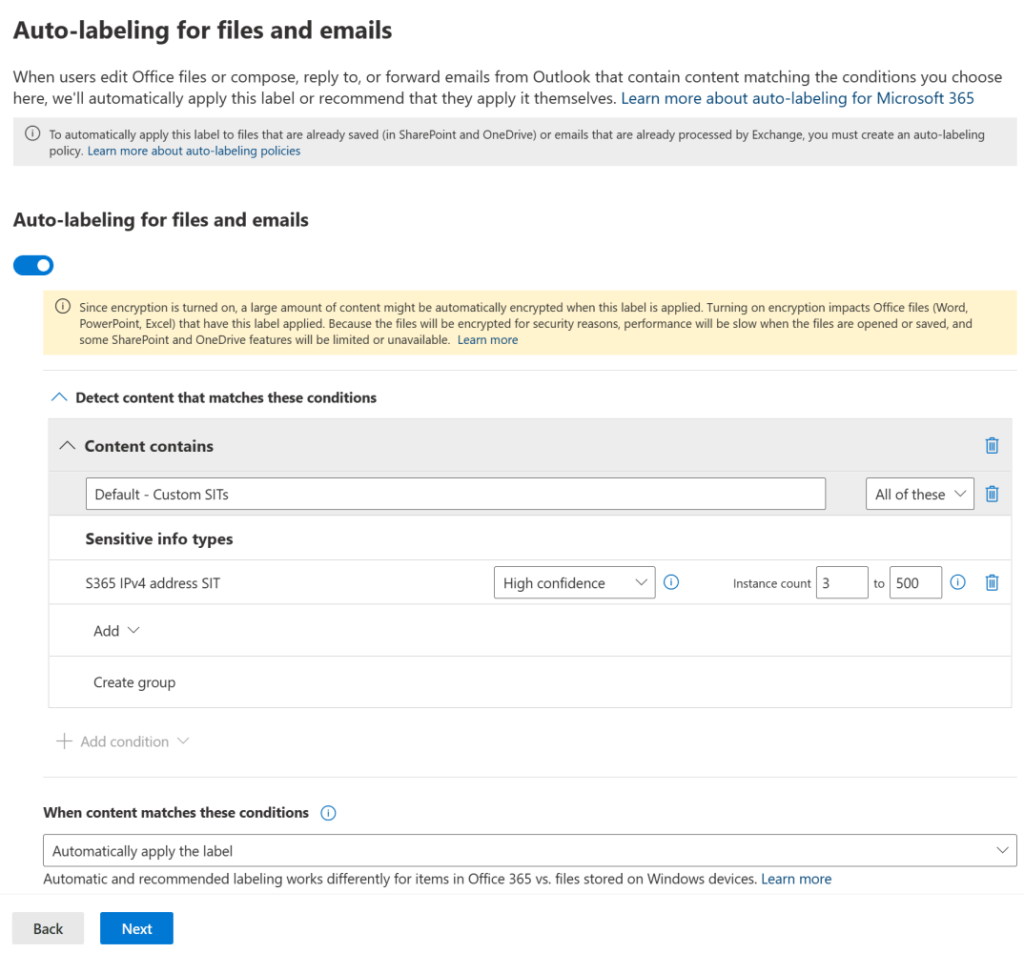
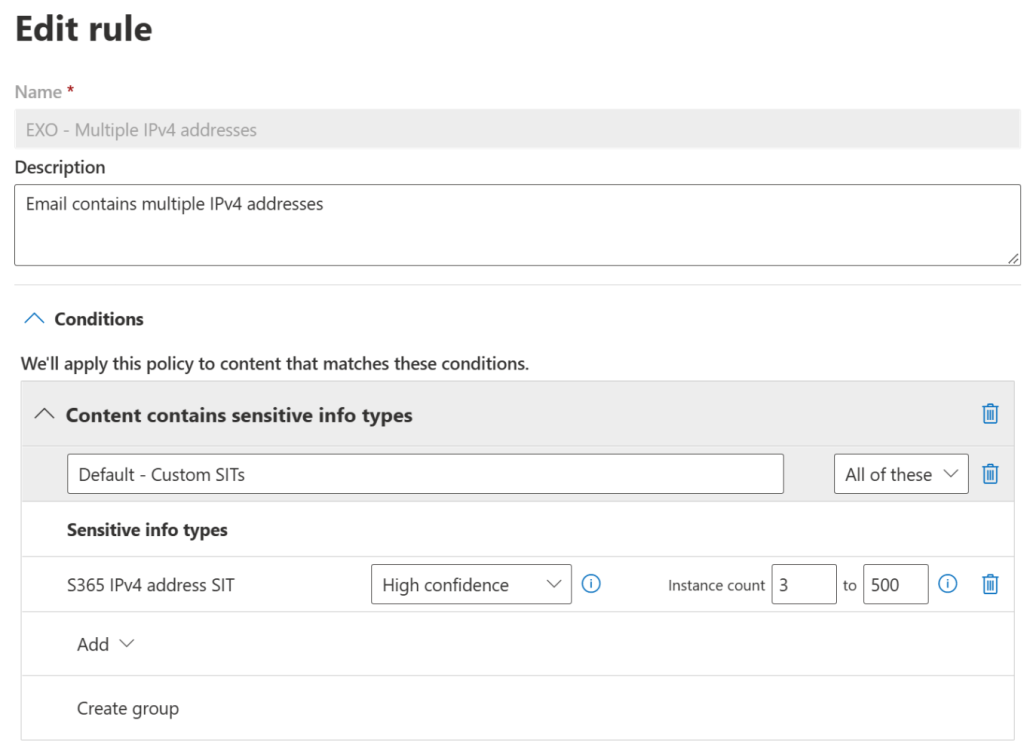
Here, we will turn on auto-labeling and then configure content detection rules to look for between three to 500 matches of our SIT. When the content matches these conditions, automatically apply the label.
We will also scroll to the bottom of the page and write a custom message to be displayed to users when this automatic label is applied.

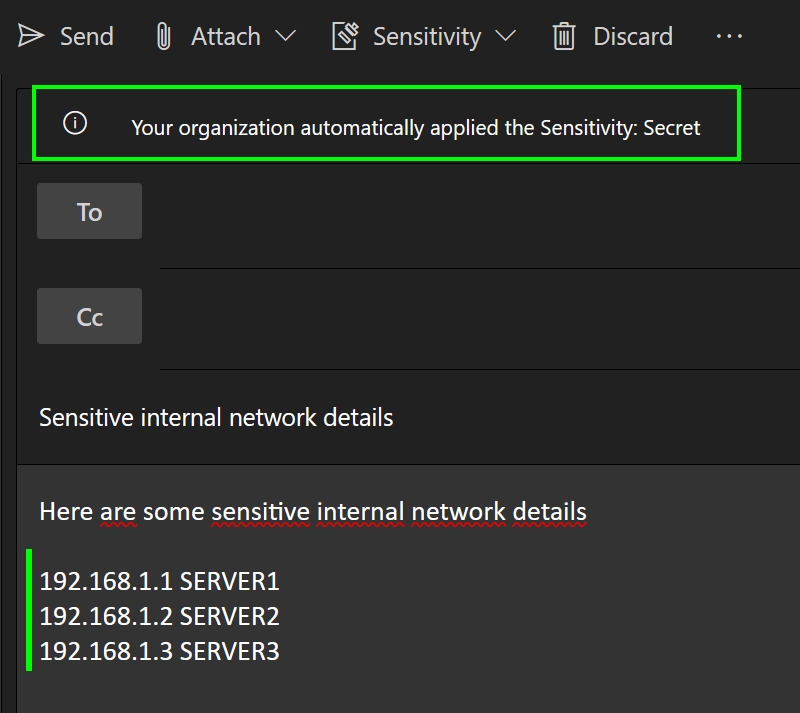
Let’s hop into Outlook on the Web to test this out. When we insert 3+ SIT-triggering IPv4 addresses into the email, it soon gets automatically labeled as Secret, just as desired.
As users we can still change the label but since we required this in our label policy, we have to provide a justification for the change when it is a downgrade.
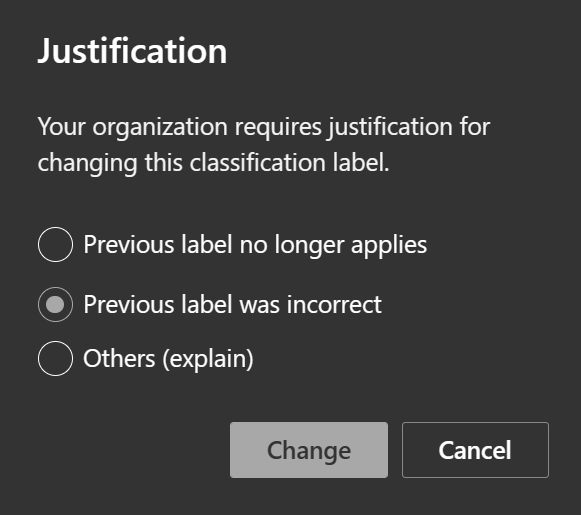
Aside from the sensitivity label change or removal event, the justification text itself also gets logged (except currently for SharePoint Online and OneDrive) when the file is saved and can later be monitored through the Activity Explorer. When aggregated over time, this is quite useful data when determining how well-formed the current auto-labeling policies actually are. If users are manually having to tinker with labels a lot after they are automatically applied, perhaps the auto-labeling policies or underlying SITs need tweaking. Alternatively, further training in the organization’s data classification policies might be required.
For up-to-date details on which activities exactly get logged around labeling, see this Docs article: Labeling actions reported in Activity explorer
Implementing service-side auto-labeling
We can get going with classifying data at rest by opening the Compliance portal and navigating to Information Protection > Auto-labeling. We’ll create one new policy called SIT-based auto-labeling.
For locations, we will select all available options – namely Exchange Online, SharePoint Online and OneDrive.
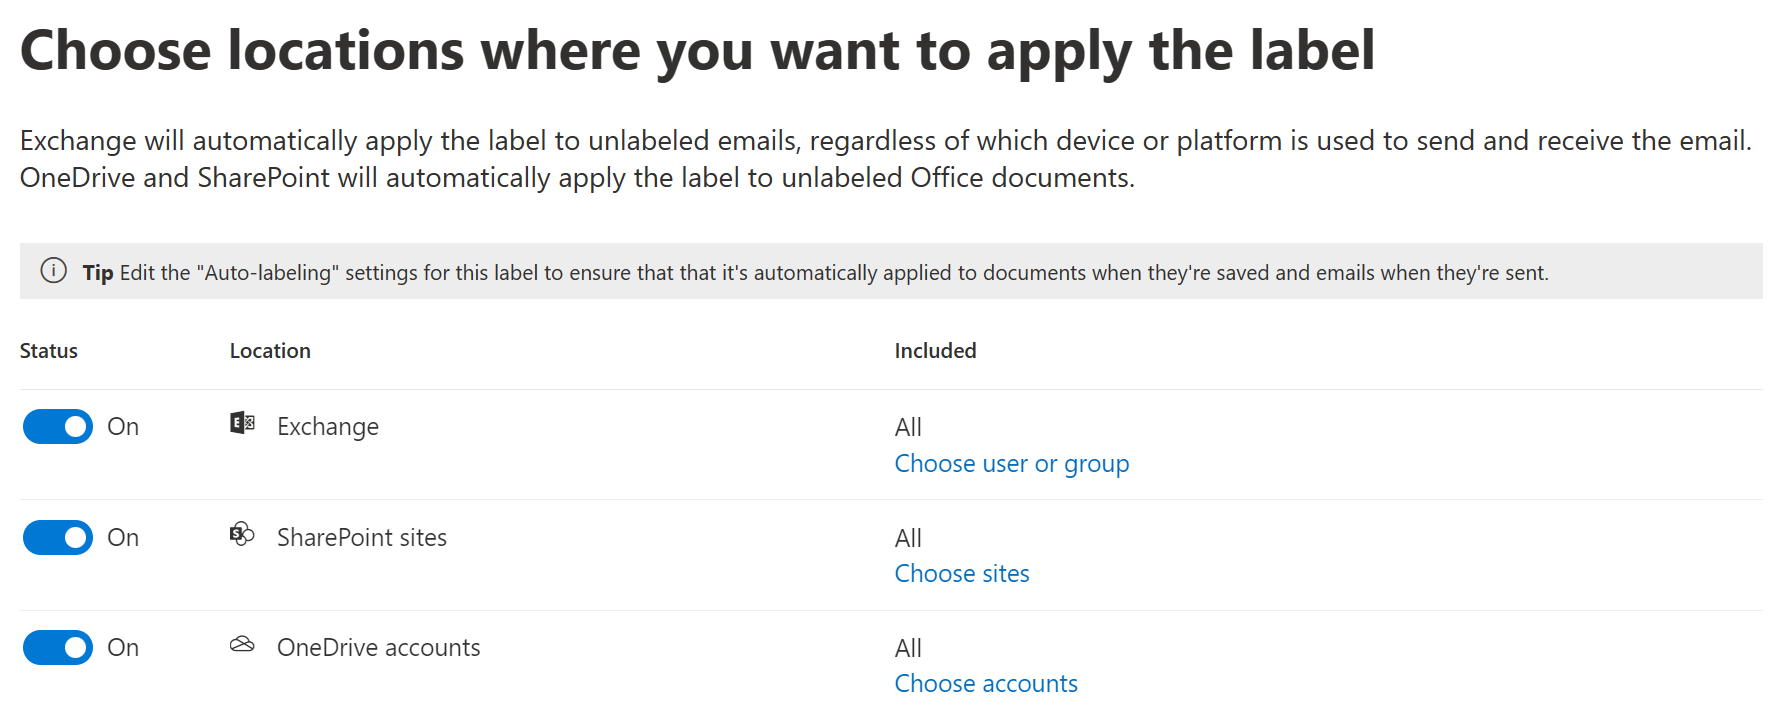
When we have multiple locations selected, we get to create custom detection rules for each location separately. Here, we will define a similar rule for all locations that looks for three or more matches of our custom SIT in content. We typically want service-side auto-labeling rules to align with client-side rules to ensure a consistent, logical user experience.
Once the rules are in place, we choose the label to apply. We will choose the label we created earlier – Secret.
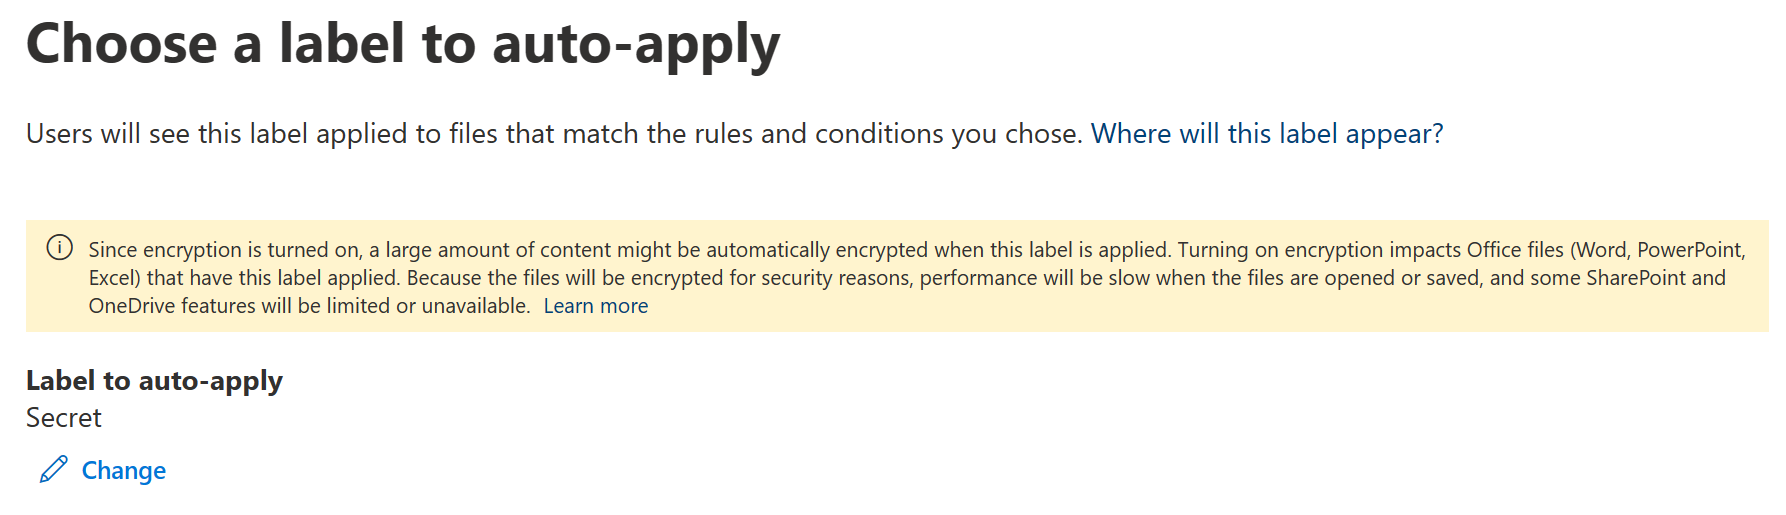
Keep in mind the user permissions we selected when configuring our label’s encryption settings in the last article – when the service-side policy is published, they will get applied to targeted data-at-rest along through the sensitivity label. Don’t auto-apply labels with encryption before you are sure your permission model is sound.
Let’s test it. I created a non-classified Excel file locally with four IPv4 addresses. I then uploaded a couple of instances of it to OneDrive.

Once that was done, I finished configuring the auto-label policy by choosing to run it in simulation mode – a mandatory initial step, as I mentioned earlier.
After taking a ~15min hiatus I came back to check up on the progress of the simulation. Here’s what I saw.
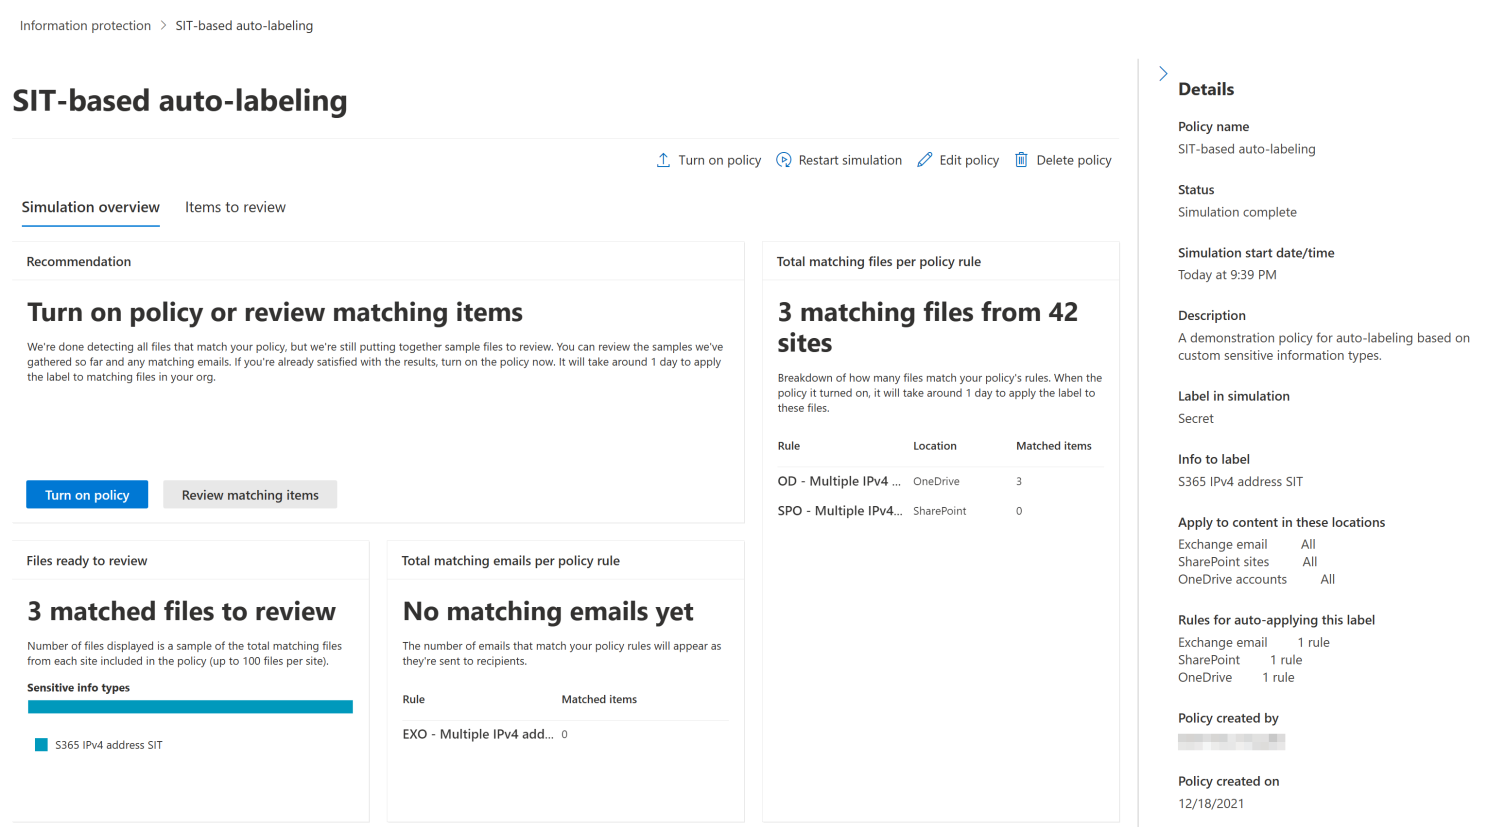
There were already a few matches for files I had uploaded. As Microsoft says, you should allow 12h for the simulation to process, so you can just leave it running overnight.
Once the simulation run has completed and you are satisfied with the expected scope of the policy, you are allowed to turn it on to start applying sensitivity labels to data-at-rest.

After the policy was published, I tested it once more but this time with email to see how auto-labeling in-transit functions. I wrote a short and quick email with enough IPv4 addresses in it to trigger the policy. I then sent it to an external email address without applying any sensitivity label to it. I had already implemented Data Loss Prevention policy to block external sharing of Secret content – a topic we will cover in a later article.
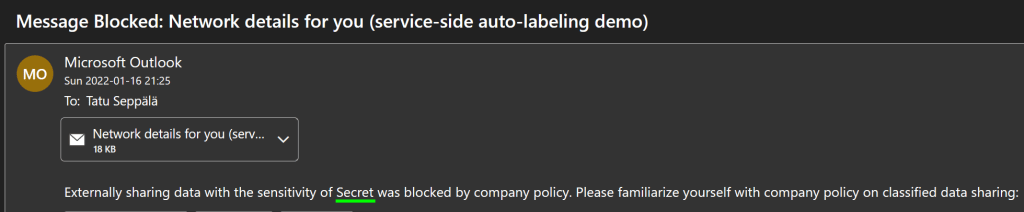
The message, as expected, got labeled as Secret in-transit and was consequently blocked by the DLP policy, as I was informed by the message pictured here. We can also check the Activity Explorer to verify the actions taken by the auto-labeling policy.

You can track high-level statistics for your service-side auto-labeling policies from Auto-labeling tab after you publish them and exact actions from the Activity Explorer, as we saw just now.

It is a good idea to check back a few times over a couple of months after publishing a new auto-labeling policy to check that it still works according to expectations.
As for technical limitations, up to 25 000 files can be automatically labeled per day. Also, service-side auto-label application does not alter a document’s “modified” or “modified by” attributes.
Shaping your labeling strategy 🗺️
Different organizations have different needs and varying levels of readiness to implement Microsoft Information Protection sensitivity labeling and associated controls.
For many organizations, the taxonomy used as a foundation for determining the sensitivity of files and emails might not initially be fully formed and will take time to create and refine. Others might have a more mature classification framework in place already and only need to translate that to technical configurations in Microsoft 365.
Any compliance strategy will also naturally evolve over time as both new external requirements are identified and Microsoft 365’s technical compliance capabilities expand.
Below, I put together a quick example of how an organization’s sensitivity labeling strategy might look like. Each phase builds on the previous one through training, monitoring, iterative refinement along with entirely new technologies to achieve specific goals. If the phase names look familiar, it is probably because I borrowed them from the helpful Power Platform adoption maturity model.
The aim is to use cloud technologies to gradually remove the burden of manual compliance actions as long as this can be done reliably, repeatably and with good monitoring across the organization.

Stage zero – Preparatory
When aiming to roll out Microsoft Information Protection, take sufficient time to refine the taxonomy for classification and plan a comprehensive, multi-channel training and communication effort for your organization. Starting to classify data on an organizational scale can demand a change to the mindset of many employees since they now have to consider the content they work with from what can sometimes be new and unfamiliar angles.
Excellent guidance and general best practices can be found from Microsoft’s Compliance Customer Engineering resource portal in GitHub, among other sources.
Stage one – Initial
Start user training and communication well in advance of any technical rollouts – even before basic labeling is implemented and labels are published. Explain the concrete security and compliance goals that the organization seeks to meet by classifying data. Try to keep guidance regarding the taxonomy simple and straightforward.
When initial human-centric activities have progressed sufficiently, publish labels and apply mandatory labeling to make sure they are used. You can also create a simplified labeling scheme for containers (Teams teams and SharePoint sites) if rolling out the full taxonomy for containers at this point doesn’t seem feasible but you still want to get started with classifying containers.
Stage two – Defined
After having monitored and refined your labels for 6-12 months (just a ballpark number) and after the organization has gotten experienced with classifying data as part of a normal workday, you can start to bring in automation to help lighten the manual work.
Moving from mandatory labeling to default labeling assisted by SIT-based automatic and recommended labeling in high-value scenarios will make people’s workflows faster without giving up quality, since people by this point understand the correct usage of labels and can manually correct them if need be. Containers can also be transitioned to use the same, fully-formed taxonomy with files at this point, if this wasn’t implemented earlier.
Stage three – Efficient
Once earlier automation efforts are impelemented and have become familiar to employees, you can start thinking about expanding sensitivity label usage through integrations to new frontiers like Power BI and Azure Purview. You can also explore more advanced automatic labeling scenarios through SITs based on machine learning and other more novel methods – along with Defender for Cloud Apps based auto-labeling for specific scenarios.
A Power Virtual Agents chat bot can also help provide easy self-service compliance guidance to your employees 24/7. Step-up authentication for protected sites can be implemented through sensitivity labels. Even content lifecycle governance can be automated by tying retention labels to file sensitivity – we’ll look at this more in a later article of the series.
The journey continues
An organization’s information protection efforts are never 100% done and dusted as we can see here – there is always room to implement more granular or otherwise more advanced methods of bringing in data-level protections in the cloud.
Hopefully you now have some more tools and ideas to start or keep walking that path with your organization. In the next installment, we’ll move on to governance topics – namely, how to automatically apply retention controls to sensitive data in the cloud.
Thanks for tagging along! 👋

3 responses to “Information protection & governance with Microsoft 365 #3: Implementing automatic sensitivity labeling & outlining a labeling strategy”
[…] Part 3: Implementing automatic sensitivity labeling & outlining a labeling strategy […]
LikeLike
[…] Like Loading… February 6, 2023 Security & Compliance Power Platform / Power BI, Purview / Information Protection ← Information protection & governance with Microsoft 365 #1: Identify your data → Information protection & governance with Microsoft 365 #3: Implementing automatic sensitivity la… […]
LikeLike
[…] & Compliance Purview / Data Lifecycle Management, Purview / Information Protection ← Information protection & governance with Microsoft 365 #3: Implementing automatic sensitivity la… → Information protection & governance with Microsoft 365 #5: Data […]
LikeLike