
Most organizations need to bring external partners and customers over to their Entra ID tenant in order to collaborate effectively. This has been possible for a good amount of time now by using B2B guest accounts. Collaboration between organizations in Teams etc. is a key to success in many instances. However, external users having access to a slice of a company’s resources does create new management requirements to maintain control over the created guest accounts.
The B2B guest account lifecycle is a vast topic in its entirety and a bit much for a compact article like this. Still, at least a few questions are good to think about when it comes to B2B guest accounts:
- Bringing in new guests: Which organizations do we need to collaborate with in the first place and do we need a process to control this?
- Securing ongoing access: What can we do to secure day-to-day access to our resources for these external users, since we have no control over the security of their source identities / accounts?
- Tidying up: How do we get rid of guests that don’t actually need access to our environment anymore – without introducing significant extra workload from manual management?
The good news is that we can answer all of these questions by using Entra ID features. Let’s go through a simple example scenario using a few core capabilities, shall we?
Bringing in new guests
First, we’ll want to sit down and figure out which of the following is true:
- We want to let our users bring in guests from any external organization
- We prefer to maintain control over which domains guests can be invited from
If the answer is #1, we’re already good to go, since Entra ID by default lets organizations invite B2B guests from any domain, making setting up collaboration easy and fast.
For discussion’s sake, let’s assume the answer is #2, which means we’ll want to make some changes to our tenant’s configuration.

In the Entra ID portal, let’s navigate to External Identities and check out External collaboration settings. We’ll set collaboration restrictions to Allow invitations only to the specified domains and add our desired domains below. When we’re done, we’ll select Save to lock in the configuration. For example’s sake, I input a few consumer email domains here.
Doing this means that guests can only be invited from these domains. It must be noted, that in a real-life business scenario, taking control of allowed B2B domains would also make it a good idea to set up a clear process for users to request additions to the allowed domain list so the well-intentioned limitation doesn’t end up blocking legitimate collaboration scenarios.
Securing ongoing access
OK – we now have a handle on which external domains’ users can be invited to access our resources. That still leaves a clear challenge – once guests start operating in our tenant, we typically have no direct control over what measures in place to keep our their source identities secure. Luckily, we aren’t totally helpless though – after all, we have Conditional Access. Using CA we can automatically enforce MFA for all guest users starting from their very first login to our tenant. While we’re at it, let’s make sure all of our guests read and accept our terms of use.
First, the terms of use. For this example, I created fairly extensive terms that cover most critical scenarios (image below) and saved the document as a PDF file.

With the PDF at hand, we’ll navigate in the Entra ID portal to Security > Conditional Access > Terms of use and create New terms. In the Name field, we’ll input an internal name for the configuration and in Display name, we’ll choose the title that guests actually see for our terms when they first log in. We’ll select the PDF file we just saved and Require users to expand the terms of use, since we came up with such long-winded terms for our example. We don’t want to badger our guests too much, so we’ll choose not to expire consents once given. In our case it’s enough to give consent on any one device, so we won’t require users to consent on every device they use to access our tenant. Finally, for Enforce with conditional access policy templates we’ll choose Create conditional access policy later.

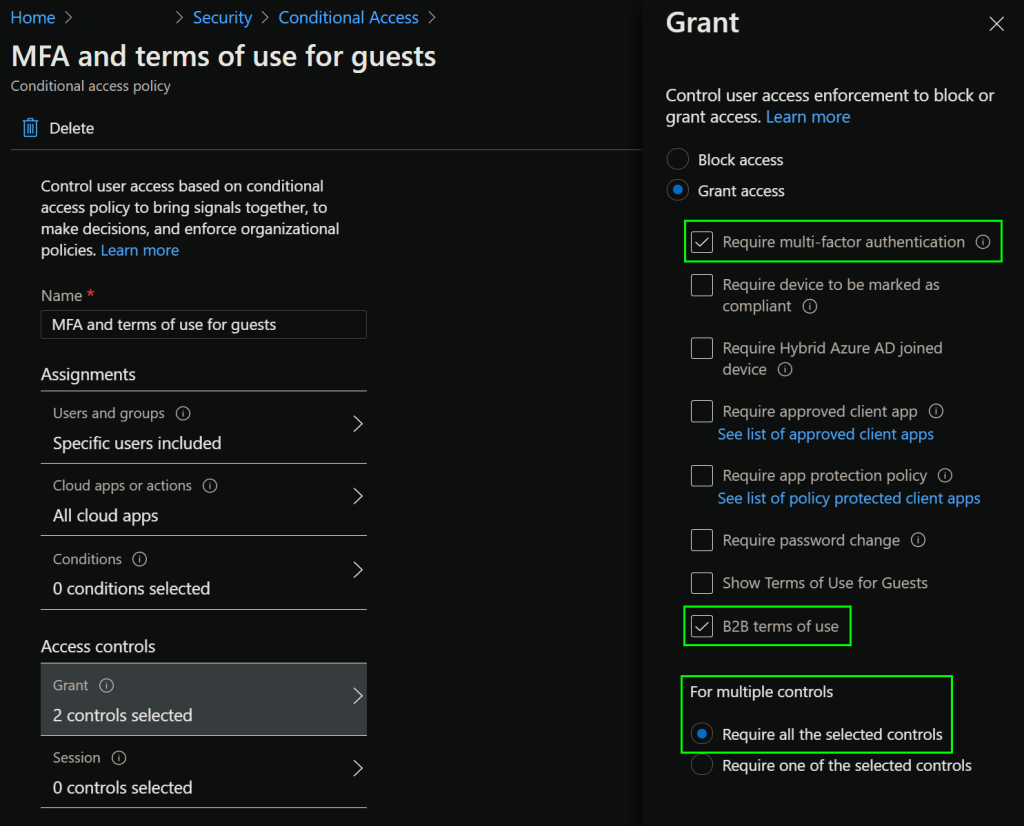
Now, for the Conditional Access policy itself. Let’s navigate to Security > Conditional Access, where we’ll make a New policy. We’ll name it MFA & terms of use for guests.

For users and groups, we’ll select Select users and groups > All guest and external users.
By the way, make a note of the fact that this option includes Entra ID B2B guests but not SharePoint B2B guests. We’ll need to do a separate exploration around how to bring the B2B functionality in SharePoint / OneDrive fully in line with our Entra ID B2B access controls. As a matter of fact, this is already possible but requires enabling email one-time passcode authentication and some preview features through PowerShell.
Let’s turn our focus back to the CA policy.
For Cloud apps or actions, we’ll choose All cloud apps. We won’t configure any specific conditions so the policy will have a blanket effect on all guests signing-in to any of our Entra ID apps and services. We want to make sure all guests provide MFA for any logins to our tenant, so for Grant, we’ll choose both Require multi-factor authentication and B2B terms of use, while making sure we choose to require all the selected controls.
Keep in mind that any others terms of use you might have previously created and configured with the Create conditional access policy later option also show up here as separate options.
Finally, let’s enable the policy by setting it to On and selecting Create.
Thanks to our efforts earlier, each guest must provide – and, if necessary, register for – MFA when logging into your tenant for the next time. Each guest user will also be prompted to read and accept our brand new terms of use document, as pictured below.

After reading the terms, guests can make the choice to accept them and move on to our tenant or alternately to decline them.

If a guest declines the terms, they’ll be warned that they will have limited or no access to our resources. If they go ahead with declining the terms, they’ll be presented with the following information:

Let’s assume our terms of use weren’t too draconian and most guests do end up accepting them, letting them continue collaborating in our tenant. We have now imposed some form of mandatory multi-factor authentication (MFA) on all of our guest users, which should at least significantly cut down on the risk that malicious actors can use their compromised, external accounts to access our resources. They’ve also hopefully actually read and accepted our terms of use, letting them know of the conduct expected of them in our tenant.
As time goes on, some guest accounts will inevitably become unnecessary, which brings us to..
Tidying up
Have you taken a look at how many B2B guest accounts are in your tenant? If not, might want to do that at this point. In some environments with active collaboration, the number might rise to the thousands. Some of the guests might be in Microsoft 365 groups, some might not. Not every one of them is relevant anymore, but they won’t be decommissioned without manual intervention – unless we do something about it, that is.
For this, we’ll use two often-overlooked Entra ID features – dynamic groups and Access reviews. Our primary aim is to make our guests automatically be prompted to evaluate the necessity of their continued access to our services. Should they not need access anymore – or not react at all – we’ll remove their access in a controlled fashion.
Gathering the guests
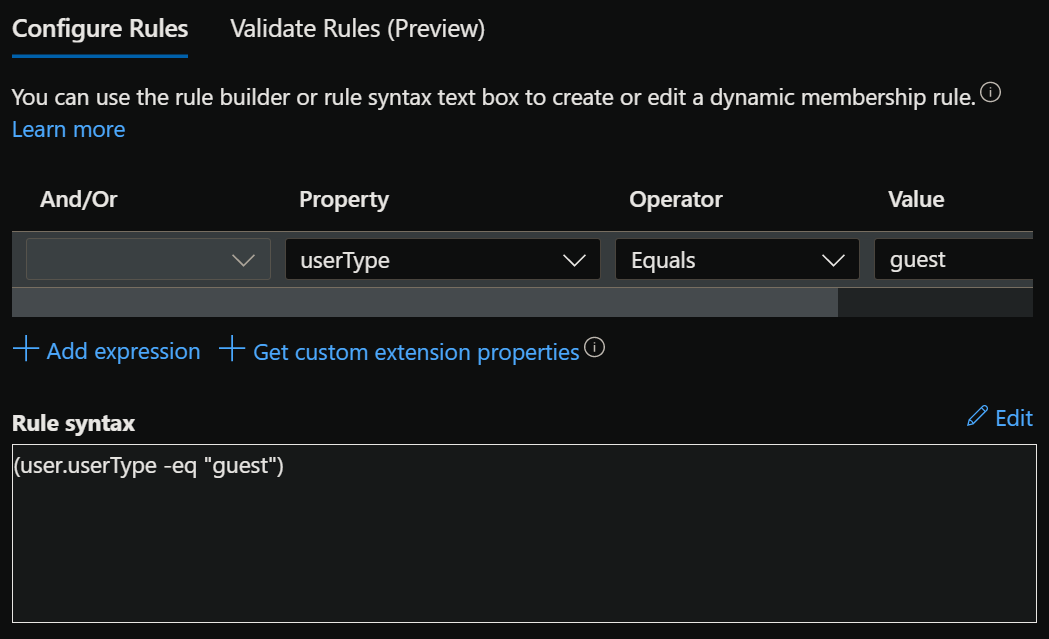
First, we’ll need to herd all of our guests into a handy group. For this, we’ll use a dynamic group, an underappreciated feature if I’ve ever seen one. Dynamic groups let us build groups not through adding members manually, but through set rules. One big upside of a dynamic group is that it automatically gathers all identities that correspond to its membership criteria.
We’ll navigate to Groups > New group. An example configuration can be found below.

With the basic information in place, we’ll select Add dynamic query to define our group’s membership rule. Our rule will be simple and straightforward – (user.userType -eq “guest”)
With the rule defined, we’ll Save and Create our new group. It takes a bit of time ⌚ for the dynamic group to first evaluate its membership based on the rule, so it is once again a good moment for some coffee ☕ or other refreshments.. or just a good stretch.
By the way, while we’re waiting – did you know dynamic groups can also be used in Microsoft Teams to build teams based on, for example, the department attribute in Active Directory & Entra ID? If your users AD accounts’ organizational attributes are already automatically enriched during employee onboarding, you can let your organizational Teams teams maintain their own membership without any hassle. Neat!
OK, back on track now. The dynamic group is ready – let’s move on to Access reviews.
Self-review to the rescue!
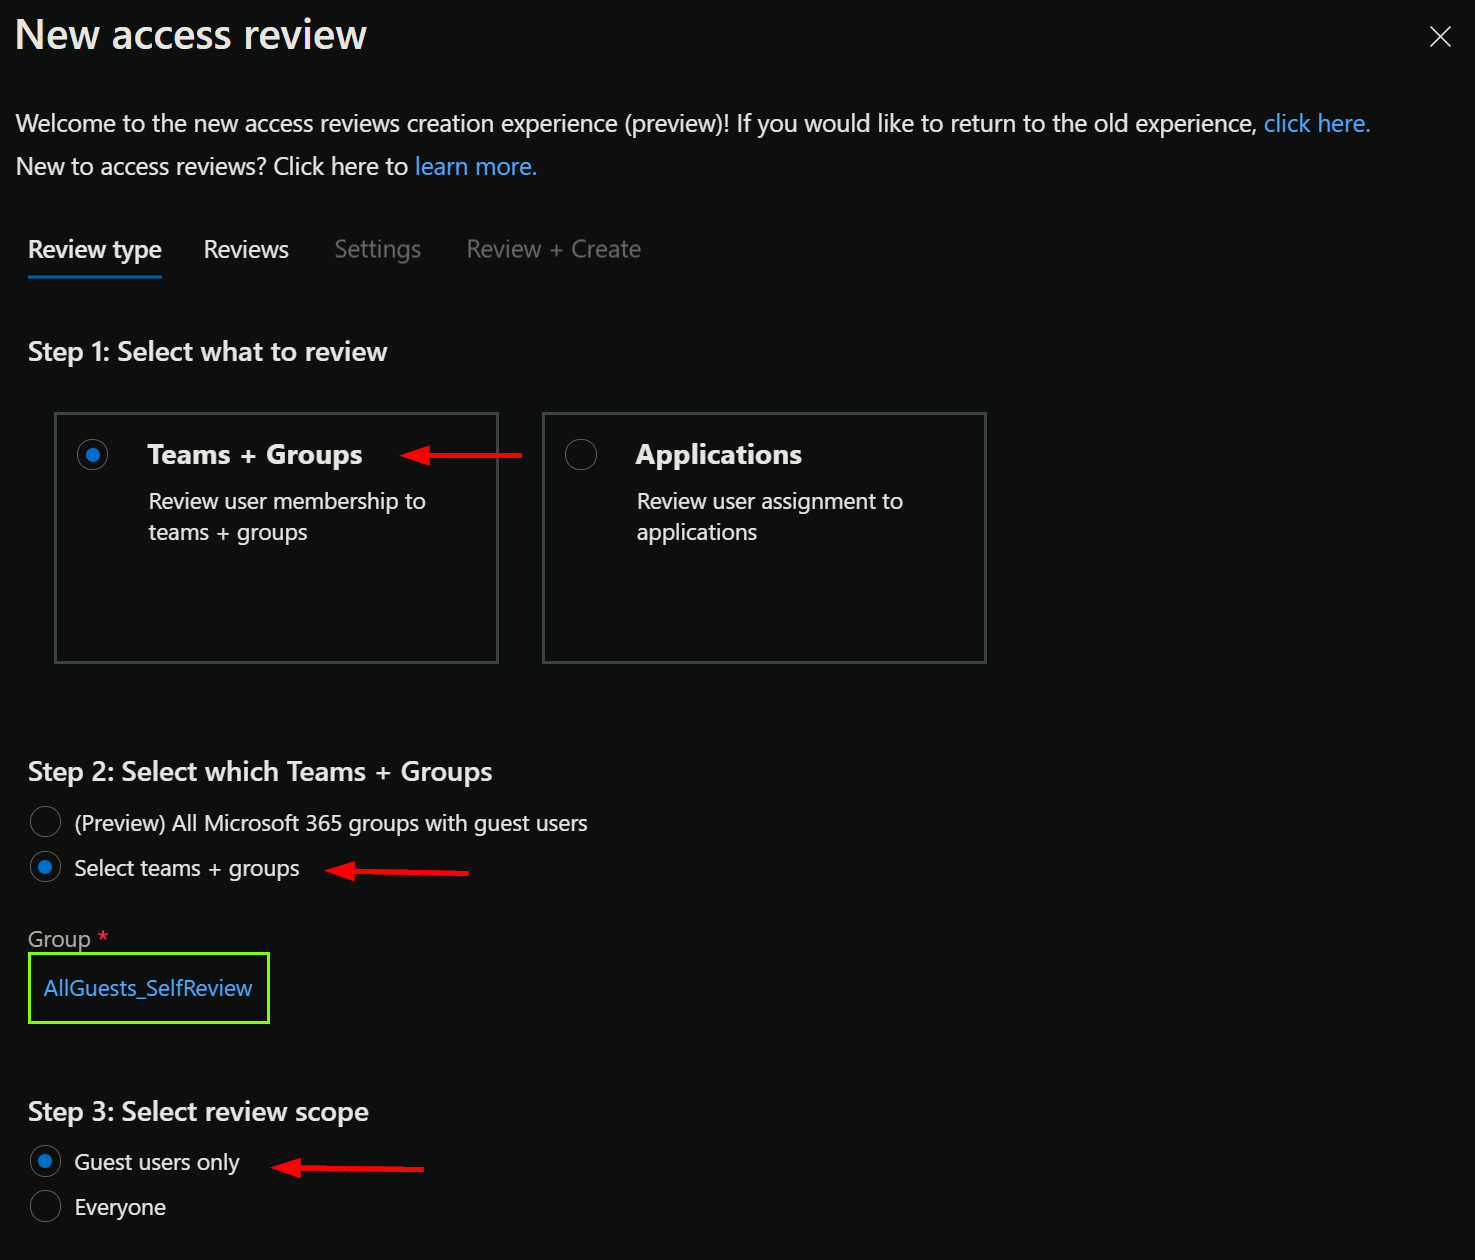
To make our guests confirm their need to keep using our tenant on a periodic basis – and take action if not – we’ll navigate to External Identities > Access reviews. We’ll create a new access review. In our example, we’ll choose to review Teams + Groups. We’ll choose to select which groups to review and we’ll specifically target the dynamic group AllGuests_SelfReview that we just created.
While it won’t make much difference in our scenario since all group members are guests to begin with, we’ll nevertheless scope our review to guest users only. This will at least somewhat protect our use case from careless admins tinkering with dynamic group membership rules. 😉
Moving on! At this point we’ll start defining the actual review process by choosing Users review own access. I’d say a quarterly review cycle is roughly appropriate for our needs and we’ll set the review period to 14 days. Once the review starts, affected guests will get notified via email and will be able to answer (and change their mind) for the entire review period. Any actual governance actions are taken only after the review period ends so we want to keep it relatively condensed. In this case we´ll leave the start date to the current date, so the first review will start more or less immediately.
In a “real” scenario we might want to set the start date to slightly later point in time so we can make sure the necessary guidance is distributed to affected parties beforehand, minimizing confusion.

Next, it is time to choose the actions taken during and after the review. To make the magic work, we need to choose to auto apply results to resource and if reviewers don’t respond, remove access.

We’ll set the action to apply on denied guest users to Block user from signing-in for 30 days, then remove user from the tenant. This combination lets guests handle their own reviews while unresponsive or unnecessary guest access gets removed without our manual intervention, as desired.
Taking a look at Advanced settings, we might to want to disable justification required to keep the process as light as possible or enable it to make guests provide a documented reason for their continued use. Guests can still provide a justification even if it is not required.
It might also be good to make use of the Additional content for reviewer email field to provide a bit more context on what the review is all about. The example text we will use here is:
Please review the necessity of your continued access to the Company tenant. If you don’t complete the review process, access will be automatically removed.
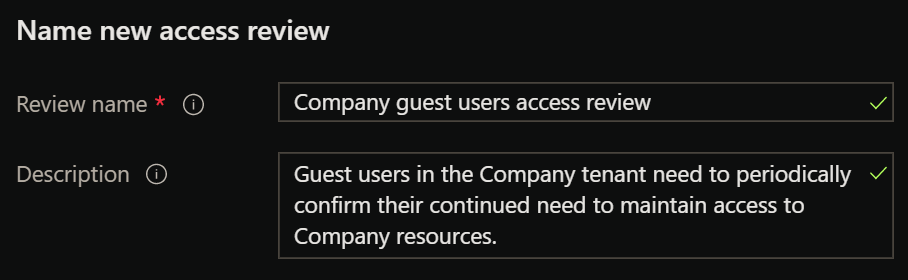
With all this in place, let’s move on to the final phase of review creation – name and description. The review name and description will actually be shown to guests, so we’ll pick something clear and descriptive. Finally, we’ll choose Create.
At this point our Access review is complete and will start notifying users in a matter of minutes, since we configured it to start on the same day.
The end-user experience
Finally, a short peek into how a typical guest user might experience these periodic access reviews. As the review period starts, the guest will receive an email from azure-noreply@microsoft.com. The email would actually contain our company branding but I edited that part and the tenant name out of the image below.

The guest chooses Review access, after which they’ll be prompted to sign-in through our tenant’s standard Entra ID login page, complete with the MFA requirement – and terms of use as well, if they haven’t agreed to it yet – that we set up earlier. After this, the guest will be redirected to the myaccess.microsoft.com portal to complete the actual access review, seen below.
If a guest wants to do so, they can choose See details to see our previously chosen, more detailed description of what the review is all about.

After making the choice and choosing the Submit, nothing else is required and the review process is done. If the guest doesn’t answer or indicates that access isn’t needed, the necessary actions will happen once the review period is over.
In conclusion
This brief journey touched just a few of the keystones used to manage and secure B2B guest accounts. Hopefully you got some inspiration for your efforts to enable sustainable cross-organization collaboration through B2B guest accounts.

2 responses to “Taking charge of the Entra ID B2B guest user lifecycle – thoughts & observations”
images not loading properly.
LikeLike
Thanks for raising this! I found a moment to fix the images now. Also replaced any mentions of Azure AD with Entra ID. 🥲
LikeLiked by 1 person