
Every day, we collectively create more and more data in the cloud. A lot of it ends up structured into files and email. We try to keep this data secure by storing files in access controlled services like SharePoint Online. Theoretically, diligently controlling access to these services then helps keep this content secure from unauthorized access, duplication and exposure – or so the story goes.
Inconveniently, files frequently escape from these carefully prepared safe havens. We use USB drives, personal mobile devices, online consumer services of various kinds and countless other ways to exfiltrate organizational data out into the Wild – a world where no conditional access exists and information can be duplicated, modified and exposed to any third parties at will.
This is why we need to equip our most valuable structured data with protection that travels with it even in the hazardous landscape of the open internet.
This is why our most important documents need encryption.

In this two-part blog (of which this is the first) we will walk through many of the key topics around encryption applied by Microsoft Purview sensitivity labels, with my tips and experiences infused into the discussion.
Part 1
- How encrypted documents work with the RMS service
- The building blocks – individual encryption permissions and settings
- Pre-defined permission templates
- Layers of permissions
- Custom permissions
- User-defined permissions
- Decryption
- Tracking and monitoring
- Parting considerations
How encrypted documents work with the Rights Management Service

Before discussing Microsoft Purview Information Protection encryption itself in more detail, we need to understand the high-level function of the Azure RMS (Rights Management Service). It is the cloud service that makes it possible for protection to travel with your data.
To put it simply, the RMS service is what your device contacts when you try to initially open a document protected with a sensitivity label that applies encryption. For the sake of clarity, I though it best to walk through this interaction as a conversation between two parties – Jane Doe (our information worker) and the RMS service.
The exchange might go something like this..

Jane Doe: Hey RMS service! I want to see what’s inside this file labeled as 🟡 Confidential that I haven’t opened on this device before.
RMS service: OK, sure thing – let me first check who you are and verify that you are allowed to access the file. I will use your sign-in information and check your permissions.

Jane Doe: OK, I have provided my credentials. What happens next?
RMS service: Thank you! I have confirmed that you indeed have the right to access the file. I will now unlock it for you and follow the rules associated with the 🟡 Confidential sensitivity label to determine how you can interact with it. Looks like you are allowed to read and change the file’s contents, but not print or copy it.
Jane Doe: I see. If I want to see my permissions in more detail, what should I do?
RMS service: Good question. Most apps, such as Word, Excel or Adobe Acrobat can show you if a document is protected and what you can do with it. In your Office apps, you can also click on the File button in and then on Protect Document to see more details.
Jane Doe: Sounds good, thanks! Can I still view the file if I don’t have a network connection? I’m planning on taking a trip to the countryside this weekend..
RMS service: Your employer has configured files with this sensitivity label to allow offline access for up to 14 days. After that period, you will need to check back with me to re-authenticate and confirm your privileges to this file. Oh, by the way – the same applies if you access the file for the first time with a device other than this one. See you then!
This is naturally a simplification of the detailed, technical process which you can find in the official documentation. Still, I hope it helps illustrate the central role of the RMS service and helps you understand some of the other points made later on in this blog. Without access to (and verification from) the RMS service, a client app cannot provide access to an encrypted file.
Use licenses
Both the period of offline availability and a user’s exact permissions for an encrypted document are tied to something called a use license. Think of it as a time-limited pass for a specific user, on a specific device, to access a specific document.
(In fact, the use license received by a device from the RMS service actually contains the means to decrypt the document’s body itself – but that is going into a deeper level of technical detail which is something I try to avoid in this write-up.)
👉 The important bit to understand is that for whenever a use license is obtained, any changes to the user’s permissions in a sensitivity label’s settings will only take place once a new use license needs to be obtained through reauthentication.
In practical terms, the use license validity period is controlled through the allow offline access option when configuring a sensitivity label’s encryption settings.
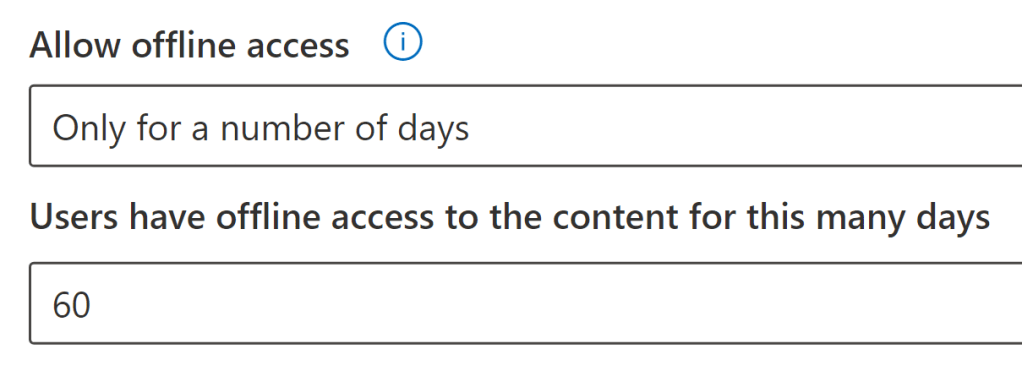
When reading this, you might have realized that configuring Allow offline access to Never would then mean that any changes to a given user’s encryption permissions would come into effect instantly the next time they open a document.
While this is indeed true, I urge you to only consider this configuration for clearly defined, high-value cases. It is a rather stiff restriction on the usability of business documents that will inconvenience people in some situations, like on many work commutes by train where internet connectivity might be spotty – not to mention on airplanes or during maritime travel!
“But wait!”, you might interject and ask: Does configuring offline access to Always mean that use licenses never expire and thus, permissions never get updated – even if they are stripped from a user?
Luckily, this is not the case. There is a default use license validity period of 30 days that always applies in this and some other scenarios. Admins can adjust this via PowerShell using the Set-AipServiceMaxUseLicenseValidityTime cmdlet found in the AIPService module. You can choose a default use license validity period of between 0 and 65535 days (or 179 years).
❗ A word of caution: When your tenant’s default use license validity period and the validity period of a specific sensitivity label are compared, the most restrictive option wins. To not mess with your ability to granularly control use license validity periods, I don’t recommend lowering your tenant’s default validity period much from the standard 30 days – but you might want to raise it in some cases.
Conditional Access considerations
Remember when I mentioned that a user needs to be able to access the RMS service to open an encrypted document for the first time on a device?
Well, if your core Conditional Access policies are scoped to All Apps – and I sincerely hope you do! – one of the affected services is the RMS service. The cloud app for it has a different name – it’s called Microsoft Azure Information Protection for the old name of the broader service RMS is a part of – but it’s there.
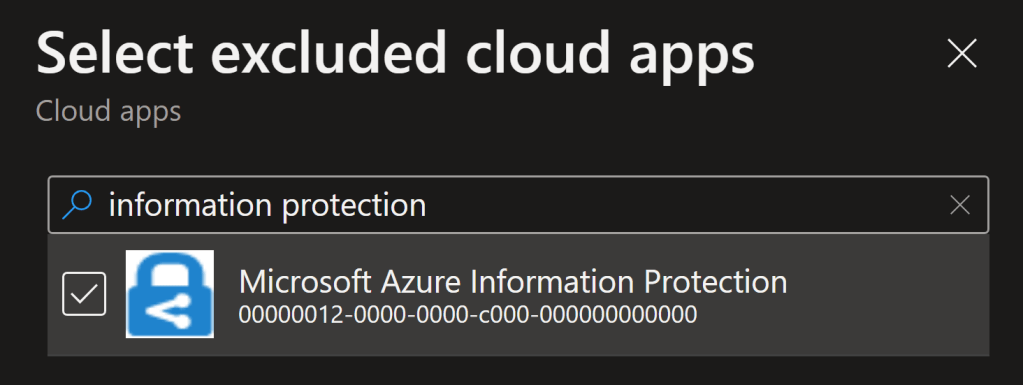
In short, when the Microsoft Azure Information Protection cloud app is part of a CA policy, the RMS service enforces the conditional access policy whenever scoped-in users authenticate to obtain a use license for protected content.
If not accounted for, this interaction can cause issues during Purview Information Protection rollouts when B2B guest users are required to provide MFA for all cloud apps – a fairly common approach.
⚠️ In this situation, external individuals without existing B2B guest accounts in your tenant can get blocked from interacting with encrypted content to which they have been granted permissions through encryption.
This is because when these externals open a protected document, their client app accesses the RMS service. The RMS service then tries to authenticate them using their user identity, which is typically the Azure AD account they’ve signed into their Office app with – but cannot find any such identity in the RMS service’s tenant, because such a B2B guest doesn’t exist yet.
To remedy this, there are two three main paths to take:

- Invite all of the necessary identities to your tenant as B2B guests. This can get tricky to maintain and I wouldn’t recommend it for your typical organization, but the approach has value in highly regulated environments.
- Exclude the Microsoft Azure Information Protection cloud app from any Conditional Access policies enforcing strong authentication requirements for external users, which is what I’ve usually do as it solves the issue without adding an unacceptable degree of security risk to daily operations.
- Configure cross-tenant access trust settings for tenants of other, trusted organizations, letting you trust their own MFA claims, removing the necessity to provide a separate B2B identity for MFA purposes to all externals. My kudos for catching this one go to Christian 👍
Implementing Entra ID B2B integration with SharePoint Online and OneDrive also helps – when it is turned on, B2B guest user identities are created for externals whenever files are shared with them from those services in your tenant.
With the RMS service and use licenses covered, let’s talk about the stuff Microsoft Purview sensitivity label permissions are made of – individual permissions and settings.
The building blocks – individual encryption permissions and settings

Again, I won’t try to simply duplicate the existing technical documentation (here & here) as I don’t think that would provide any extra value to neither you or me.
Instead, I’ll explain the basic premise and point out some non-obvious quirks that are easy to miss – ones that could crop up into real issues if not understood correctly.
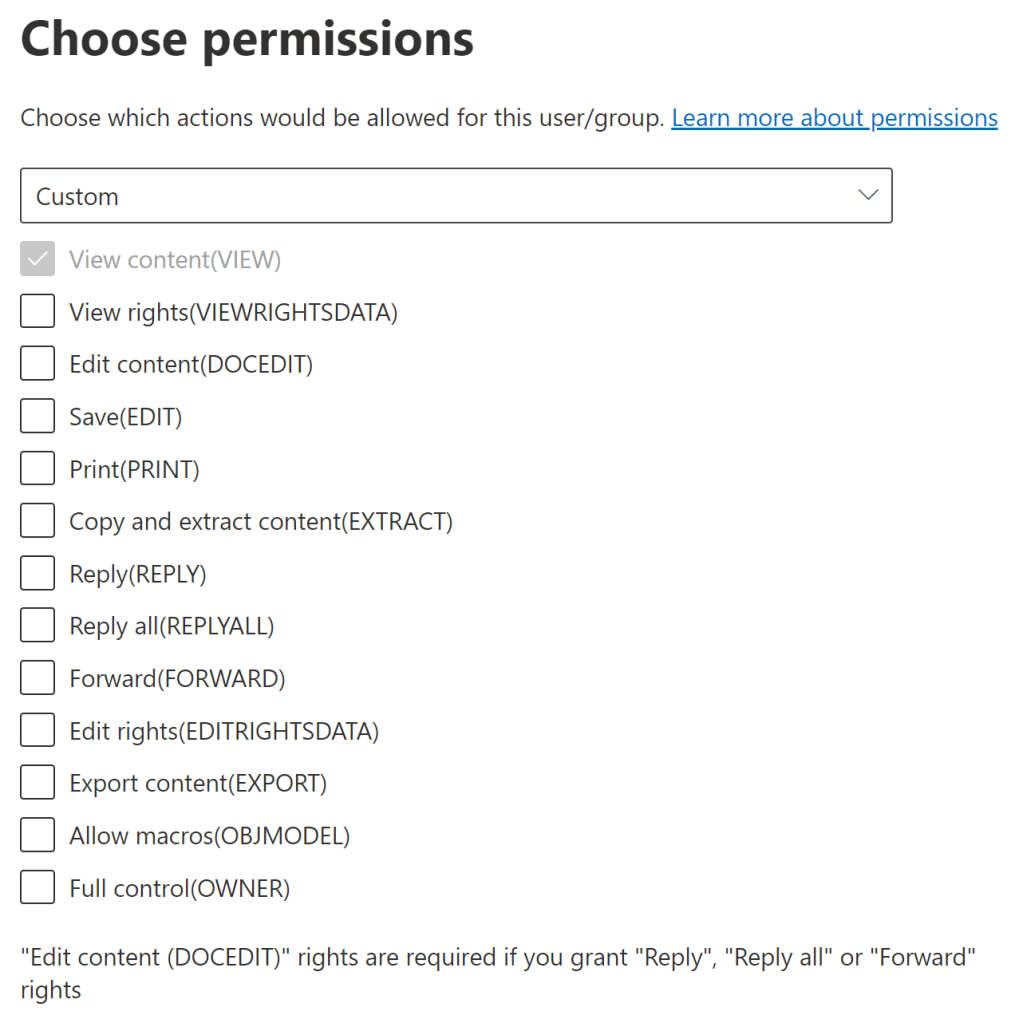
When you configure encryption for a sensitivity label, you have the option of choosing from pre-defined permission levels (we’ll get to them later) and custom permissions.
Regardless of your approach, the template you end up with is comprised of individual permissions for various actions which a user either does or does not have. Some of them are self-evident, while others are more obscure. Some even look obvious but have surprising effects.
Let’s get to know them a bit better. Many of these privileges have both obvious and surprising implications.
Every permission has both a friendly name and a technical policy name that comes up when looking at sensitivity labels and document rights programmatically. I added the technical names in (parentheses) below.
🔎 View, Open, Read (VIEW)
✅ Lets you open and read the content of a document or email.
✅ Together with EXTRACT, allows Copilot for Microsoft 365 to see and access content during interactions.
✅ The most fundamental permission, which is why it is always included even when specifying custom permissions for a sensitivity label, as in the image above.
But also..
⚠️ Isn’t actually enough by itself to sort and filter data in Excel. For these actions, you also need Edit content, Edit (sorting) and Copy / Extract
🔒 View rights (VIEWRIGHTSDATA)
✅ Allows you to check out the permissions and restrictions applied to a document by its existing encryption. Not all clients have functionality for this though and different clients might choose to display a document’s or email’s permissions differently.
📝 Edit content (DOCEDIT)
✅ Having this permission lets you mess with the content of a file, as you would expect.

But also..
⚠️ By itself, doesn’t let you save the document even though you can make changes.
⚠️ In old, pre-1807 versions of Word in Apps for Enterprise, doesn’t let you turn off or use change tracking features. Back then, you needed Full Control for that. This is fixed in newer versions.
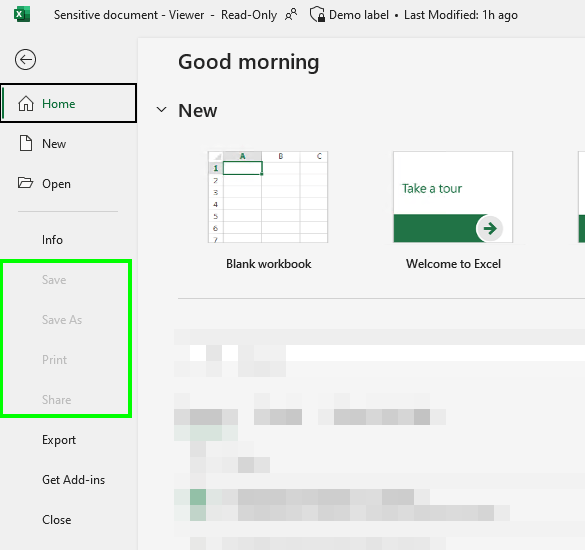
💾 Save (EDIT)
✅ Lets you save changes to a document. Duh. Naturally, also affects AutoSave.

But also..
⚠️ In Microsoft 365 Apps, lets you save the file with a new name in a new place without removing or altering existing encryption.
⚠️ Exclusively for Microsoft 365 web apps, also practically provides the Edit content permission. Maybe Edit content will be rolled into this permission at some future point? Here’s hoping.
🖨️ Print (PRINT)
✅ Literally controls the ability to print a document or email. No surprises here.
👉 Endpoint DLP also allows you to control printing of sensitive documents in a very granular way (for ex. only from specific printers) but naturally it only works on Purview-enrolled workstations. Encryption (and thus, this permission) follows the document anywhere.
But also..
⚠️ Extends to scenarios where someone tries to print a protected document or email to PDF from the web browser.
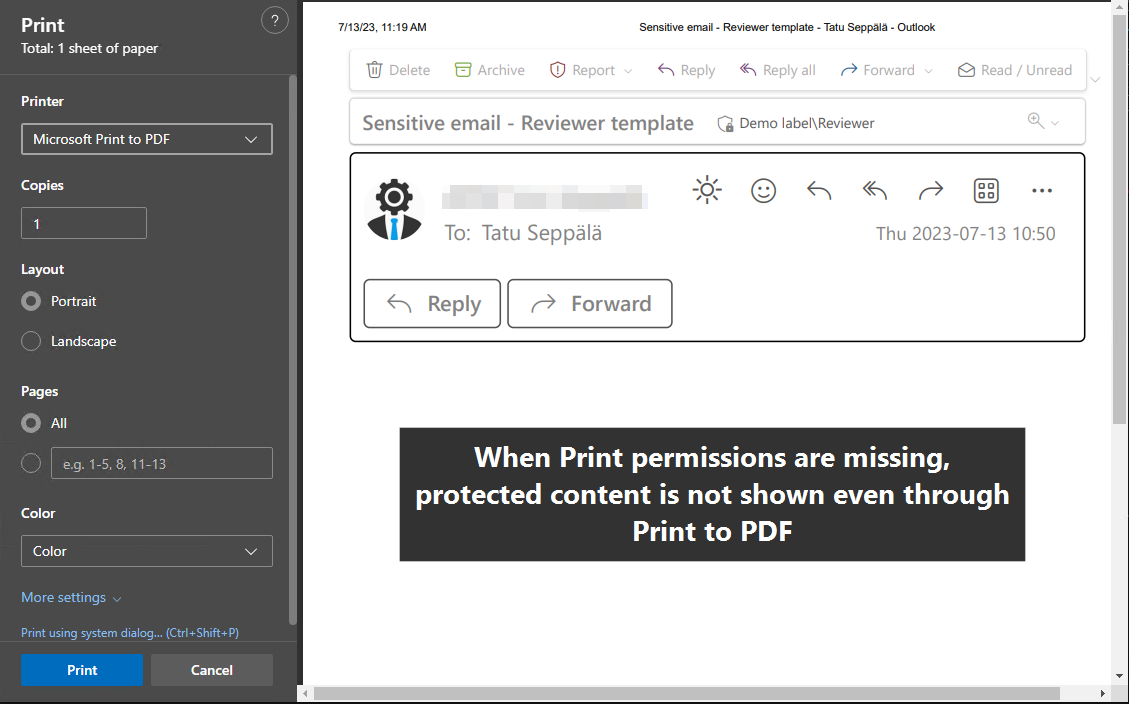
🧲 Copy and extract content (EXTRACT)
A crucial one to comprehend correctly!
✅ Allows copying content from the protected document or email to the same or a different document or email.
✅ Together with VIEW, allows Copilot for Microsoft 365 to access and use the information in a document.
But also:
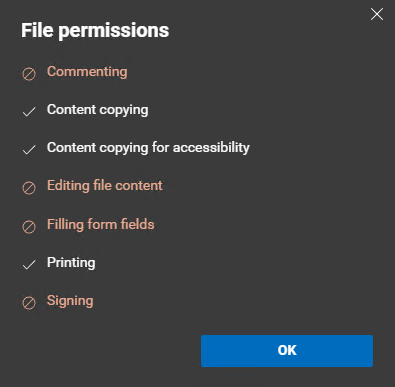
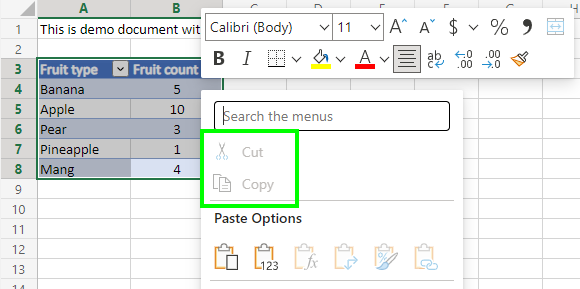
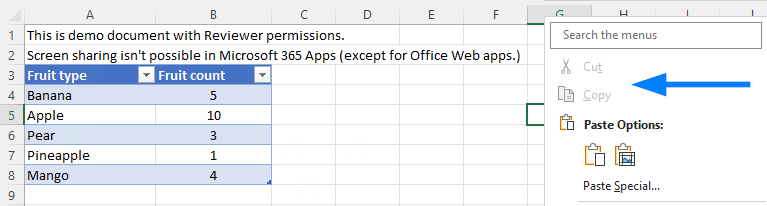
⚠️ Controls whether or not the contents of the document or email can appear when a person is sharing their screen in Teams and similar apps. If the person sharing their screen does not have this permission, the document or email will appear as a black box for other attendees. Check the image below for an example of this.

🤔 As an exception to this, office apps in Teams and on the Web don’t seem to care about the Extract permission when it comes to screen sharing and show protected document contents just fine, as seen below. EDIT: In December 2023, Microsoft announced this discrepancy will be fixed.

⚠️ According to Microsoft, in some apps (presumably certain non-Microsoft ones that use the MIP SDK) the Extract permission lets people save a document without encryption. I haven’t yet encountered practical examples of this happening in the wild though.
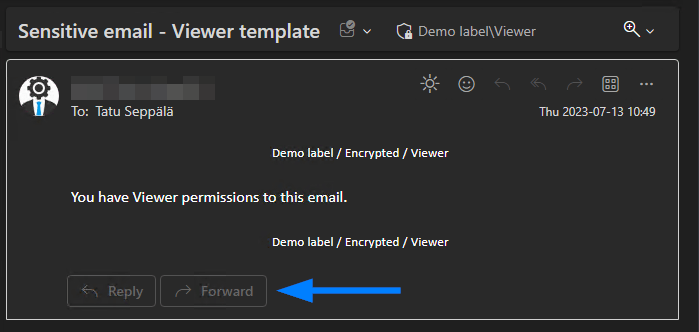
💬 Reply (REPLY) >> 📧 Email only
✅ Lets you Reply to a message in compatible email clients. That’s it.
But also:
⚠️ You’ll want to supplement this with the Save and Edit content, Edit permissions. If you don’t, recipients will get the protected email as an attachment that they then have to open separately to trigger authentication and get access to the message’s contents. Not the greatest user experience, that.
⚠️ Does not allow you to tinker with the To and Cc addresses.
🌍 Reply all (REPLYALL) >> 📧 Email only
✅ Same logic as with Reply, but for the Reply all functionality instead.
⚠️ Same supplemental permissions are required, as well.
➡️ Forward (FORWARD) >> 📧 Email only
✅ As the name says, controls the ability to forward email messages.
But also:
⚠️ This is the permission that lets you edit the To and Cc fields when replying to or forwarding a protected email. Recipients still need to have the View permission to actually read the email you send their way, though.
⚠️ The same supplemental permissions are required as with the other two previous “email only” permissions.
🔓 Change rights (EDITRIGHTSDATA)
Omitting this permission can cause unexpected disruption in production. More on this in the next chapter.
✅ Lets you change (upgrade or downgrade) a document’s or email’s sensitivity label – along with its encryption permissions.

But also:
⚠️ Lets you remove the sensitivity label from the document or email entirely, unless Mandatory Labeling is enforced in a Label Policy scoped to the user’s Entra ID account.
📚 Save As, Export (EXPORT)
✅ Unlocks the ability to save a protected file with a new name (Save As), without any encryption. As such, this is a similarly impactful permission as Change rights.
But also:
⚠️ Controls native content export functionality to other Microsoft apps as with the Send to OneNote feature.
🤖 Allow macros (OBJMODEL)
✅ Allows most forms of programmatic / non-native access to a protected file’s contents.
But also:
⚠️ Office add-ins (including Copilot for Microsoft 365 plugins for office apps) need you to have this permission for them to operate with encrypted files. The same can apply to many other applications integrating with Microsoft 365 Apps.
⚠️ Microsoft 365 Copilot plugins possibly require this permission to access a document’s contents as well, as stated here. You can remove this permission from a label to exclude files with the label from Microsoft 365 Copilot. Update, June 3rd 2024: Any mention of this requirement seems to now have been removed from the article above but I’ll leave this mention up for future reference.
👑 Full Control (OWNER)
✅ Owner privileges. If you have this permission, encryption doesn’t limit the actions you can take with the file.
👉 Before you implement sensitivity labels (or a similar solution), everyone everywhere practically has Full Control equivalent access to any of your documents they can get their hands on.
Pre-defined permission templates

Now that we understand the peculiarities of the individual building blocks of encryption templates, it is time to look at the pre-defined permission levels offered by Microsoft. Most sensitivity labels around the world will probably be built primarily relying on these.
From least to most permissive, the built-in templates are:
- Viewer
- Reviewer
- Co-author
- Co-owner
Using the chart I built below and the things I pointed out about individual permissions, you can probably make a few observations about the implications of each template on the user experience.

As you choose stricter permission templates, the demands for a successful implementation tend to escalate:
No encryption to Co-owner
When you are getting started with encryption tied to sensitivity labels, choosing the Co-owner template for internal users presents a low risk of disruption to existing processes. Doing so offers a practically unchanged user experience for internal collaboration while limiting external access to protected data.
Co-owner to Co-author
When taking the step to Co-author, the first concrete restrictions come into play and the user experience is altered. People can no longer change the document’s sensitivity label – unless they are the person who manually applied the label in the first place (the so-called Rights Management issuer) or an admin.

In my testing, I also noticed exporting protected Office documents as protected PDFs to be blocked from this level forwards, both for Office web and desktop clients.

To successfully use Co-author permissions, you need to understand and account for any business processes during which a document’s sensitivity label needs to be changed by different people various times over the document’s lifecycle.
👉 Failure to acquire this understanding can result in disruptions to these processes – or in the very least, an unintuitive user experience.
Co-author to Reviewer
Moving one notch stricter to Reviewer brings significant restrictions to the interactions people can have with a document. Reviewers can no longer cut or copy content from protected documents and emails or show them through Teams screen sharing. Printing is also prohibited.
👉 To use this template in an org-wide scenario, you need to understand all business-related formal and informal processes during which people could expect to be able to use the prohibited capabilities. No small feat!
Reviewer to Viewer
At the Viewer level, people only have read access to protected information and can only reply to emails without altering the recipients. I would typically reserve this for external partners and specialized, limited scenarios.
👉 Careless use of the Viewer template is almost certain to cause plenty of disruptions – especially if selected for org-wide sensitivity labels and not rolled out with significant adoption communication and training.
Understanding the built-in permission templates correctly is paramount to avoid causing more harm than good. I currently only consider Co-owner to be a relatively safe “starter” option – and even then, only when scoped exclusively to internal users and possibly to trusted partners.
The stricter templates come with escalating requirements for comprehending your organization’s patterns, processes and expectations. You can build readiness towards more restrictive encryption over time through careful label taxonomy design and awareness-building – but initially, I would consider reserving Co-author and the others mostly for sensitivity labels meant for limited audiences with well-defined needs.
Layers of permissions
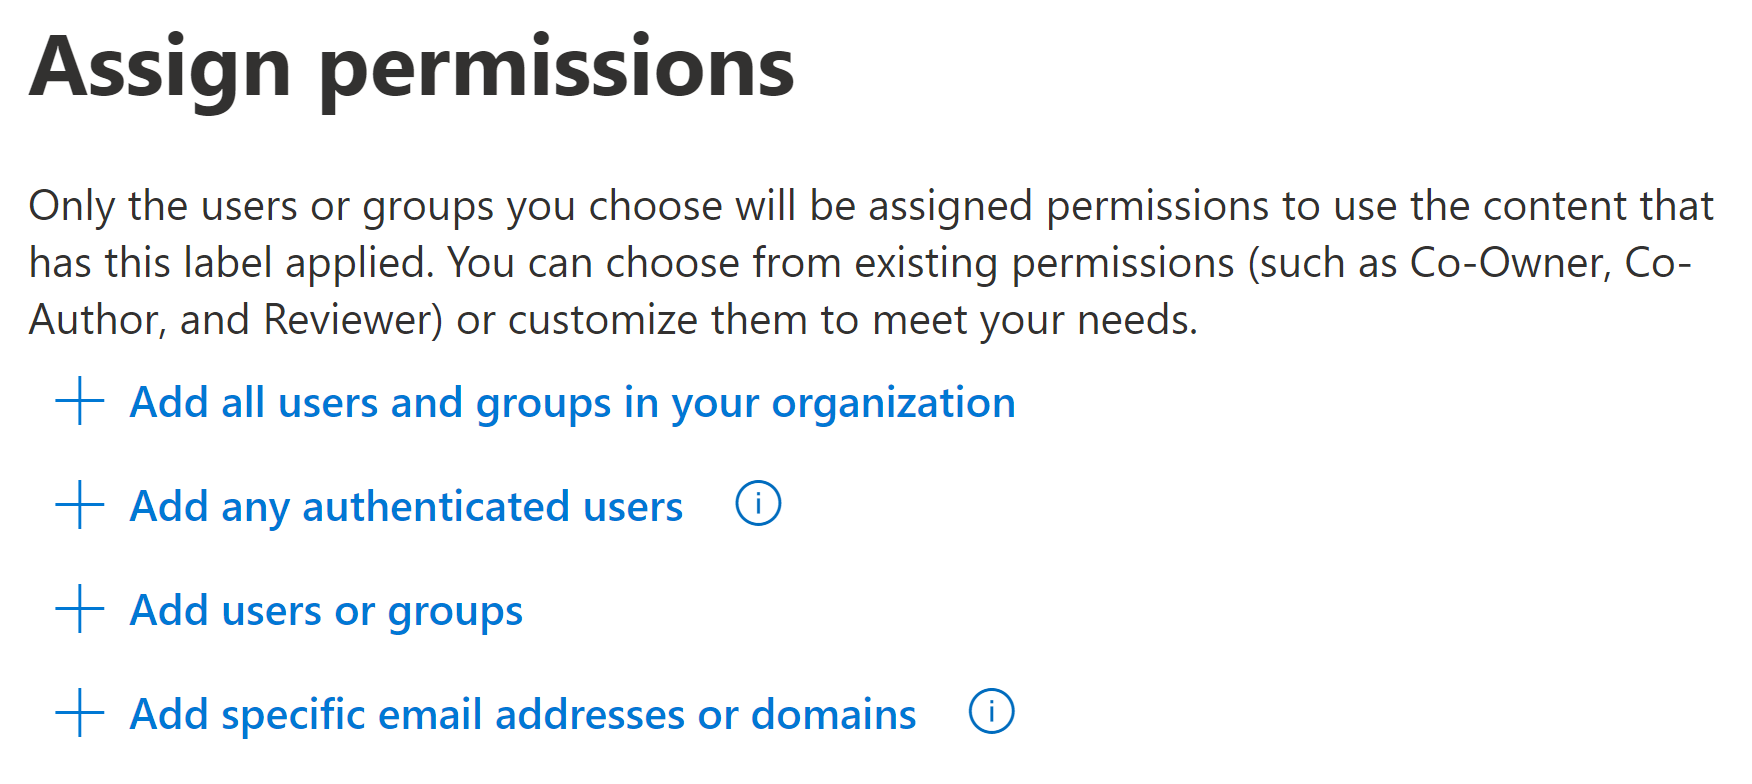
Keep in mind that each sensitivity label can offer differentiated permissions to various scopes:
- Any authenticated users regardless of tenant
- ⚠️ Be very careful with this one! It includes pretty much anyone, with any kind of account, anywhere.
- Typically used only for very specific scenarios, covered pretty well in existing documentation.
- Specific domains or email addresses
- Often used to include permissions for external domains like those of your partner organizations
- Also used to limit permissions within large, multi-domain enterprises
- All users and groups in your own organization
- Specific groups – more on these below.
- Even for individuals, although I recommend avoiding this if possible due to cumbersome manageability.
For example..
- All internal users might be given Reviewer permissions to a sensitive marketing plan..
- ..while members of a security-enabled Entra ID (Azure AD) Microsoft 365 Group consisting of members of the Marketing department might have Co-owner privileges on top of that to ensure they can collaborate on the plan without issues.
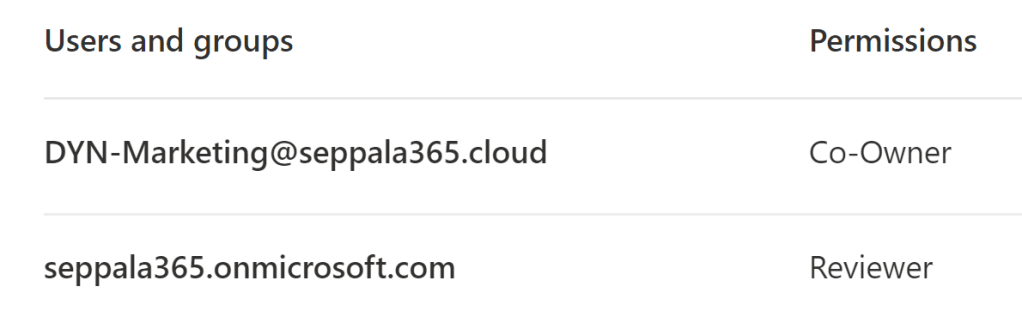
You can use both assigned and dynamic Microsoft 365 groups along with mail-enabled security groups when scoping permissions for a label.
So far I have found dynamic groups to be quite powerful here – as well as in many other scenarios – as they allow handling limited subsets of accounts that require elevated (or restricted) privileges without increasing governance overhead. I suggest using them where applicable.

This concludes the first part of this two-part blog.
In the next part, we’ll cover topics like user-defined permissions (and what those various options in the user experience really do!), decryption and monitoring – and of course, I’ll share my practical experiences and tips. 👍

4 responses to “Demystifying Microsoft Purview sensitivity label encryption – part 1”
[…] Part 1 […]
LikeLike
[…] can be accomplished by creating a sensitivity label with custom permissions that excludes the Allow Macros (OBJMODEL) permission, which Copilot plugins rely on to access […]
LikeLike
[…] subject to the same quirks around use license expiration I detailed at length in my earlier article Demystifying Microsoft Purview sensitivity label encryption – part 1. I suggest reading at least the first chapter if you don’t already know how use licenses […]
LikeLike
Great article!
I’d like to highlight one important point: when you configure co-owner permissions (e.g., for internal users) in a sensitivity label and set a document expiry, the expiry will still apply to the recipients—even if they have co-owner access.
The only user not affected by the expiry is the document creator.
LikeLike