
We are continuing right from where we left off in the first part of this two-part excursion. If you haven’t already, I recommend checking it out first.
- How encrypted documents work with the RMS service
- The building blocks – individual encryption permissions and settings
- Pre-defined permission templates
- Layers of permissions
Part 2
- Custom permissions
- User-defined permissions
- Decryption
- Tracking and monitoring
- Parting considerations
Custom permissions
We already discussed various encryption templates like Reviewer and Co-author. Admins also have the ability to forego these pre-set permission levels and customize a sensitivity label’s encryption permissions according to their needs.
This option is called setting custom permissions and it can be used in synergy with permission templates as we discussed in the chapter Layers of permissions.
Let’s say you want to create a sensitivity label that as part of its encryption gives permissions equivalent to the Reviewer template to a group of users.. but you also want to include the EXTRACT permission so these users can copy text from the protected documents and show their contents while screen sharing. At the same time, you do not want to allow these users to print the document, so upgrading to Co-author is a no-go.
To accomplish this, you could then choose to create custom permissions instead. This option lets you pick the exact permissions you want to include for a chosen group of users.
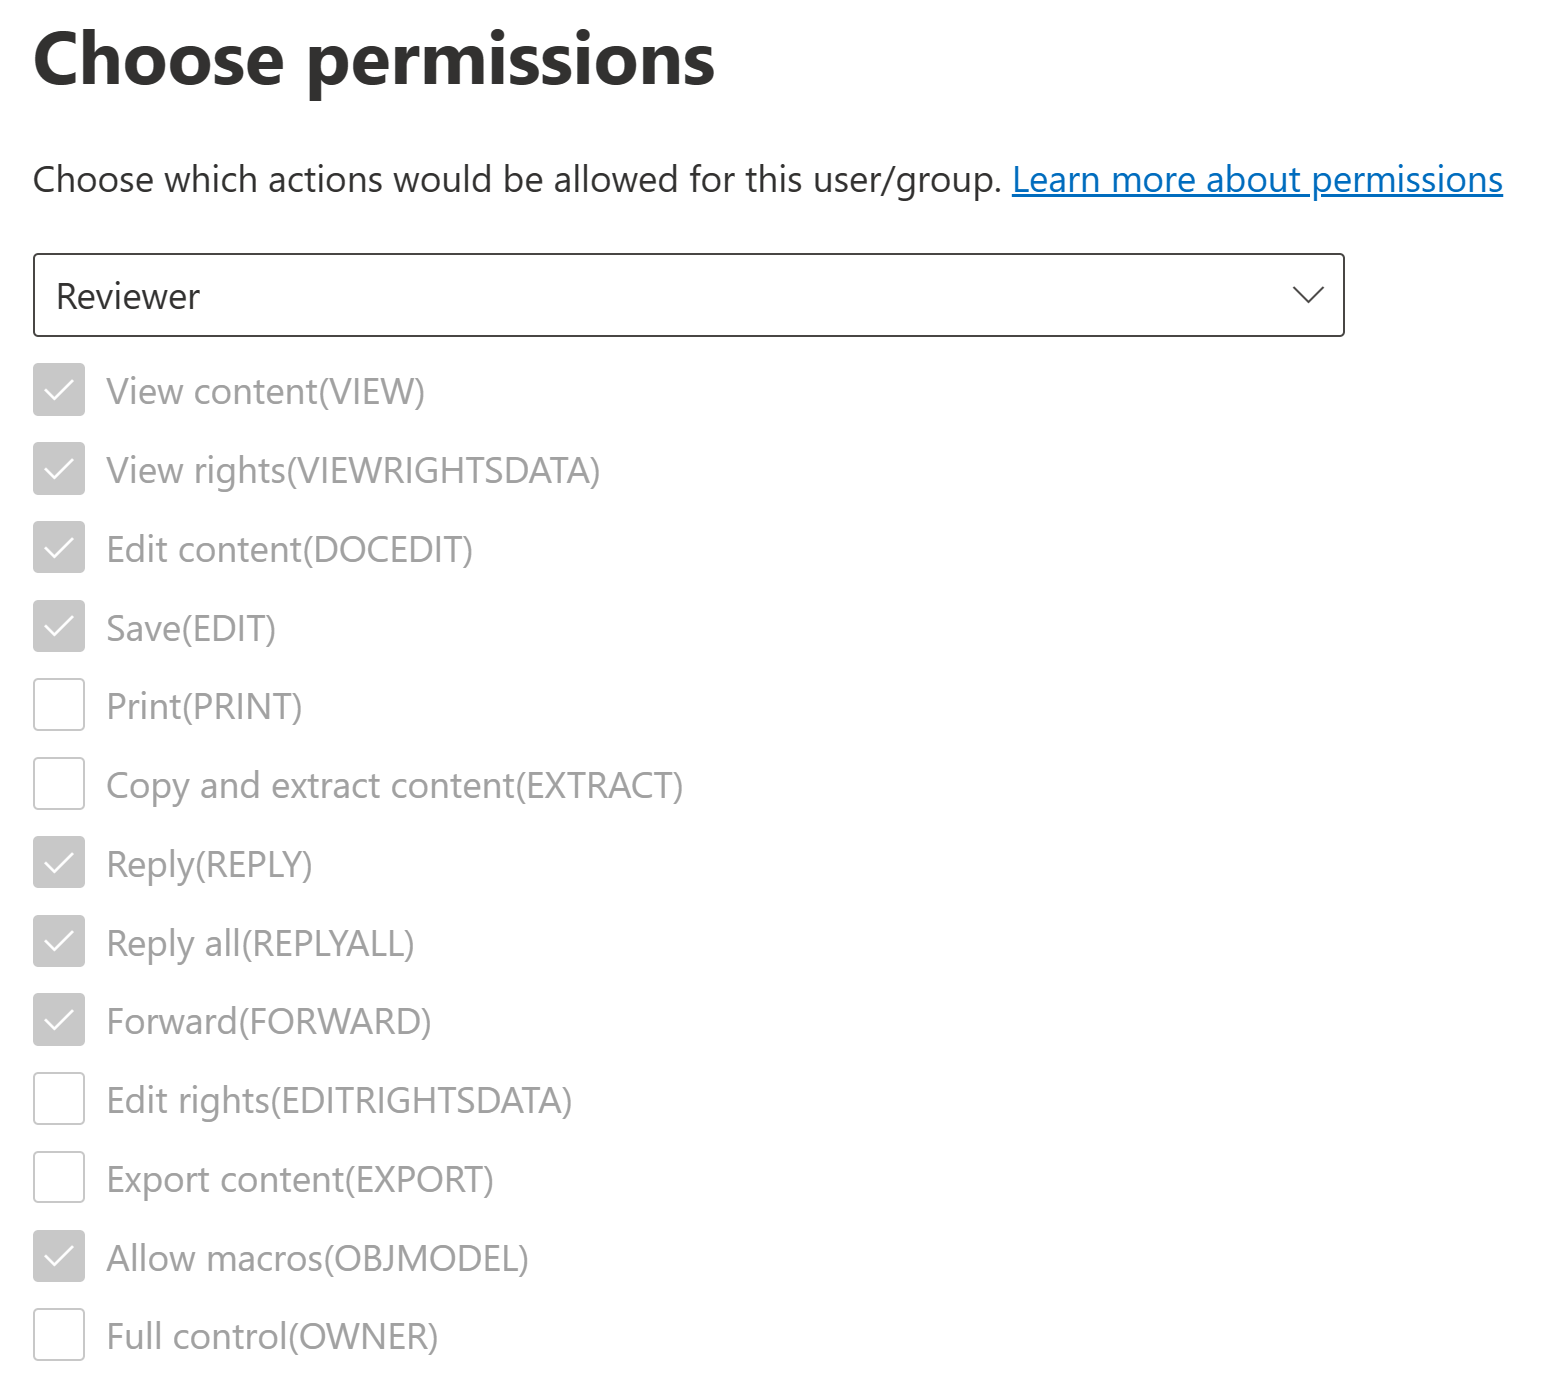

If you do choose to go this route, I recommend starting from the permissions included in the pre-defined templates and doing small tweaks from there. Unless you understand the implications and interactions between each encryption permission by heart, it is very easy to end up with a dysfunctional solution for practical use. If this stuff was easy, I wouldn’t be writing this blog. 😉
There are also some important caveats you need to understand when it comes to custom permissions:
Choose custom or template-based permissions for each scope
- When defining permissions for a specific scope (such as for all internal users in your organization) you can only define either template-based or custom permissions for a single sensitivity label for that group of users.
- You can, however, still define differentiated permissions for other, more broad or narrow sets of users.
As an example, you could..
- Define custom permissions for all internal users..
- ..give Viewer permissions to all authenticated users..
- ..and give Co-owner permissions to a specific group within your organization.
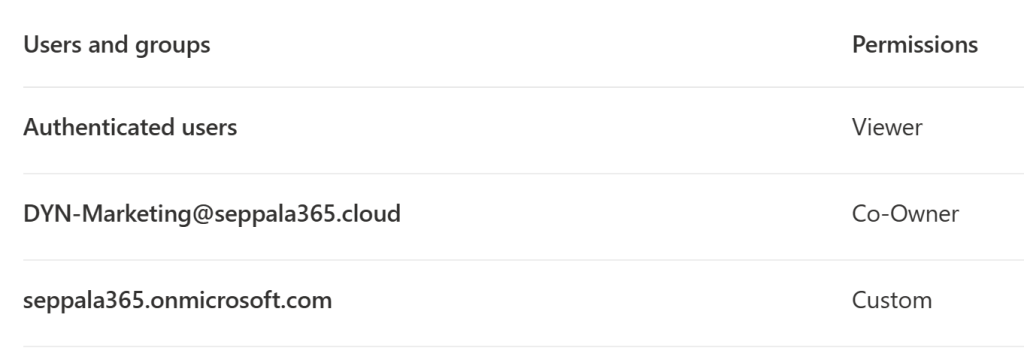
You could not, however, give both custom and Viewer permissions to all authenticated users simultaneously, on the same sensitivity label. It’s either one or the other, which is also why I usually recommend building custom permissions by starting out from the pre-defined templates.
User-defined permissions
We can also give people an active role in defining the permissions of information they create.
Letting people choose exact permissions for a protected document can be especially valuable in collaboration scenarios where information is very likely sensitive in nature but the intended audience is unpredictable or varies constantly.
To unlock this opportunity, we can configure a sensitivity label to use user-defined permissions, or UDP for short. These are an alternative to the admin-defined encryption we’ve discussed so far and cannot be configured for the same label at the same time as them. It’s either one or the other.
When it comes to encryption permissions, the user experience has some aspects you need to understand and be able to communicate onwards. Let’s have a look.
Files and email are differentiated
First off, it’s good to mention that user-defined permissions work differently on email compared to files.
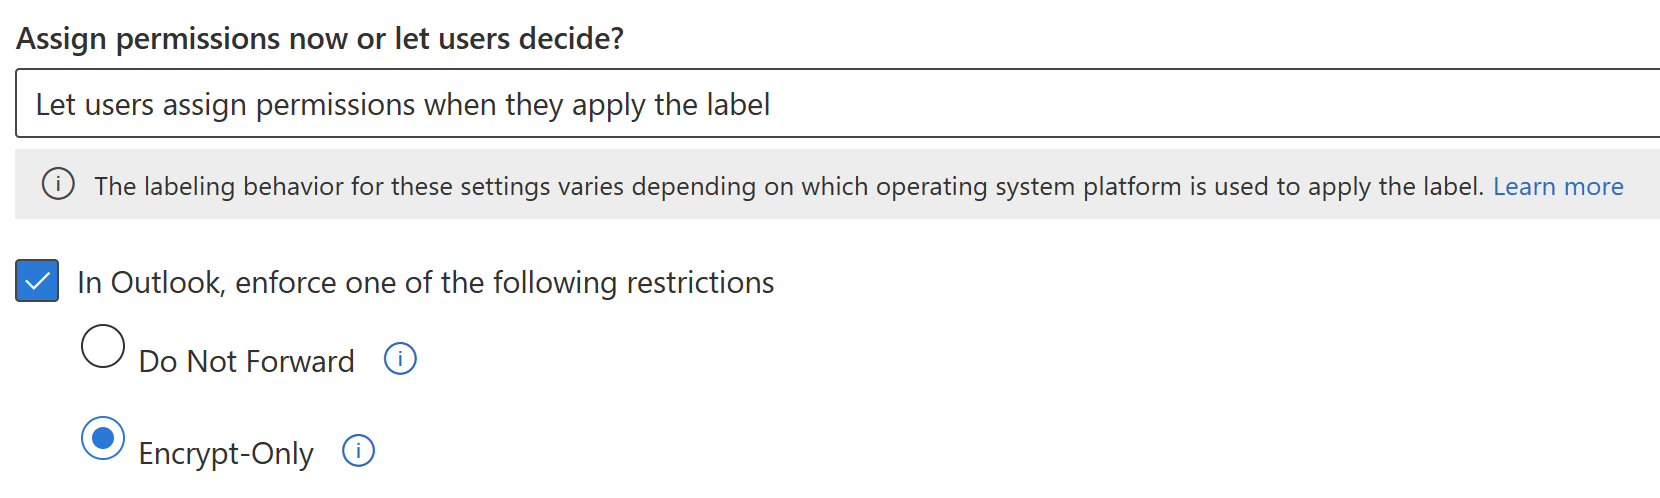
For email, admins have three pre-defined options: you can either not apply any encryption or apply one of the two familiar Office Message Encryption templates:
- Encrypt-Only
- Do Not Forward
For files people can select the applied permissions when applying the sensitivity label. There are some aspects to this that are not necessarily intuitive, so I’ll try to clarify below – but first, a word on some important limitations with this particular type of encryption.
Some important limitations..
As of August 2023, you can only apply UDP labels in Office desktop clients – not in Office Web, Office in Teams or on Mobile.
Also, before the latest round of updates, SharePoint Online’s support for UDP labels wasn’t fully mature – for example, you couldn’t open and edit files with UDP labels in Office Web and the aforementioned unsupported clients didn’t even display these labels in the sensitivity label menu.
Support has recently been improved (see Microsoft’s blog) in many ways and while you still can only apply UDP labels on Desktop, you can now also see the label in the other clients and get directions when trying to use them. AutoSave works now and the label is displayed properly in SharePoint metadata.
The user experience
When you apply a label with UDP encryption to a document in Microsoft 365 Apps (Excel, Word or PowerPoint), you get a pop-up prompt asking you to specify permissions.
In the initial screen, there are two simple options: Read and Change.
What is less obvious is how these options correspond to the built-in permissions and templates discussed in part 1. This is important because as we discussed in part 1, permission levels have non-obvious implications on the user experience that aren’t explicitly stated.
As far as I can tell, Read is equivalent to the Viewer permission level.
- Copying content from the file isn’t permitted.
- The document will show up as a black square if attempted to be screen shared using the Teams client by the person with this permission.
Change seems to correspond to the Co-author permission level – but without implicit Print permissions.
Additionally, there’s the option of the full premission definition mode which can be accessed through the More Options button. Through it, certain specific permissions can be added on top of chosen Read and Change permissions.
There are some tricky parts here that might be confusing:
- The options for additional permissions are titled in a way that doesn’t explain their full functionality. See part 1 for an explanation of the implications of each permission.
- Any selected additional permissions are applied to every account that is given any permissions through this experience.
- The option Require a connection to verify a user’s permission practically means setting the Allow offline access option to Never, which has the side effect (benefit?) of instantly applying any changes to the document’s permissions to all users with access to it.
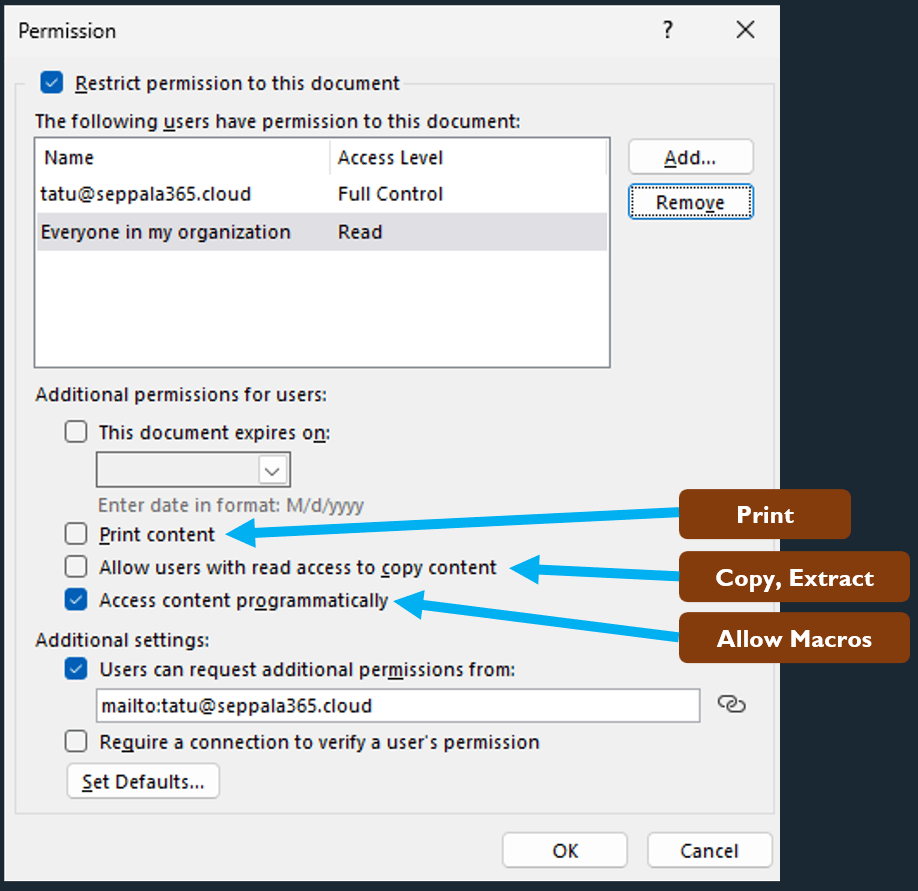
None of these implications are explicitly clear to a regular user so proper guidance and training are a must to avoid unwanted confusion.
Decryption

When you have labels with anything stricter than Co-owner encryption in production, you will probably eventually run into a situation in which a person has left the company and a file they previously protected through a sensitivity label needs to be decrypted by admins.
This is because the label of a document cannot be changed if people don’t have the Change rights (EDITRIGHTSDATA) permission to it.
Luckily, there are several mechanisms in place to ensure admins can always decrypt a document in these scenarios:
- Both SharePoint Online (SPO) Admins and Global Admins can use the Unlock-SPOSensitivityLabelEncryptedFile cmdlet from the SharePoint Online Management Shell to remove a sensitivity label from a file in SPO or OneDrive. 👉 This is my preferred route, as it is simple, effective and straightforward. Files do need to be in one of the two supported services for this cmdlet to be usable, though.
- There is also a special role called the AIP Super User that can always decrypt any file encrypted using your organization’s Microsoft Purview Information Protection sensitivity labels. Before you can use it, this role might need to be first turned on in your tenant and then assigned to groups and / or individuals. The role is powerful and outside of during rollouts, I would only recommend activating it when it is required. I’m planning to write a separate blog on how to provide monitored and managed on-demand and just-in-time access to this role.
- Graph API now also offers the assignSensitivityLabelItem endpoint that also serves to remove labels with their associated encryption from files. You can tap into this to, for example, build Logic Apps and Power Automate workflows to let people request document decryption from admins.
- Finally, Defender for Cloud Apps File Policies can be used
Until very recently, labels with custom or user-defined permissions could only be decrypted with the AIP Super User role. SharePoint Online lacked mature support for UDP labels and Unlock-SPOSensitivityLabelEncryptedFile didn’t work on them.
Great news though – as of August 2023, this support is now available. You now only need to use the AIP Super User role to decrypt on-premises / offline files – so the role needs to be activated less often.
Tracking and monitoring

Visibility is key no matter what you do with Purview technologies and encryption is no different. You will want to understand sensitivity label usage and protected document access trends.
You might remember from part 1 that whenever an encrypted sensitivity labeled document is accessed on a device for the first time – and for specific configurations, every time – by an authenticated user identity, the Office app or service opening the document “phones home” to the RMS service, which identifies the user and their permissions.
These file access events get logged and are a valuable source of information on consumption of sensitive content. To monitor and analyze these and other Purview events you have a few options, each with their pros and cons.
The main tools you might typically use are:
- Activity Explorer
- Audit log search
- Log Analytics (with Sentinel)
- Power BI (through Log Analytics or other source)
Here are my bried pros & cons for each.
Activity Explorer
A great discovery tool for performing fast snap analysis and understanding various trends.
Pros
- Easy to learn and use
- Near instant pivoting between filters
- Customizability
Cons
- Visibility only goes back one month
- You can only export up to 10 000 rows for offline analysis
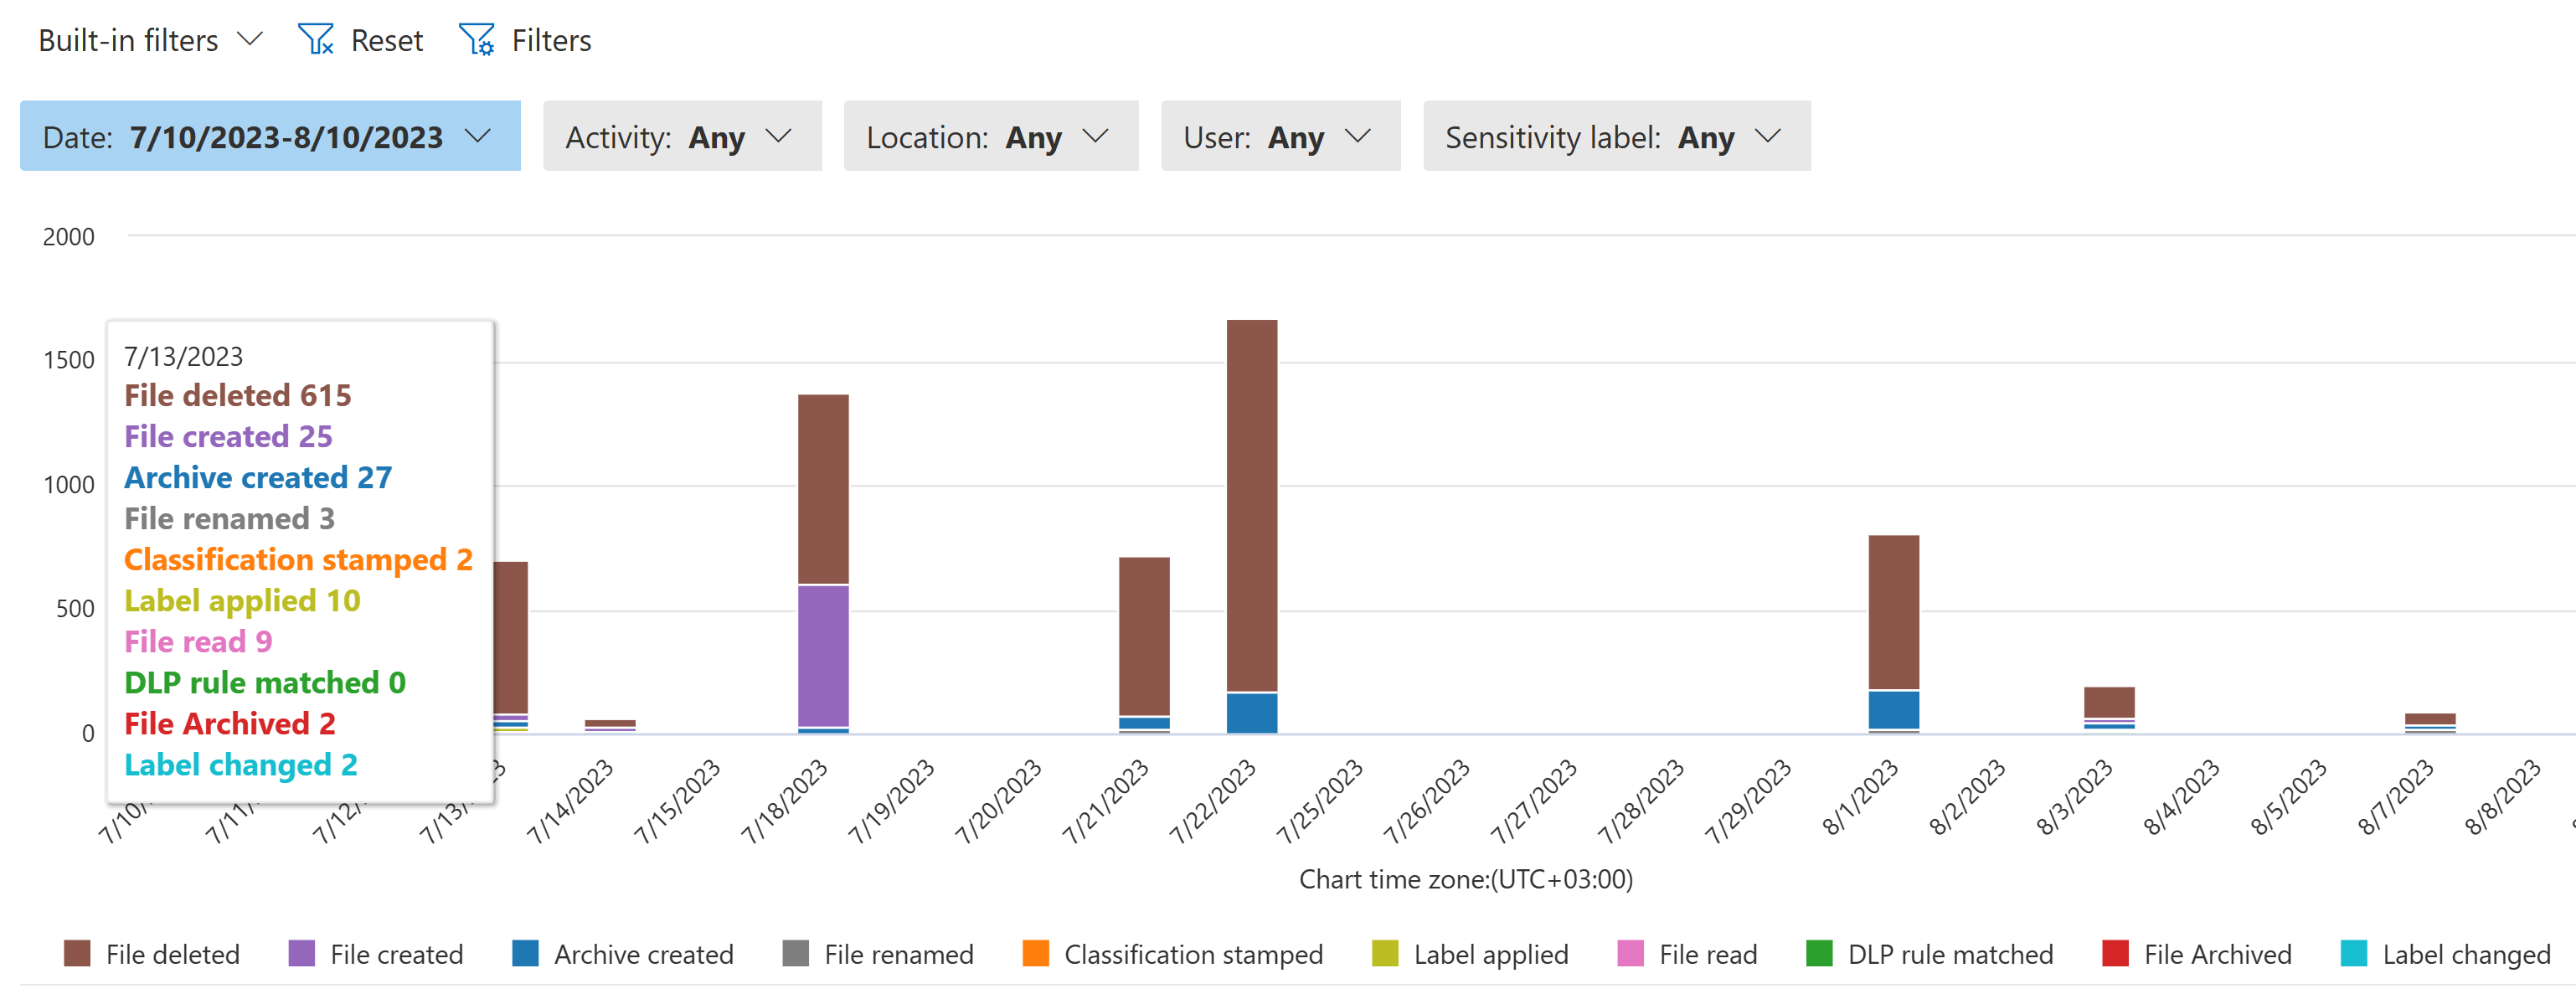
My most commonly used tool for understanding what’s going on initially after building visibility through auditing in an unfamiliar environment.
To track trends on protected file access, you can filter for the File read event. You might also want to focus on a specific sensitivity label or any number of other refining factors.

If it weren’t for the limited backwards visibility, I wouldn’t rely on the other tools nearly as much.
Oh, and you can also use the Security & Compliance PowerShell cmdlet Export-ActivityExplorerData to fetch these events with similar filter options (up to five types at once). This option and a bit of scripting lets you bypass the 10k exportable event barrier in the Compliance portal but it still isn’t the ideal approach for exploring hundreds of thousands of events.
Audit log search
Most useful when you know what you want and you need a longer, comprehensive look back

Pros
- Fine-grained filtering
- Search for events up to six months back
- Deep visibility into events and metadata with a possibility of post-search filtering
Cons
- Has a learning curve; finding the correct events to look for will initially have you reaching for the documentation
- Search results take a while to prepare
- No pre-built visualization to accompany the results
The Compliance portal’s audit log search tool lets you look at a vast array of events in the Unified Audit Log by first specifying your conditions and then letting the search run for a while. When the search run is complete, you can explore the results and filter them further and explore the metadata of each event.
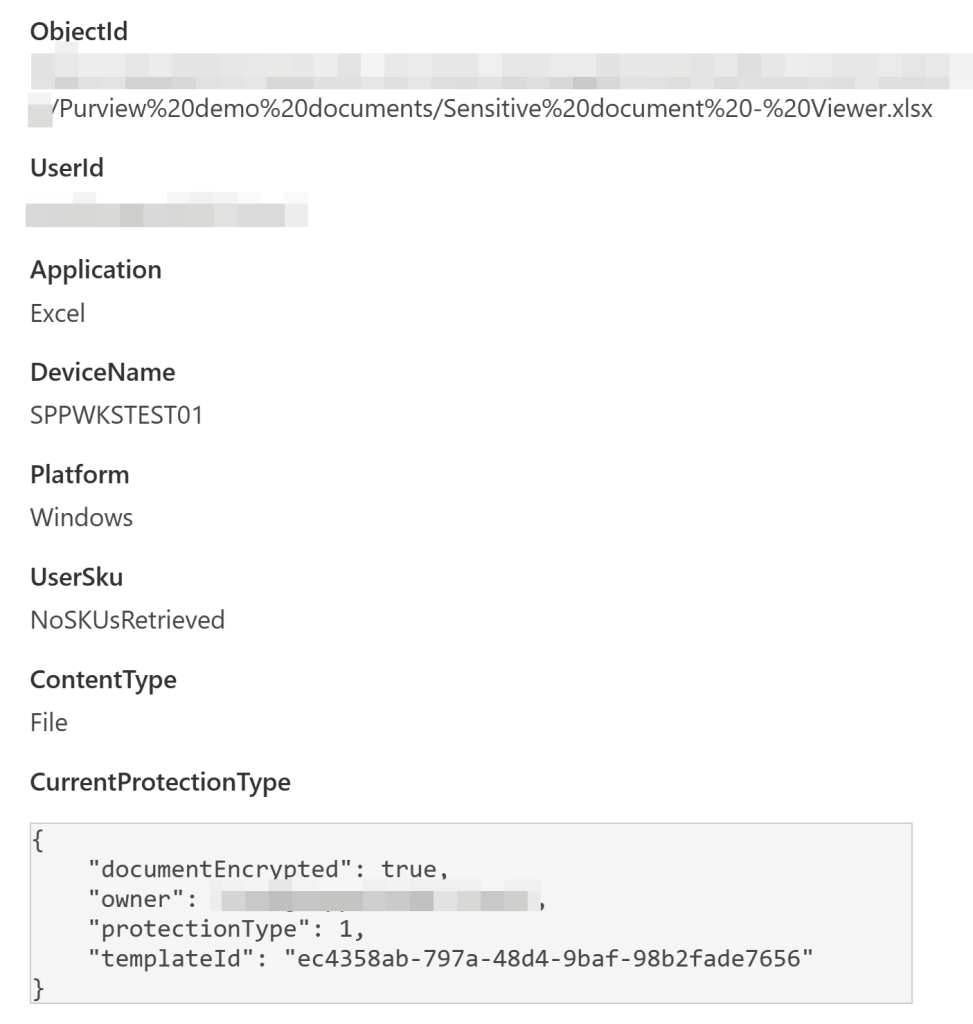
💡Tip: To understand sensitivity labeled file access events, look for events with the operation name of SensitivityLabeledFileOpened.
This one’s also available through PowerShell! Check out the relevant cmdlet here: Search-UnifiedAuditLog – and if you do, make sure to also look through the best practices docs to make the most of it.
Sentinel + Log Analytics
Medium-to-long term event retention with fast, powerful and fine-grained search and strong integration opportunities.

Pros
- Amazing and granular searchability, extendability and filtering with KQL
- Helps your SOC team as well as your Compliance and data security responsibles
- Plenty of pre-built queries and blogs to lean on
- Fast summarization in various ways and of large quantities of events
- Limited built-in visualization capabilities
- Content can be retained for fast interactive search for up to two years..
Cons
- ..but not for free. 🪙 The cost goes up with retention time and ingested data volume. For low-to-moderate volume event types like sensitive file access, it’s really not that bad though. I mean, even I use it in my lab tenant and I’m kind of a frugal guy! 😁
- There’s no easy dropdown menu filtering. KQL has its own learning curve, although great and fun resources like Kusto Detective Agency make it quite approachable.
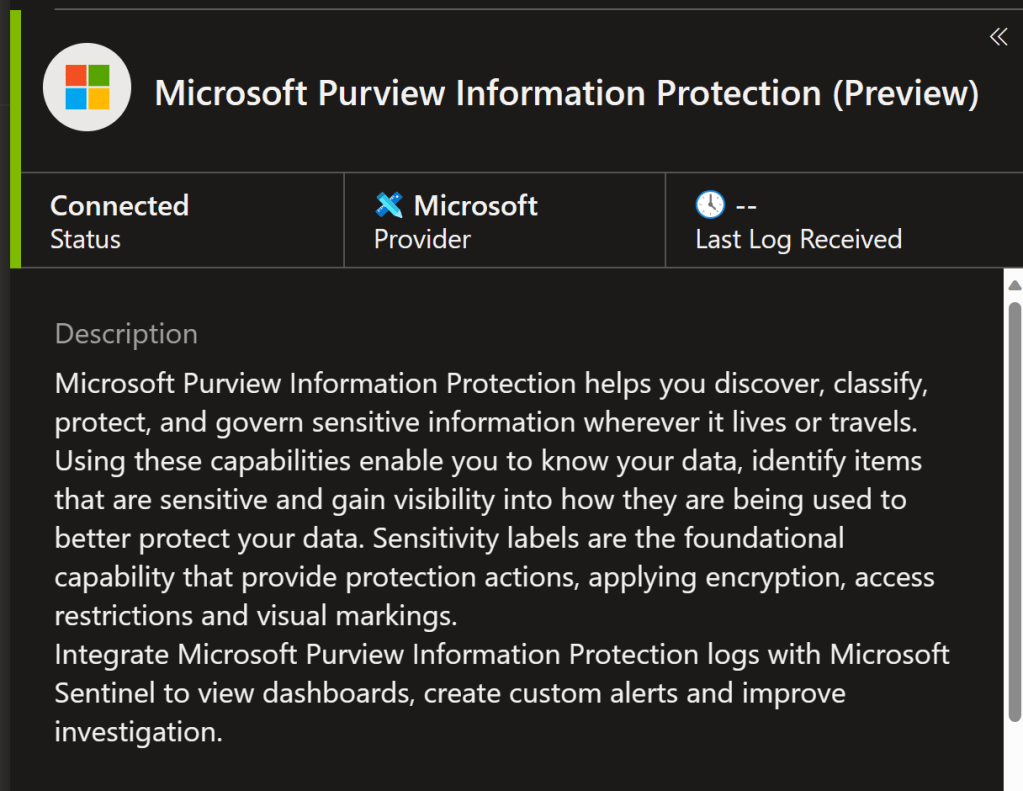
You can ingest sensitivity label events from the unified audit log to Microsoft Sentinel’s Log Analytics workspace through various connectors.
I recommend the dedicated one for Microsoft Purview Information Protection since it pushes label events into a dedicated table called MicrosoftPurviewInformationProtection, letting you set a custom retention time and permissions only for these specific events if you want to.
As a plus, any SecOps teams using the Log Analytics workspace will be able to enrich their investigations with valuable context from this table, which only grows in value as Purview solution use matures in your organization.
A simple query to find the access events:
MicrosoftPurviewInformationProtection
| where TimeGenerated >= ago(90d) and Operation has “SensitivityLabeledFileOpened”
Once you have the data in Log Analytics, you can push it to Azure Data Explorer with LA:s Data Export capabilities for very long term and cheap retention – I’m talking about 100 years here! Phew. 😰
Log Analytics also opens up the door to the fourth option, which I’ve started appreciating a lot more lately..
Power BI
With Power BI, you can tap directly into your Log Analytics data, build relational data models using various sources and then transform + visualize your dataset as you please like some digital wizard.
Pros
- You can expose exactly the data you need, to the people you need – and nothing extra
- Powerful and flexible with a low barrier of entry
- Reports can be embedded in Teams with the correct licensing
- Datasets can refresh automatically
- Visuals from different reports can be combined into dashboards for a “single pane of glass” approach
- Datasets and reports themselves can be sensitivity labeled
Cons
- Requires you to learn a new tool. This is actually a pro in disguise.
- Useful reports can take time and effort to build.
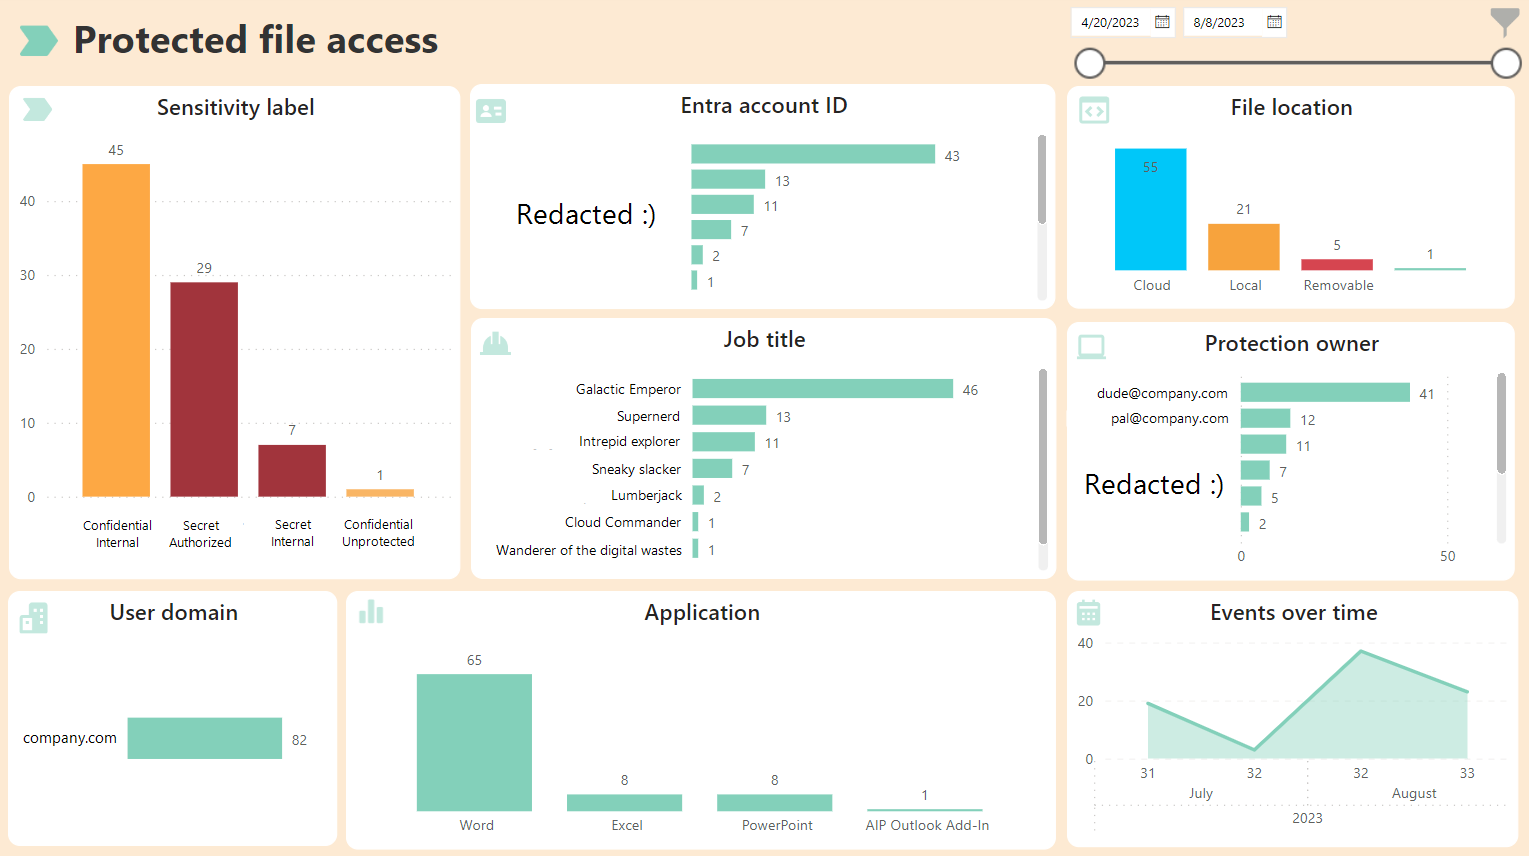
When you want to truly to explore your Purview trends and make some new discoveries – including on actions related to encrypted documents – look no further than Power BI. Once you get the hang of building reports, it’s a breeze.
Power BI does cross-filtering and highlighting of data across data sources like a boss, which allows you to answer questions none of the other native tools can really touch out-of-the-box, like:
- “Which roles and departments in my company consumed the most Confidential and Secret content last quarter?”
- “Which roles and individual users produce and own the most protected content?”
- “How much protected content was copied to removable drives over the last year? When, by whom, from which apps and to which types of removable drives?”
You get the idea.
A key benefit of Power BI is that it allows you to expose only exactly the necessary data points to analysis – and nothing else.
For example, you can choose to exclude any directly personally-identifying information when bringing in data from Log Analytics for your Purview dataset. Then, you can allow access to the curated data to a wider audience of report builders without compromising essential privacy protections.
If you are serious about monitoring information security events and informing your solution design with data, I recommend learning Power BI – or finding a friend who does. 🤝
Parting considerations

To finish this off, here is a non-exhaustive selection of common real-life considerations and issues you might need to understand concerning Sensitivity Labels and encryption.
- As already mentioned in the first part of this blog, using only Co-author or stricter encryption in a label’s encryption settings means only the protection owner (a.k.a the user account that applied the sensitivity label) can change the document’s sensitivity going forward. This can be a great way to mess up production and get admins to practice decryption commands. You have been warned.
- When you assign encryption permissions through an Entra ID security group, both dynamic and static groups are supported. This means encryption can be based on HR attributes like title and department.
- Sometimes you might have users with existing limited access (like Viewer permissions through an “all users and groups in your organization” scope) that were recently added to a security group that grants elevated permissions – say, Co-owner – in the same sensitivity label’s encryption settings. This change only takes effect for the user when the user needs to reauthenticate to renew their use license.
- Make sure you turn on co-authoring for encrypted documents but check the prerequisites first. It helps ensure the user experience doesn’t degrade unnecessarily when working with encrypted information – and enables some key “solo” benefits like AutoSave as well. Also check out the known issues for useful tidbits.
I think it’s time to wrap this one here.
Thanks for coming along – and see you in the next one! ✌️
This concludes the second part of this two-part blog.


2 responses to “Demystifying Microsoft Purview sensitivity label encryption – part 2”
[…] Part 2 […]
LikeLike
[…] permission levels from Co-owner through Viewer so you’ll definitely need to implement custom permissions to make this […]
LikeLike