
- The fundamentals
- A closer look at confidence levels
- Understanding rule packs
- Reverse-engineering confidence scoring with PowerShell
- The inconsistent confidence criteria of (some) bundled SITs
Content classification in Microsoft Purview services is a familiar and trusted feature to an increasing number of organizations – cloud or endpoint services look at pieces of text or images and use various so-called classifiers to determine whether the content contains information that warrants targeted audit logging, informative policy tips, encryption, sharing restrictions or other controls.
Microsoft calls these classifiers Sensitive Information Types or SITs. This article assumes at least passing familiarity with them and doesn’t aim to explain the basics. I will use the terms sensitive information type, SIT and classifier interchangeably.
Microsoft provides a wide range of built-in classifiers and you can also build your own. Commonly-used built-in SITs include ones like..
- Credit card number
- Microsoft Entra user credentials
- International banking account number (IBAN)
- IP address (v4 or v6)
A significant part of my work with Purview services revolves around using the right SITs in the right way to accomplish a customer’s data security goals. A key part in utilizing any SIT is choosing the correct confidence level for your use case – and this is what I’ll focus on in this article.
In my opinion, the finer points of SIT confidence levels are easy to miss because understanding them requires close inspection of available documentation and even programmatic access to classifier definitions.
The fundamentals
Content evaluated against a sensitive information type is assigned a confidence level for a match against that SIT based on a number of factors that are unique for each classifier.
There are typically three confidence levels available for each feature (for ex. Data Loss Prevention, Auto-Labeling) that uses SIT matches as a condition: Low, Medium or High. This binning simplifies usage but also obfuscates the true numerical granular scoring scale under the hood, which runs from 0 to 100. Let’s call this granular scale the confidence score – it’s not an official name, as the numerical scale is also referred to as the confidence level when looking at classifier results, but it helps us differentiate the two concepts.
Based on their confidence score, matches to Purview classifiers are typically assigned to confidence levels as follows:
0 to 64: No match
65 to 74: Low
75 to 84: Medium
85 to 100: High
The key thing to understand here is that different SITs leverage confidence level binning in very different ways. If you don’t understand how the specific SITs you use assign confidence levels, you will potentially misuse them in DLP rules and other controls.
In short, a High confidence match isn’t always what you want – while sometimes it’s the only viable option to avoid an unbearable percentage of false positives. A few pointers:
- SITs often have pre-defined criteria for only one or two confidence levels – for ex. only High and Medium.
- There is variance between SITs in what is required to obtain a match with a confidence score high enough for each confidence level – although there are some commonalities as well.
- Combined SITs (for example IP address) can have looser criteria required to reach high confidence levels compared to the individual SITs they are comprised of – in this case, IP address V4 & IP address V6).
To illustrate some of the discussed concepts, let’s look at the classifier for credit card numbers.
- For a Medium confidence match by that SIT, content needs to contain the predefined pattern for credit card numbers and this content needs to pass the Luhn test.
- For a High confidence match, an additional check also needs to be passed. The evaluated content (a file, email, Teams message etc.) needs to have one of the following within 300 characters of the valid credit card number:
- A keyword from one of two separate lists (one for words related to credit card verification and an another one for other keywords like credit card providers and terminology)
- A correctly-formatted credit card expiration date
A closer look at confidence levels
So, how can we get a grip on how confidence levels are determined for a sensitive information type we would like to use?
The first, most straightforward way is to access the documentation for the SIT you want to use in the SIT entity definition reference in Microsoft Learn. There, you’ll find a written descriptions of what each classifier looks for in terms of patterns and keywords. For some – but not all – classifiers, you’ll also find the confidence level definitions both in written and in XML format.
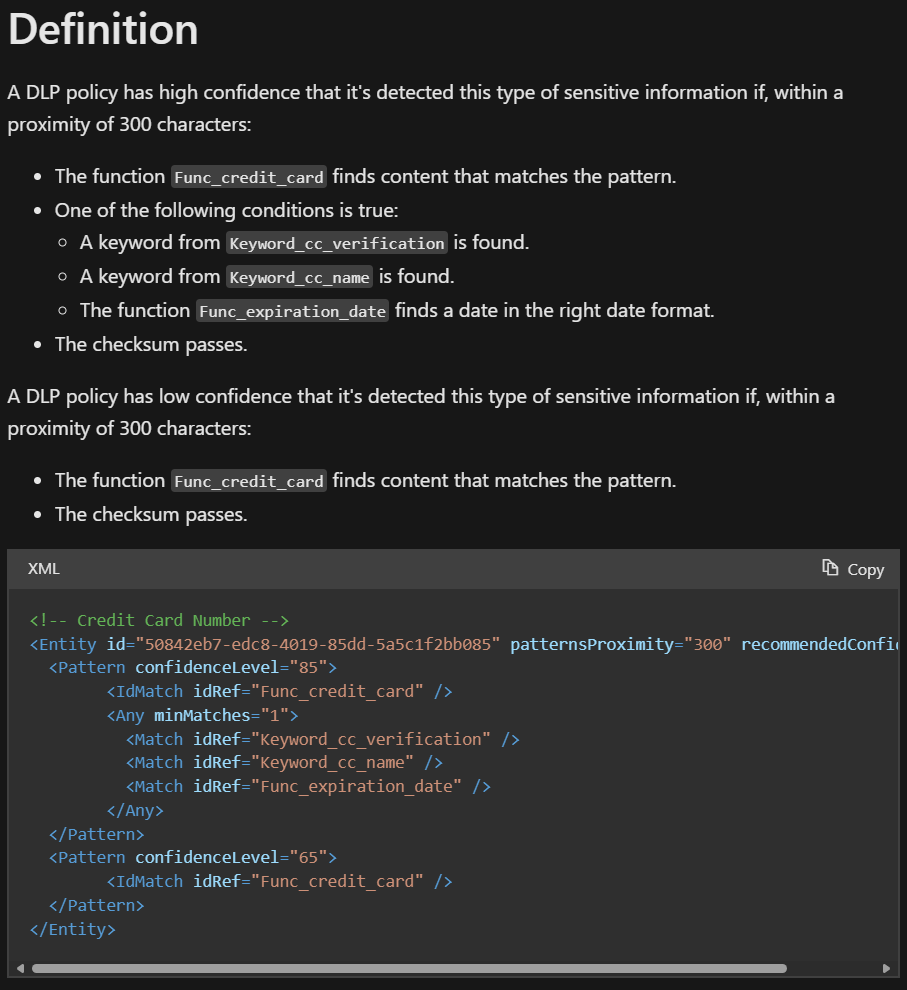
The XML-formatted exact definition is particularly interesting since it shows the exact numerical confidence scores and the associated criteria that the classifier adheres to. In it, you also have more key information like:
- The pattern proximity value, or how far apart the primary pattern (for ex. valid credit card number) and supporting evidence like keywords (“cvn”, “cvv2”, “security code” etc.) can be from each other to produce a High confidence match.
- The recommended confidence level from Microsoft. This is the confidence level offered for the SIT by default in contexts like the DLP rule editor. It might – or might not! – be optimal for your use case.
If it seems to you like the XML definition snippet hints at a more expansive root source for classifier definitions outside of Learn documentation, you are correct. That source is called a rule package.
Understanding rule packs
Classifier rule packages are one of those parts of Purview you might never come across if you build your data security solutions exclusively through the graphical user interface of the Purview portal.
Rule packs contains the technical definitions for almost everything related to sensitive information types. Let’s have a look at the largest of them, which holds 223 SITs.
To access the contents of a rule pack, fire up the Security and Compliance PowerShell and follow Step 1 from this documentation to export the pack’s contents to an XML file. In this case, we want to pull the data for the pack called the Microsoft Rule Package.
Refer to the documentation linked above for the up-to-date syntax but as of 7/24, the PowerShell commands would be:
# Save the data of the Microsoft Rule Package to a variable
$rulepack = Get-DlpSensitiveInformationTypeRulePackage -Identity "Microsoft Rule Package"

# Write the serialized rule collection to an XML file
[System.IO.File]::WriteAllBytes('C:\Temp\MicrosoftRulePack.xml', $rulepack.SerializedClassificationRuleCollection)
You can open the XML file in any text editor or XML viewer. It contains information structured roughly as follows:
On the high level, each rule pack XML has two tags..
- RulePack – details on the rule pack itself like pack name, description, version, immutable guid and translations of the pack’s name to various languages.
- Rules – the definitions of individual sensitive information types. This is mainly what we’re interested in.
The Rules tag contains..
Entities – definitions for the individual SIT’s confidence levels. These are what you see in the XML box in the documentation for some classifiers in Learn.
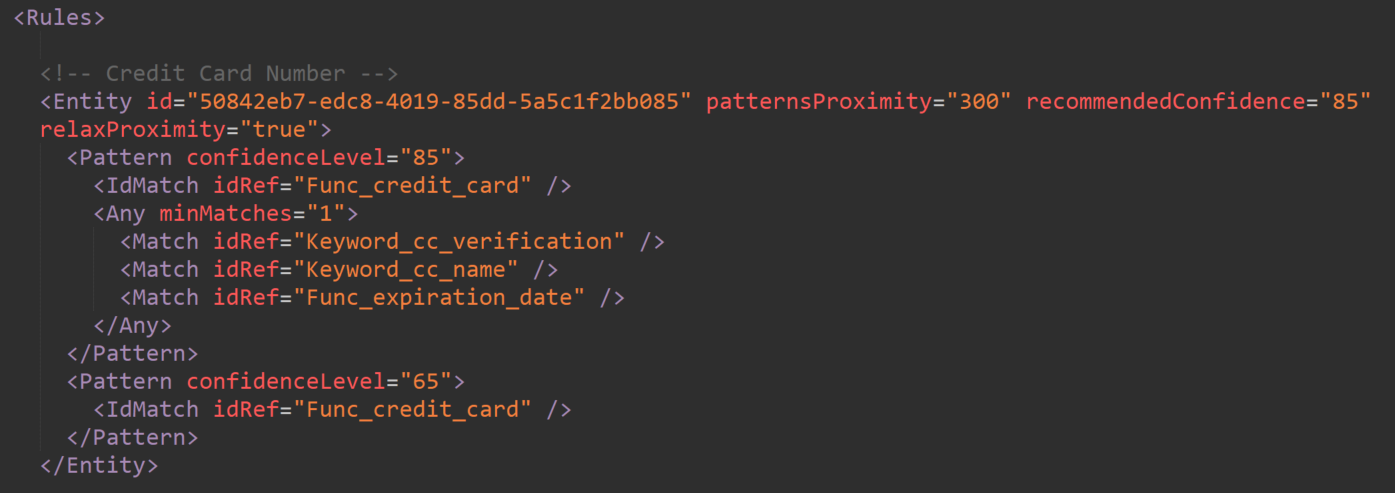
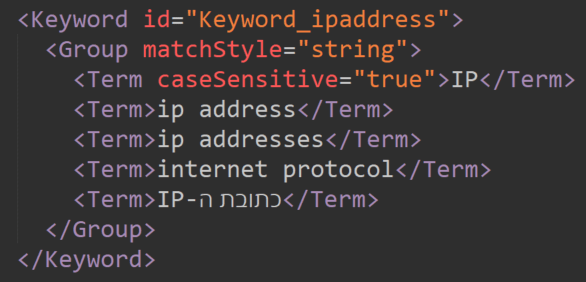
Regular expressions (RegEx) – these are used by various SITs to validate their primary patterns.

Keyword lists – commonly utilized by SITs as supporting evidence.
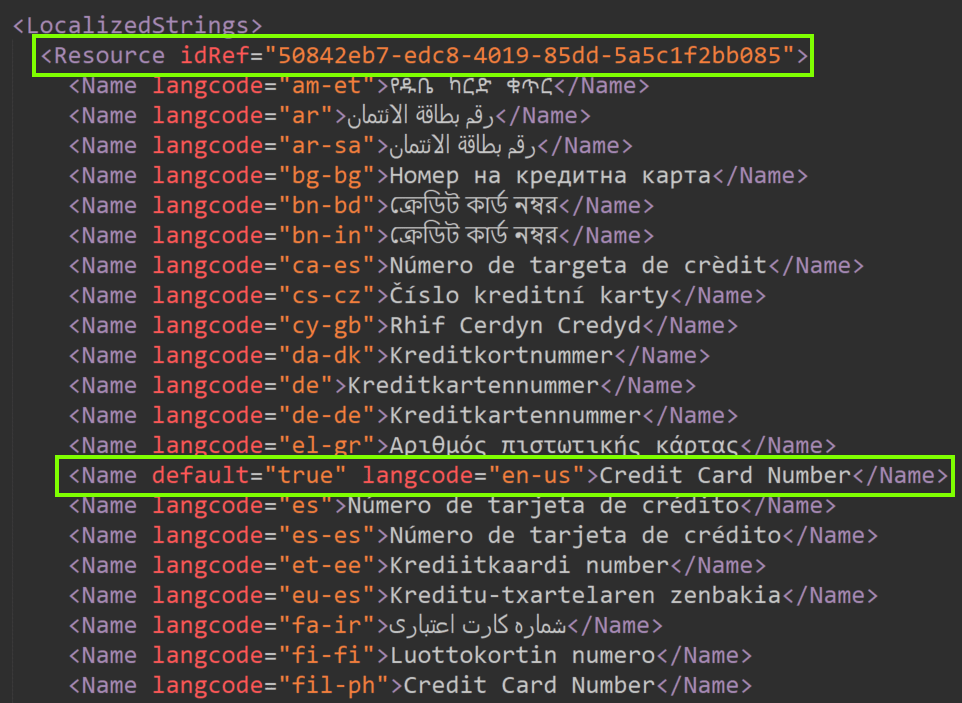
Localized names and descriptions for each SIT – Matched to SIT definitions using their unique identifier, highlighted in the image below along with the default classifier name in English.
Exporting, customizing and re-uploading a rule pack XML is a supported and documented action you can take to, for example, add new keywords to built-in SITs if the common terminology your organization uses isn’t included by default.
While the Microsoft Rule Pack contains definitions for hundreds of SITs, I mentioned previously that there are others, too – and some of them we can’t directly access.
When you run the Security & Compliance PowerShell command Get-DLPSensitiveInformationTypeRulePackage, you might think you’re getting a comprehensive list of all rule packs in your tenant. In fact, Microsoft even says so in the documentation:

🚫 This isn’t true.
The cmdlet above actually only lists the rule packs you are allowed to export and modify, like the Microsoft Rule Pack along with the rule packs for your custom Exact Data Match classifiers, Document Fingerprint SITs and other custom information types you might have created.
To really enumerate every rule pack in your tenant, we need to pull up the Security & Compliance PowerShell and list them based on the sensitive information type attribute DlpSensitiveInformationTypeRuleCollection, which designates the rule pack each particular SIT is contained in. Try it and see:
# Retrieve all DLP sensitive information types
$classifiers = Get-DlpSensitiveInformationType

# Group the classifiers by their rule pack, then select the count and name of each group, sorting by count in descending order
$rulepacks = $classifiers | Group-Object DlpSensitiveInformationTypeRuleCollection | Select-Object Count, Name | Sort-Object Count -Descending

# Output the sorted rule packs
$rulepacks
Doing a quick comparison between the rule packs reported by the Get-DLPSensitiveInformationTypeRulePackage command and those identified by our custom enumeration, we’ll quickly notice that at least two Microsoft-managed rule packs containing a grand total of 101 SITs exist – but aren’t available to us for closer scrutiny or export. These are:
- Microsoft Entity Rule Package
- Microsoft Credential Scanner Rule Package

If you want to see which sensitive information types these two rule packs contain, you can dump the data for all classifiers into a CSV file with..
# Retrieve all DLP sensitive information types
$classifiers = Get-DlpSensitiveInformationType

# Export the DLP sensitive information types to a CSV file
$classifiers | export-csv D:\Temp\SensitiveInformationTypes.csv -Encoding Unicode -NTI
Let’s fire up Excel and take a peek at that CSV, shall we?
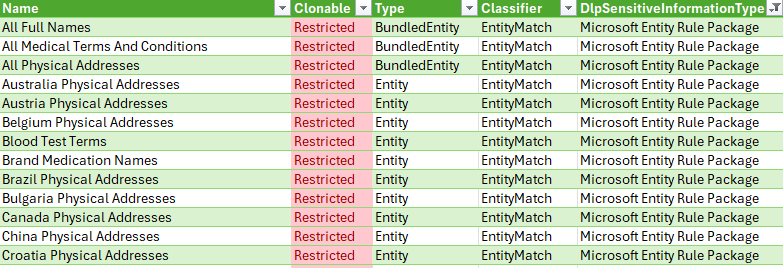
The Microsoft Entity Rule Package holds the definitions for so-called named entities – containing both the broad, so-called bundled (for ex. All Physical Addresses) and the narrower un-bundled (for ex. Finland Physical Addresses) classifiers.
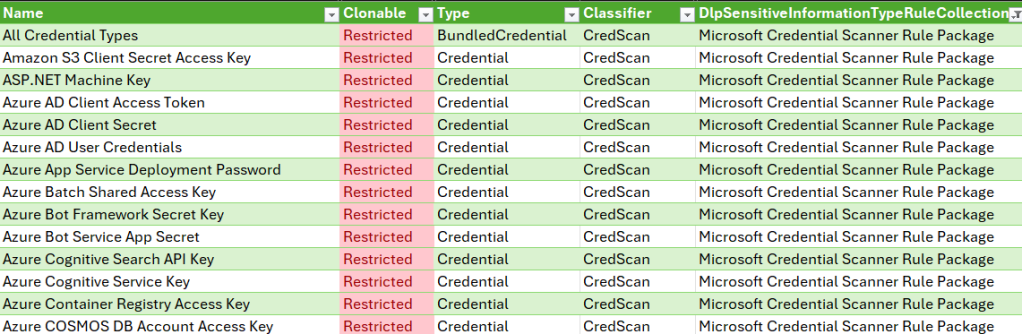
Like its name suggests, the Microsoft Credential Scanner Rule Package exclusively contains SITs related to detecting credentials.
⚠️ Not every single credential SIT is contained in this rule pack. Some, like Azure Storage Account Key are located in the Microsoft Rule Pack instead, letting us access their definitions directly. The logic behind this split isn’t yet clear to me.
Microsoft doesn’t allow closer scrutiny or export of either the entity or credential scanner rule packages. Because of this, we have no direct access to the exact confidence level criteria for the SITs they contain.
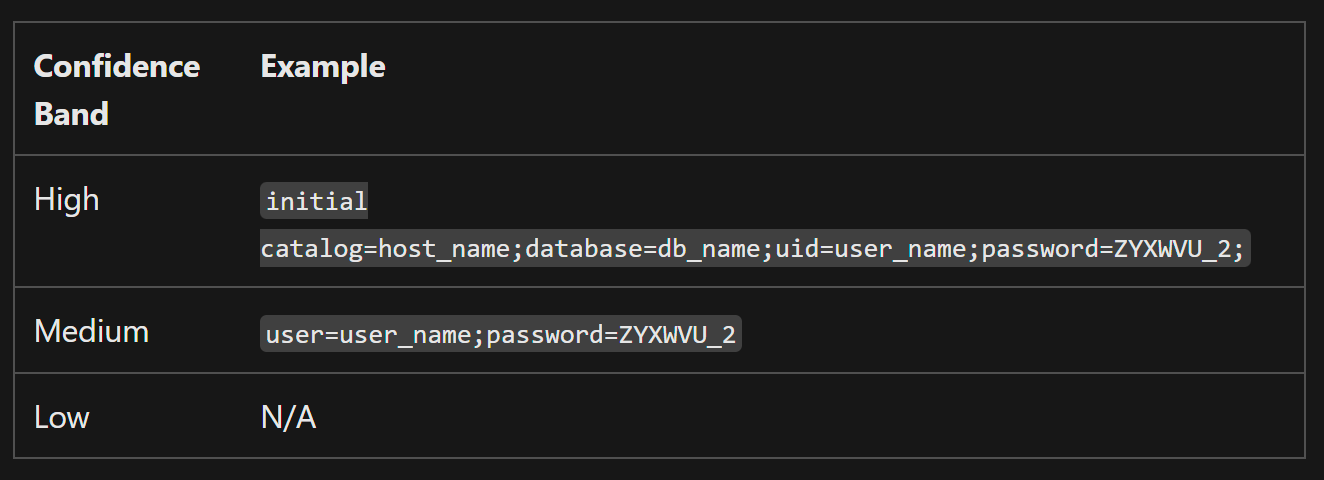
We can only rely on the information provided through each classifier’s online documentation – for an example, look at the documentation for the User Login Credentials SIT. I’ll use this one as an example going forward.
Through the documentation, we can study all the elements that are used to find SIT matches. For SITs contained in the entity and credential scanner rule packs, there is no exact technical description of how Low, Medium or High confidence levels are assigned. We can look at the occasionally-provided examples and try to infer some logic from them.
The numerical confidence scoring definition is entirely absent – and as we can see in a moment, the given examples can also be misleading.
Reverse-engineering confidence scoring with PowerShell
Tools like eDiscovery, Content Search and Defender for Cloud Apps File Policies rely on numerical confidence scores between 0-100 instead of confidence levels when using them to look for sensitive content with Purview SITs, so understanding how scores are assigned is crucial information for us.

Can we somehow find out the exact confidence score for a string of text and work backwards from there?
🤔 Perhaps we can.
Let’s open the Security & Compliance PowerShell one more time and use the handy Test-DataClassification cmdlet on the example strings provided in Microsoft Learn. In this case, I’ll use one of the examples for the User Login Credentials SIT.
The cmdlet lets us input a string of text and lets us know which confidence score breakpoints the string surpassed. You can test against all or specified SITs.
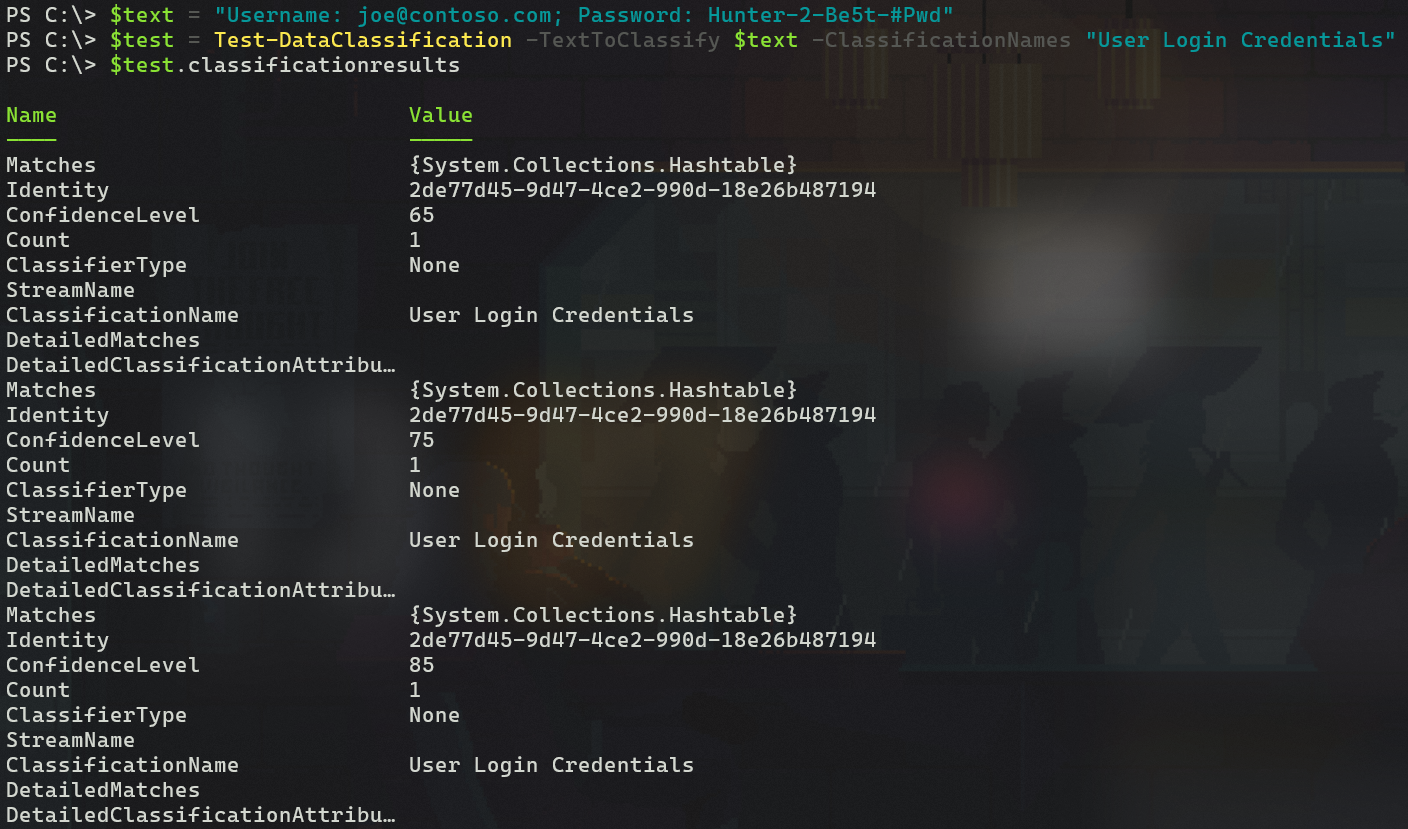
Here’s an example in which I tested the string documented by Microsoft as an example of a Medium confidence match for the User Login Credentials SIT. Pay close attention to the results.
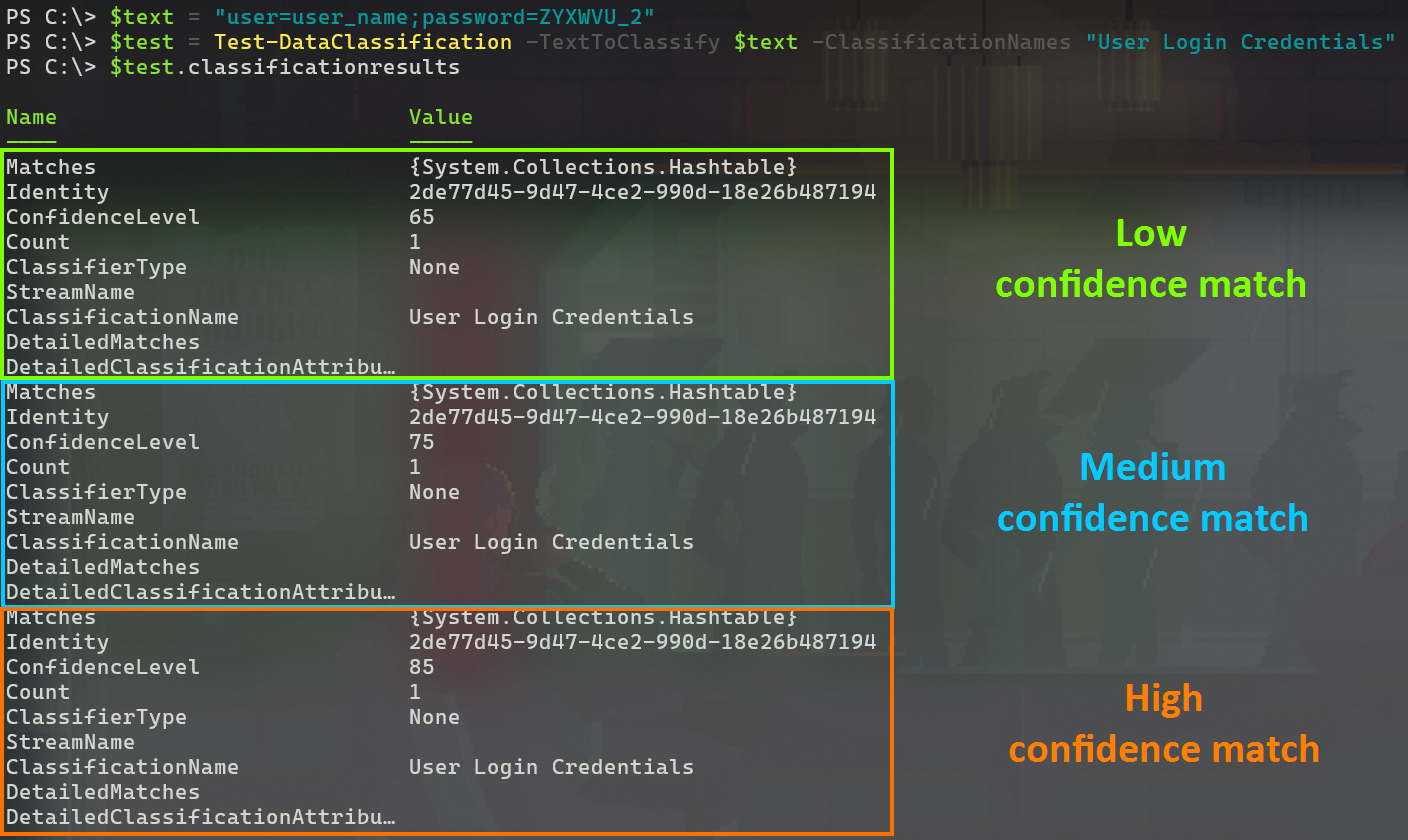
Hold on! The hashtable formatting is a bit cumbersome to read.. but according to the results, the string in question actually matches the assumed High confidence breakpoint of 85 – naturally along with those for Low (65) and Medium (75).
So the example provided in Learn of a Medium confidence match actually verifies as a High confidence one – come on now, Microsoft..☝️
Nevertheless, the test tells us that the User Login Credentials SIT uses the standard confidence score breakpoints to divide matches across confidence levels and we can see how various strings are evaluated.
Let’s see what happens if we mess with the test string. First, I removed all keywords and just input a UPN and (terrible) password. I got no results – not even for Low confidence.
Looks like this particular classifier is tuned to avoid false positives by requiring keywords to be present in close proximity – a good thing for avoiding production disruptions, I reckon. It could be that it has no defined criteria for a Low confidence match at all – it’s not possible to be 100% sure.

One more test, this time with an another custom user credential string I made up, now with keywords included. Once again it gets assigned a confidence score of >=85 for a High confidence match because of the presence of the words Username and Password near the matched patterns for each.
From here, we could continue modifying our test string to gradually gain more insight into what constitutes a Medium confidence match. I’ll leave that part of the fun to you. 😉
To cap things off, here’s a neat trick I use to process the classification test results into a more readable format. I recommend doing this especially when testing a string against all SITs at once:
# Define a string containing the string to classify
$text = "Username: joe@contoso.com; Password: Hunter-2-Be5t-#Pwd"

# Classify the text to identify sensitive information
$test = Test-DataClassification -TextToClassify $text

# Convert the classification results to JSON format
$testJSON = $test | ConvertTo-Json

# Convert the JSON back to an object and format the output to display classification results
($testJSON | ConvertFrom-Json).classificationresults | Format-Table classificationname, confidencelevel, count
The logic above is split into four commands to make it easier to follow but can be condensed to just two just as well – or even a one-liner if necessary.
🚨🤓 Nerdy details alert!
The reason I handle the results like this is because the Test-DataClassification cmdlet returns something called a hashtable. To transform the hashtable into an object that’s easier to work with, we’ll first convert it to JSON – a transformation natively supported by PowerShell. We can then convert that JSON to an object and shape it to our liking.
I do recommend keeping the text string you want to test against classifiers in a separate $text variable because that way it’s faster to modify before running the test command again, as necessary.
Here’s the standard two-liner version of the classification test and result formatting commands I most typically use:
# Define a string containing the string to classify
$text = "Username: joe@contoso.com; Password: Hunter-2-Be5t-#Pwd"

# Classify the data in $text, convert the results from hashtable to JSON and from JSON to an object, extract the classification results, and format specific attributes as a table
(((Test-DataClassification -TextToClassify $text) | ConvertTo-Json) | ConvertFrom-Json).classificationresults | Format-Table classificationname, confidencelevel, count
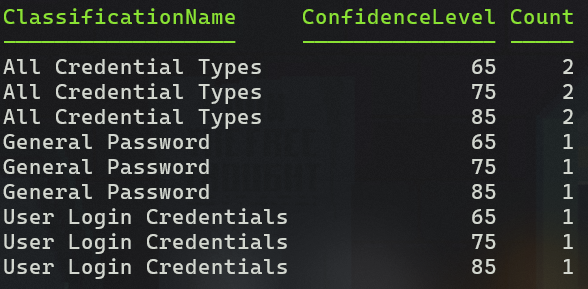
An example of the output is below. The string I tested was found to contain two High confidence matches against the All Credential Types bundled SIT – one for General Password and one for User Login Credentials.
The inconsistent confidence criteria of (some) bundled SITs
There are a bunch of sensitive information types that combine two or more individual SITs for ease of use. Here’s a few examples:
| Bundled SIT | Contains.. |
| IP Address | IP Address v4 IP Address v6 |
| All credential types | 41+ different credential SITs |
| EU drivers license number | 28+ different driver’s license SITs, for ex. the Finnish one |
| All Physical Addresses | 39+ country-level SITs for physical addresses, for ex. the Finnish one |
Some of these, like IP Address and its constituent parts, are in the Microsoft Rule Pack we discussed earlier. The fact that we can export and look at that rule pack means we can observe precisely how these SITs define confidence levels.
When examining these closely, I noticed that in some cases the bundled SIT requires less evidence for a High confidence match than the individual constituent SITs would. An example is IP address:
For an 85 confidence score (High) match, the IP Address v4 classifier requires both of:
- A pattern matching the regular expression Regex_ipv4_address
- One or more keywords from the keyword list Keyword_ipaddress
IPv6 works the same way. Having only a valid IPv4/v6 address without any keywords within 300 characters grants a confidence score of 75 or Medium.
Now, here’s the interesting part – the combined IP Address classifier defines match confidence in a very different and surprising way.
It grants a score of 85 (binned as High confidence) if it identifies a valid IPv6 address without keywords, compared to the dedicated classifier’s Medium match. You can see this in action below.

⚠️ It does not grant any match at all for valid IPv4 addresses without keywords in proximity, while the dedicated classifier grants a Medium match. Baffling.

We can confirm this weirdness by looking at the definition for the bundled IP Address classifier in the rule pack. I framed the rules for different confidence scores in the image below for easy readability.
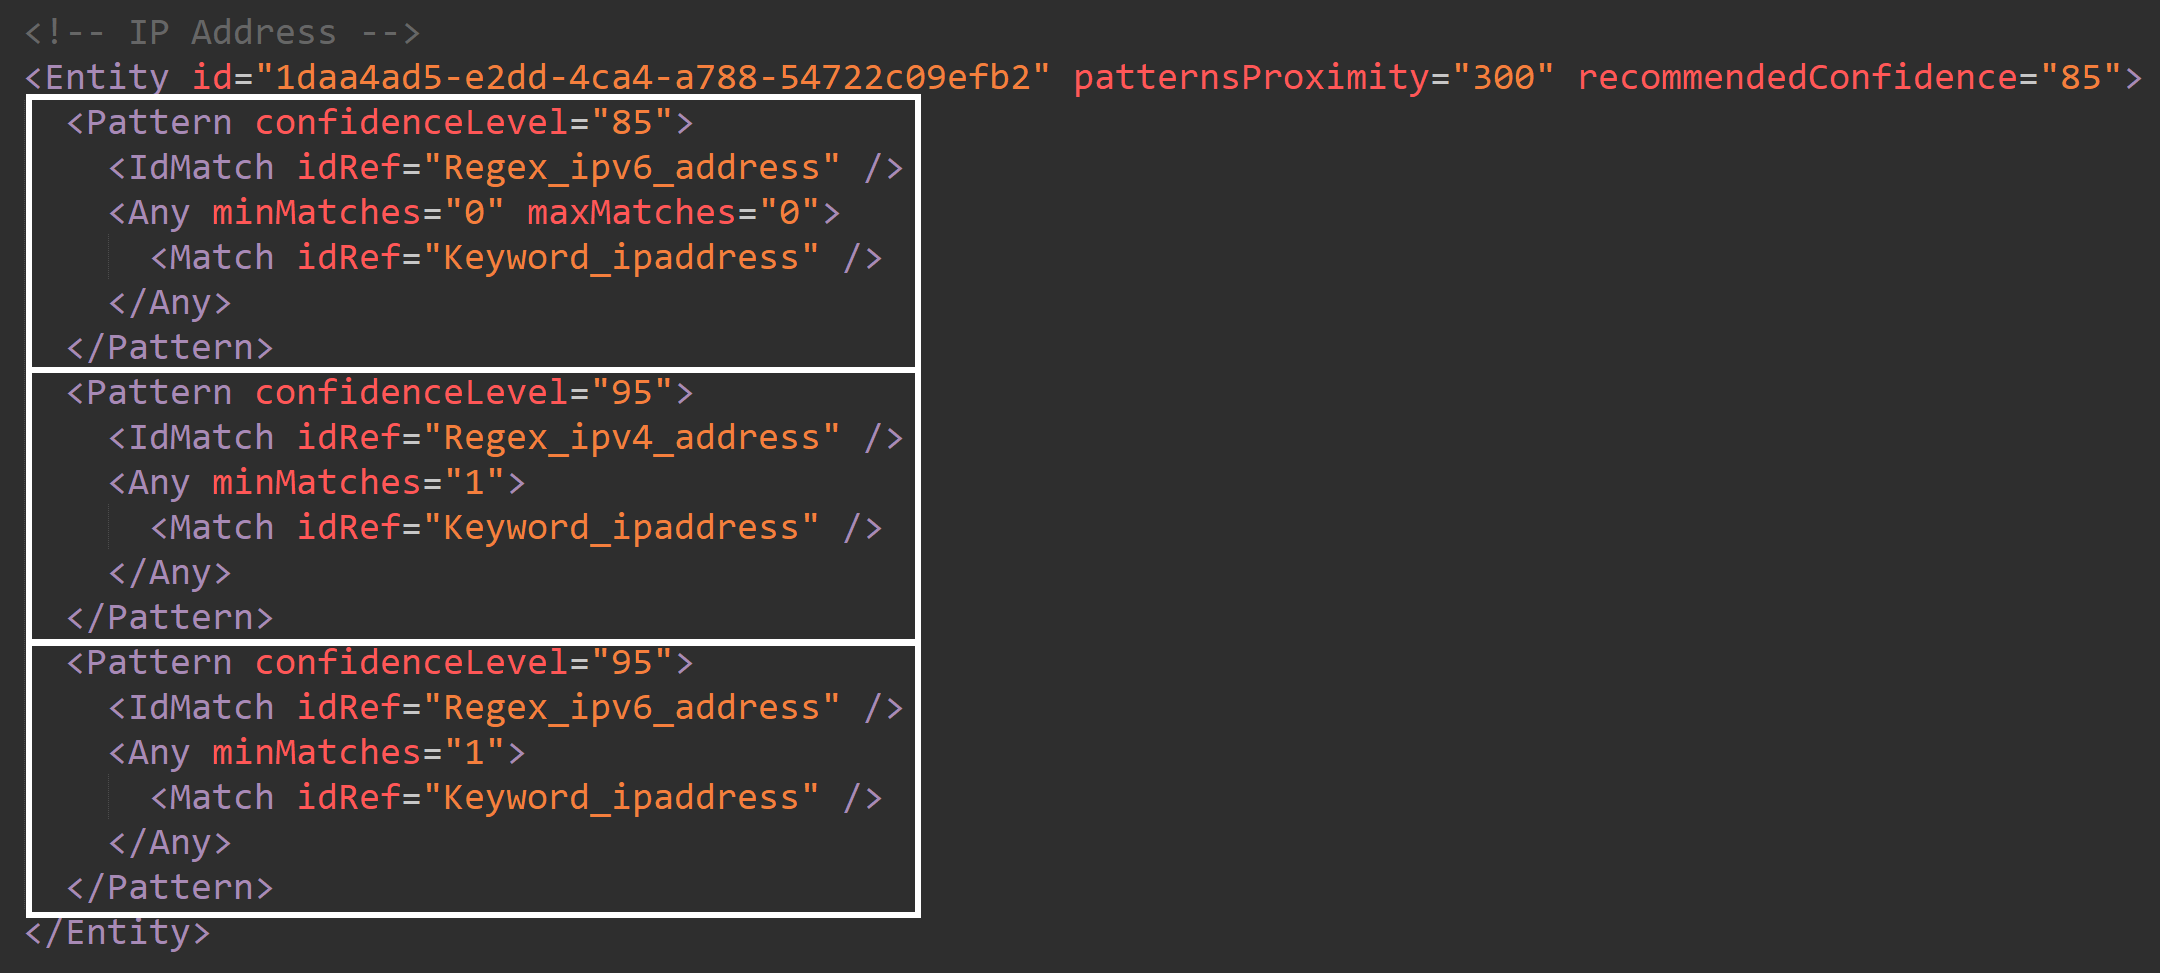
If you think this makes no sense, you’re not alone – but that’s the way some bundled SITs are set up right now, whatever the reason.
This behavior is one of the several reasons why I exclusively use individual SITs in production implementations instead of relying on the faster-to-configure bundled alternatives.
Because the exact confidence scoring criteria for bundled SITs in the entity and credential scanner rule packs are opaque to us and because even the well-documented SITs might not always work in a logical fashion, it’s good to be prepared to run your own tests to ensure the SIT you want to use works for you in production as expected – or run the risk of racking up significant false positives or negatives.
👍 That’s all for this one. I hope this write-up helped shine a light on the importance of understanding the confidence levels of the Sensitive Information Types you use in your Purview data security solution. You can use the methods I detailed to further explore your SITs and even modify the contents of the rule packs you can access.
Also, I think we got a good reminder to never take documentation at 100% face value and test things for yourself instead. 😉

4 responses to “Purview under the hood: Classifier confidence scoring, rule packs and the inconsistency of bundled SITs”
This was amazing and really helps this Purview newbie to understand how these work, especially now that we want to begin using our own trainable classifiers. I do believe MS will eventually move away from this current design and begin using whichever LLM to make these confidence decisions. If/when that happens I suspect we’ll have much less visibility into this process, unfortunately.
LikeLiked by 1 person
Thanks, I’m glad it was useful. I also think we’ll eventually lean more on AI language models as soon the challenge of scale is solved adequately, perhaps through purpose-trained SLMs that are less computationally intensive to run on millions of files than what we have now.
Now that you mentioned LLMs, I actually designed and built a proof-of-concept experiment with Logic Apps and Azure OpenAI early last year to assess whether AI language models could offer a shortcut to accurate and easily-customizable service-side auto-labeling. The results were positive but only practical on a very focused and limited scale due to cost concerns. This might change for the better going forward.
LikeLike
This was an excellent analysis. I really appreciate your detailed approach and explanation. You saved me a bunch of time and your findings will help me provide better advice to my client.
LikeLiked by 1 person
Thank you Dean, much appreciated! 🤝
LikeLike